Overview
Specifications
Supported Versions
The Authenticator supports Android API 28 and above.
Setup
The Authenticator SDK is available on https://github.com/gobeyondidentity/bi-sdk-android
// root build.gradle
repositories {
    maven { url 'https://jitpack.io' }
}
// ...
// module build.gradle
dependencies {
    implementation "com.github.byndid.bi-sdk-android:authenticator:x.x.x"
}
Usage
Currently, Beyond Identity only supports clients with a backend. This allows for two flows:
- Client / Relying Party Initiated Flow
Your confidential client is configured to handle getting the authorization code and exchanging that code for an access token and id token.
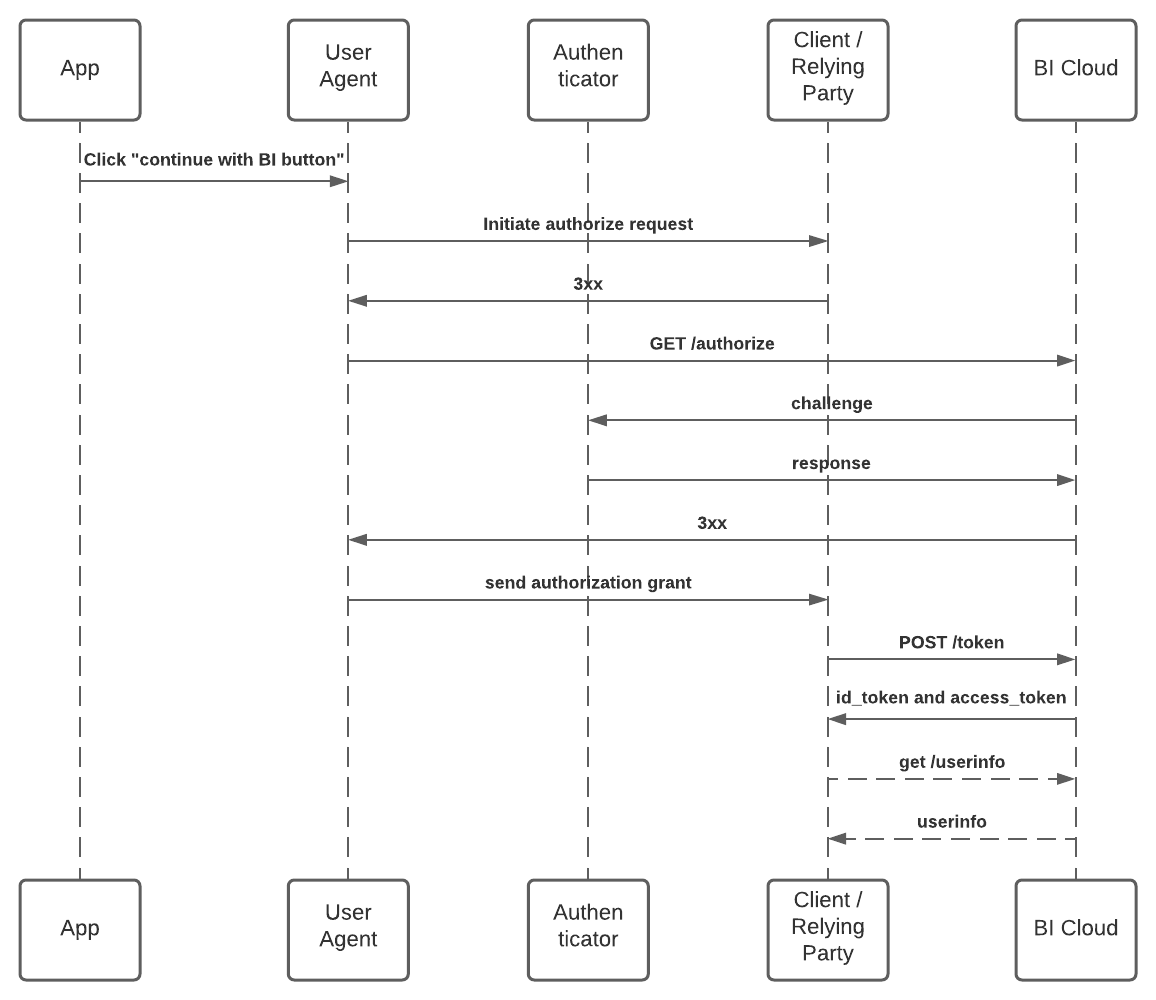
- Direct Initiated Flow
The public client queries for the authorization code and your confidential client makes the token exchange.

For either flow you'll want to create and add an AuthView in your Activity/Fragment. This view contains a Beyond Identity Sign In button.
When the user taps the "Sign In" button, your session will start.
val authView = findViewById<AuthView>(R.id.auth_view)

authView.initAuthView(
    signInUri: Uri
)
⚠️ WARNING ⚠️ Custom URL Schemes offer a potential attack as Android allows any URL Scheme to be claimed by multiple apps and thus malicious apps can hijack sensitive data. To mitigate this risk, use verified android app links https://developer.android.com/training/app-links/verify-site-associations
Client / Relying Party Initiated Flow
In this scenerio your confidential client (backend) handles getting the authorization code and exchanging that for an access token and id token.
It is up to the developer to decide how to invoke their confidential client in order to initiate the flow, as well as what the response would be. As an example, a response could be a session id associated with the authenticated user or the userinfo payload that was queried on the confidential client.
Build a Uri that points to the authentication webpage that you have configured in your confidential client. A secure, embedded web view loads and displays the page, from which the user can authenticate.
val signInUri = Uri.parse("https://example.com/signin").buildUpon().apply {
        // ! WARNING ! Don't use custom schemes (myapp://redirect), Use verified app links for your domain (https://yourdomain.com)
        appendQueryParameter("redirect", "https://example.com/oauth2redirect")
    }.build()
On completion, the service sends a callback url to the registered redirect with an authentication token or anything else you have configured your confidential client to send in that url. In order to intercept that callback, you need to register an <intent-filter>.
<activity android:name=".MyOauth2RedirectReceiver">
    <intent-filter>
        <action android:name="android.intent.action.VIEW" />

        <category android:name="android.intent.category.DEFAULT" />
        <category android:name="android.intent.category.BROWSABLE" />
        <data
            android:scheme="https"
            android:host="example.com"
            android:path="oauth2redirect"/>
    </intent-filter>
</activity>
Finally, you'll be able to get the response from the incoming Intent in the registered <intent-filter> Activity
val session = intent.data.getQueryParameter("myparamkey")
Direct Initiated Flow
In this scenario your public client (mobile app) handles getting the authorization code and your confidential client (backend) handles exchanging that code for an access token and id token.
It is up to the developer to decide what the response would be for your confidential client. As an example, a response could be a session id associated with the authenticated user or the userinfo payload that was queried on the confidential client.
The Beyond Identity /authorize endpoint supports the following parameters:
client_id: unique ID for a tenant's registered OIDC client.redirect_uri: must match one of the configured values for the client.response_type: Onlycodesupported at this time.scope: must containopenid(except for OAuth2).state: random string that the client can use to maintain state between the request and the callback.
Build a Uri that points to Beyond Identity's /authorize endpoint with the appropriate parameters. A secure, embedded web view loads and displays the page, from which the user can authenticate.
val state = UUID.randomUUID().toString()

val uri = Uri.parse(authorizationEndpoint).buildUpon().apply {
    appendQueryParameter("client_id", clientId)
    appendQueryParameter("redirect_uri", redirectUri)
    appendQueryParameter("response_type", responseType)
    appendQueryParameter("scope", scope)
    appendQueryParameter("state", state)
}.build()
On completion, the service sends a callback url with state and authorization token parameters. In order to intercept that callback, you need to register an <intent-filter>.
<activity android:name=".MyOauth2RedirectReceiver">
    <intent-filter>
        <action android:name="android.intent.action.VIEW" />

        <category android:name="android.intent.category.DEFAULT" />
        <category android:name="android.intent.category.BROWSABLE" />
        <data
            android:scheme="https"
            android:host="example.com"
            android:path="oauth2redirect"/>
    </intent-filter>
</activity>
Finally, you'll be able to get the response from the incoming Intent in the registered <intent-filter> Activity
// Check the state matches the state you've sent
val stateParam = intent.data.getQueryParameter("state")
if (state != stateParam) {
    // someone is interfering with our auth process
}

// Exchange the authorization code for access token and id token
val authorizationCode = intent.data.getQueryParameter("code")
myService.exchangeCodeForToken(authorizationCode) { response
    OnSuccess -> response
    OnError -> Throwable("Unable to sign in")
}
Prerequisites
Since most of the heavy lifting is delegated to the Beyond Identity Authenticator client when integrating the Authenticator SDK you need to follow the steps on your development phone or emulator (you'll need google play to download the app) to create an account with our demo app Acme Pay https://acme-app.byndid.com/ It should only take a minute.
Now that you have the Beyond Identity app setup with a profile for Acme app, go ahead and run the app.
Once you click sign in, the Oauth2 process is initated on the Acme backend
// endpoint to kickoff oauth2 | where to redirect once auth is done
$ACME_CLOUD_URL/start?redirect=acme-app://oauth2redirect
The Acme app backend will complete the Oauth2 flow and once it gets the access token it will launch the redirect uri with access token
acme-app://oauth2redirect?session=[session]
Which will be intercepted by MyOauth2RedirectReceiver and saved for further usage. At that point, you're able to use it to make API requests to the Acme backend.