Integrate Beyond Identity Passwordless Authentication into Wordpress
This guide provides information on how to set up Beyond Identity as a passwordless authentication provider for a Wordpress site.
This guide will cover:
- How to configure Beyond Identity as an Identity Provider
- How to install the required Wordpress plugins to support an OpenID Connect (OIDC) integration
- How to configure the OIDC Wordpress plugin
Prerequisites
Before continuing, make sure that the following prerequisites have been met:
- Ensure that you have a live Wordpress site running and administrator privileges to install and configure a plugin
- Access to a Beyond Identity tenant and its admin console. If you don't have one, reach out to Beyond Identity Support.
Set up Beyond Identity as an Identity Provider
Create a Realm and Application in Beyond Identity
Create a Realm
We need to create a new Realm to hold identities and configuration:
From the Admin Console:
- Click the Realm selector on the top-left.
- Click Create New Realm.
- Type the name of your new realm. Click Create Realm.
- Click Switch to Realm.
- From the Realm's Home page, click Edit.
Create an Application
Next, we we'll create a new Application that contains the configuration for your end users:
From the Admin Console:
- From the navigation bar, click Applications, then click Add app.
- Type a name for your new Application.
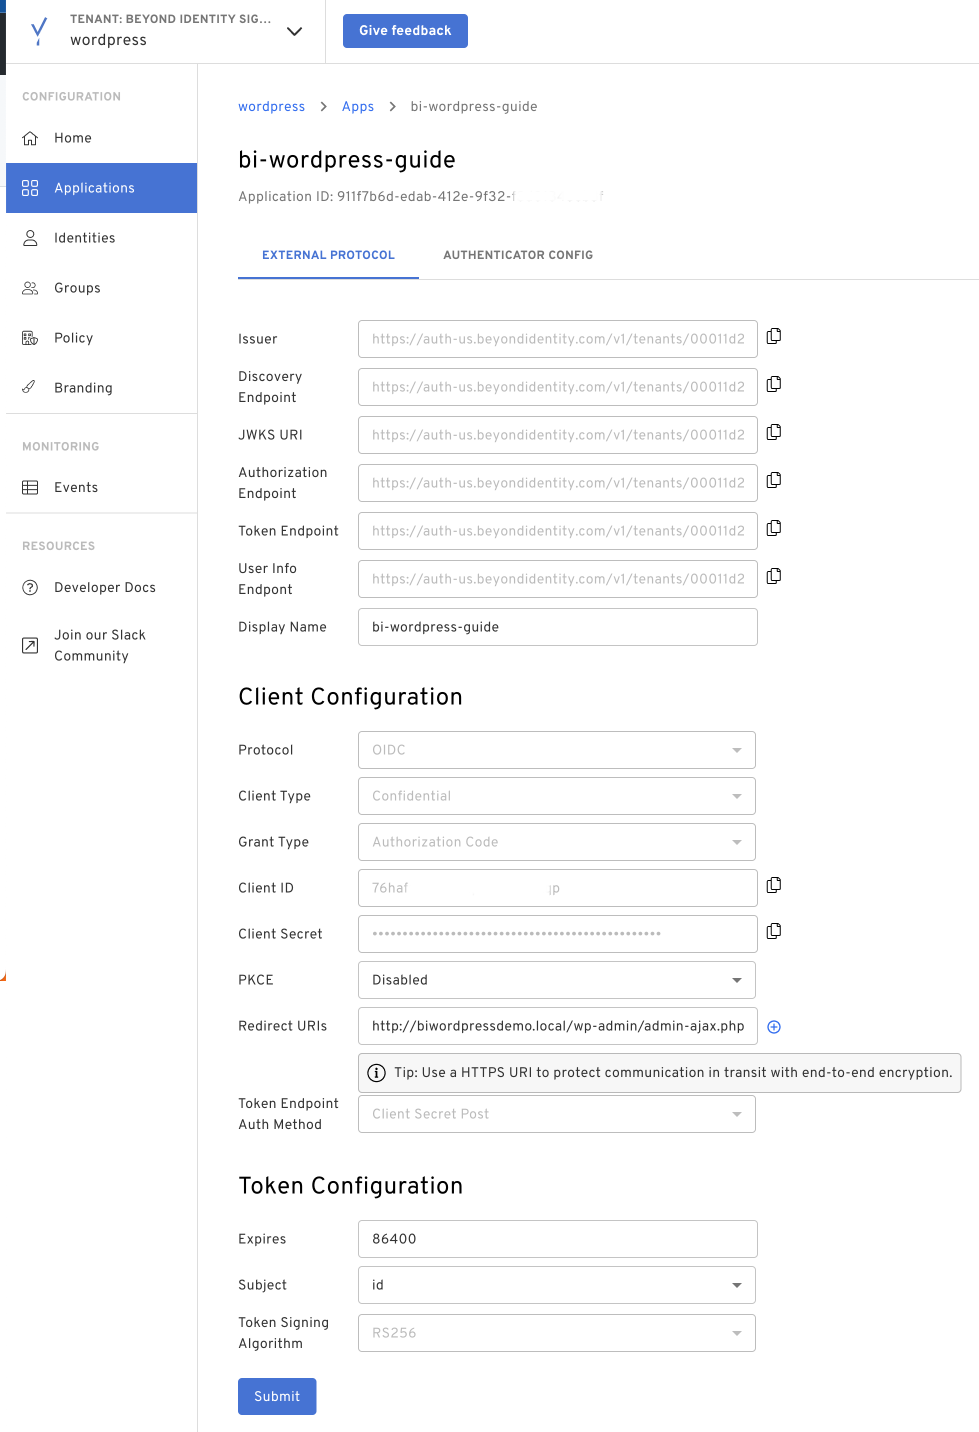
- Scroll to Redirect URIs, type
http://localhost/dummy_url. - Ensure "Token Endpoint Auth Method" is set to "Client Secret Post".
- Ensure "Subject" is set to "id".
- Verify that "PKCE" is disabled.
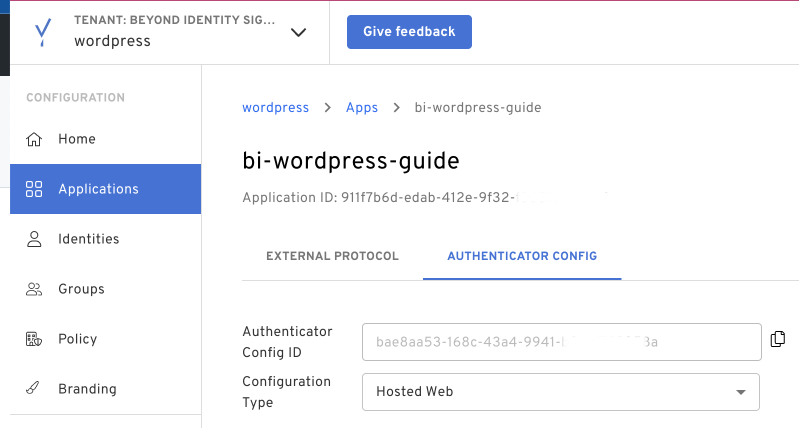
- Click on the Authenticator Config tab, change the Configuration Type to
Hosted Web. - Click Submit to save your changes.
We will overwrite the Redirect URI value later in this process, so you can use the dummy value for now.
At this point, your Beyond Identity Admin Console should be configured with a realm and an application set up.
Application
Authenticator
Create an Identity in the BI console
We will create identities that can login to the Wordpress site here, and enroll them with a BI credential bound to their device.
- In the BI Admin console, click "Identities"
- If the user you wish to use already exists, skip to step 5.
- Click "Add identity"
- Input the desired Name, Username, and Email (All three are required)
- Next, we will send the user an enrollment email to bind a credential to their device.
- Follow the steps at Send Enrollment Emails for each new identity. In the near future, this will become a push-button operation, but for now it involves sending commands via CURL.
- Each new identity will receive an Enrollment email, which they click on to bind a credential to their device (desktop, laptop, mobile, etc).
Configure Wordpress for OIDC
Install the free Plugin
This guide is based on the popular OpenID Connect Generic Client which is regularly updated and has many thousands of Active installations.
This will require administrative privileges on your Wordpress installation.
Follow the installation steps specified in the OpenID Connect Generic Client Installation Guide
Configure the plugin
These steps will help you configure the plugin to use with Beyond Identity.
- Log into you Wordpress admin console
- Keep the Beyond Identity Admin Console open in another tab or window to copy and paste values in
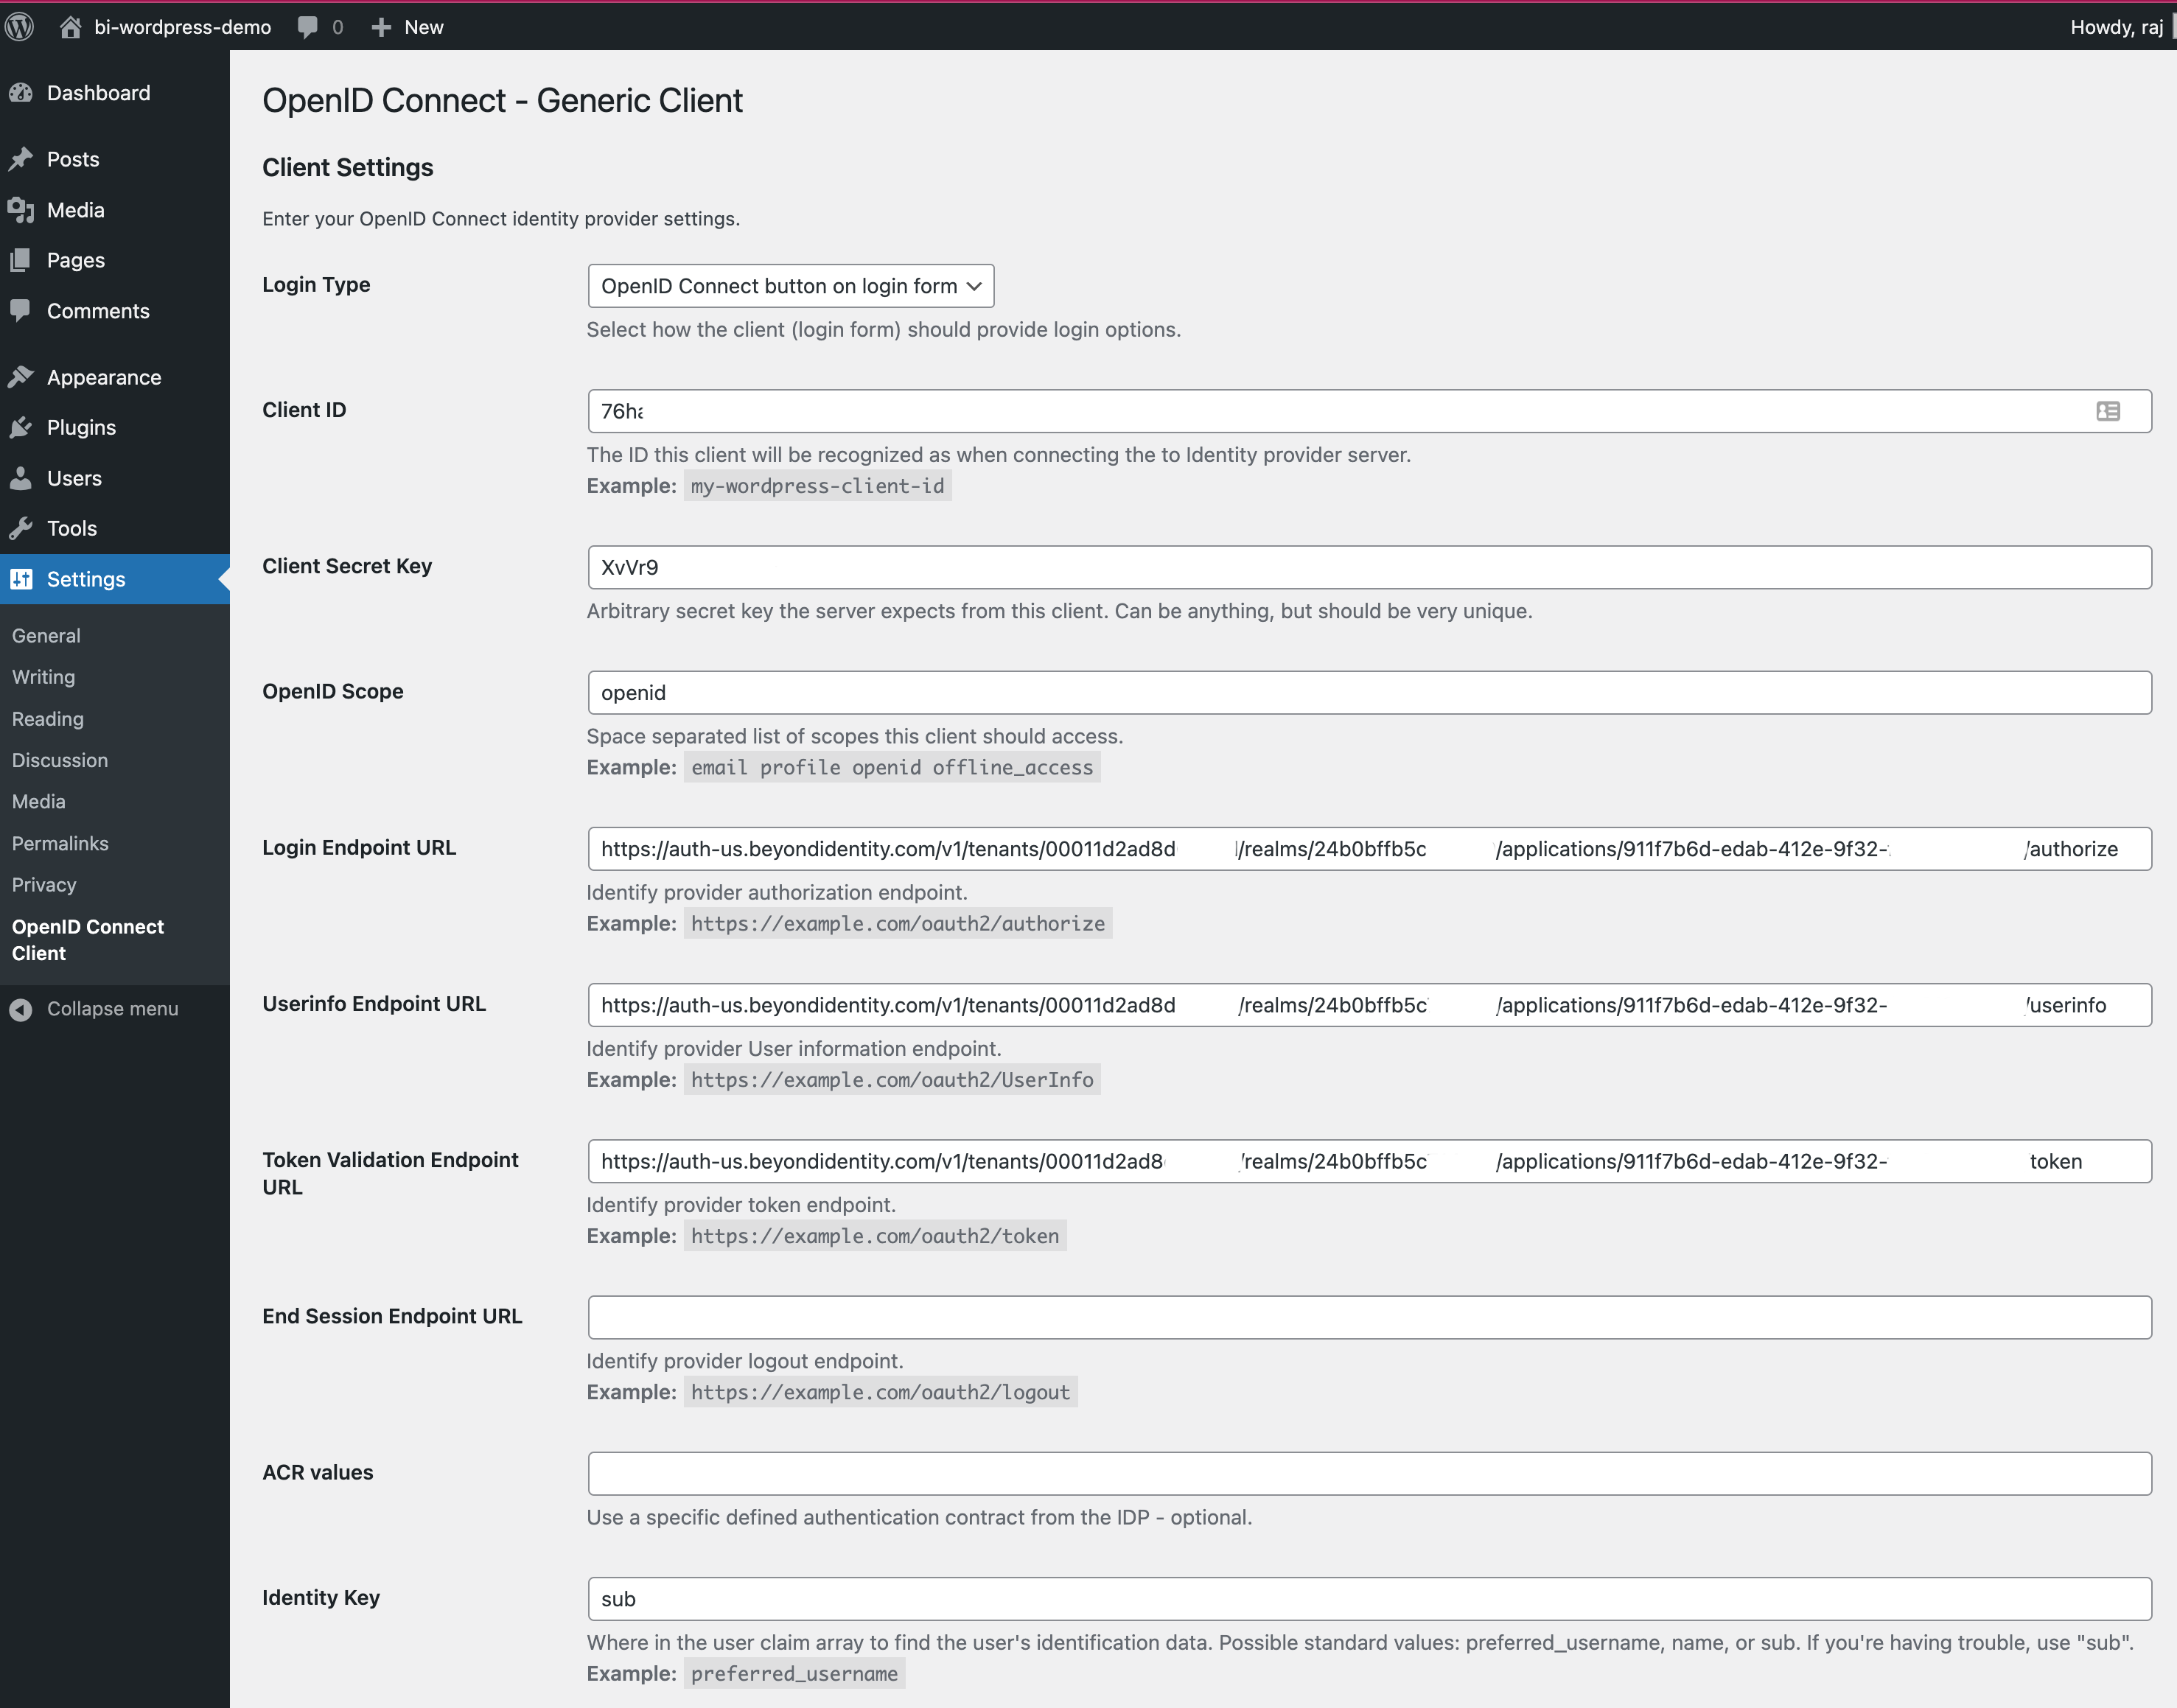
- In the Wordpress admin console, go to Settings -> OpenID Connect Client
- For "Login Type", set "OpenID Connect button on login form"
- For "Client ID", copy and paste the value from Applications -> Your New Application -> External Protocol -> Client ID
- For "Client Secret Key", copy and paste the value from Applications -> Your New Application -> External Protocol -> Client Secret
- For "OpenID Scope", paste in "email profile openid"
- For "Login Endpoint URL", copy and paste the value from Applications -> Your New Application -> External Protocol -> Authorization Endpoint
- For "Userinfo Endpoint URL", copy and paste the value from Applications -> Your New Application -> External Protocol -> User Info Endpoint
- For "Token Validation Endpoint URL", copy and paste the value from Applications -> Your New Application -> External Protocol -> Token Endpoint
- Leave "End Session Endpoint URL" blank
- Leave "ACR values" blank
- For "Identity Key", use 'sub'
- For "Nickname Key", use 'sub'
- Click the checkbox beside "Enable Logging" to give a better ability to debug any issues.
- Leave all other settings with the defaults. You are free to change them, but ymmv as some may have unpredictable results.
- Click "Save Changes"
Add the redirect URL to the BI console
The Beyond Identity web authenticator needs to know where to redirect the user after a successful authentication.
- From the Wordpress admin console -> Settings -> OpenID Connect Client , under the "Notes" section, copy the Redirect UI
- On the BI Admin console, under Applications -> Your new application -> Redirect URIs, paste the URL from the first step
- Hit "Submit" at the bottom of the page.
Congratulations, you have configured the BI console and the OIDC client plugin.
Try logging in
We will now attempt to log in and verify successful authentication.
- Using a device where you have created an identity and then enrolled a credential, Visit http://your_hostname/wp-login.php to login
- You will see a "Login with OpenID Connect" button. Click it.
- You will be redirected to the Beyond Identity Web Authenticator.
- You may see a step-up authentication prompt, depending on how Policy is set up for your tenant.
- At the conclusion of a successful authentication, you will be redirected to your wordpress console, and
- You will see several successful authentication events in BI Admin Console -> Events