Add a passkey
Setting up passkeys for your users involves two main steps:
- Create an identity for the user
- Bind a passkey to the user's identity and device through a credential binding link
You have two options for setting up passkeys in your application. The options described here are configured via the Configuration Type on the Authenticator Config tab when you add an application.
| Type | Passkey Support |
|---|---|
| Hosted Web | You will NOT need to manage creating a user identity and binding a passkey for this user. The Hosted Web Authenticator handles passkey registration and authentication for you, including generating new passkeys, presenting users with authenticator choice options as needed, and validating passkey assertions. Your app simply needs to redirect to Beyond Identity's hosted web authenticator, using an OIDC client - similar to any other Identity Provider (think social providers). For more information, see the Hosted Web. You do not need to continue reading this document. |
| Embedded SDK | You will need to manage creating a user identity and binding a passkey for this user. Continue reading this document for more information. |
Prerequisites
- Developer account
- API access token
- At least one application in a new realm with the Configuration Type set to Embedded SDK.
Create an identity
Before your users can obtain a passkey, they need to be added as a member in a realm. This realm is like a container for different apps, settings and users. Each user needs thier own identity to access an application in that realm.
If your user is creating a new account, you'll want to create an identity with their information, such as email address and username first. Collect this information on your front end and call the /identities API with that information on your back end.
Create an endpoint in your application following the below code example:
- You can find the
REGION,TENANT_IDandREALM_IDin your console. - You can generate an
API_TOKENfrom your Beyond Identity Management API application where the token contains the scopeidentities:create.
For more information, visit the add an identity guide.
- Curl
- CSharp
- Dart
- Go
- Java
- Node
- Python
- Ruby
- Rust
/identities1 2 3 4 5 6curl "https://api-$(REGION).beyondidentity.com/v1/tenants/$(TENANT_ID)/realms/$(REALM_ID)/identities" \ -X POST \ -H "Authorization: Bearer $(API_TOKEN)" \ -H "Content-Type: application/json" \ -d "{\"identity\":{\"display_name\":\"$(NAME)\",\"traits\": {\"type\": \"traits_v0\",\"username\": \"$(USERNAME)\", \"primary_email_address\":\"$(EMAIL)\"}}}"
/identities/identities/identities/identities/identities/identities/identities/identitiesIf you prefer, this can be done directly in the Beyond Identity console.
-
From the Admin Console, under Directory, select Identities > Add identity.
-
Enter the name, username, and email of the new identity you're adding.

- Click Add Identity.
Now that you have created an identity for a user, you can send the user a link to bind a passkey to their device.
Generate a credential binding link
There are two methods to generate a credential binding link. This can be done either through the Beyond Identity console or via API.
Passkey binding methods
Passkeys are created through binding jobs where a binding link gets generated to bind a passkey to a specific device or browser. This passkey gets stored in the user's device's hardware root of trust (i.e., secure enclave).
| Method | When to use |
|---|---|
| RETURN | You want to generate a passkey link and deliver it to your users however you wish (in-line, SMS, email, etc.). This is the suggested method to create a passkey without a user leaving your application. It's also the fastest way to get a binding link. |
| You want to send your users an email with a link to create their passkey. Clicking or tapping the link redirects your user to the Beyond Identity Cloud. The Beyond Identity Cloud then looks up the Authenticator Config associated with that passkey creation link. Finally, it redirects your user to your application using the Authenticator Config's Invoke URL specified. |
Console
You can send the user a link using the Beyond Identity console. This link can also be sent via email or returned immediately through a generated curl.
-
In the Admin Console, under Directory, select Identities.
-
Select the identity you want to bind a passkey to and click Add a passkey.
-
Select the app that you would like the user to be able to authenticate into and then select one of the two delivery methods:
-
Send an email to user
-
Generate curl for link from the API
-
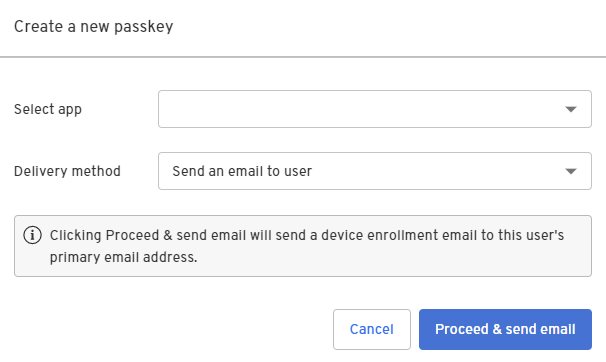
- Click Proceed & send email.
A device enrollment email is sent to your user's primary email address with a link to create their passkey. Clicking or tapping the link redirects your user to the Beyond Identity Cloud. The Beyond Identity Cloud then looks up the Authenticator Config associated with that passkey creation link. Finally, it redirects your user to your application using the Authenticator Config's Invoke URL specified.
API
- RETURN
The RETURN delivery method is the fastest way to get a binding link, which is the link you'll send to your application to complete the passkey binding process. You can deliver the link in-line, SMS, email, etc. This is the suggested method if you want the end user to create a passkey without leaving your application.
- Call the endpoint in your application following the below code example.
- Curl
- CSharp
- Dart
- Go
- Java
- Node
- Python
- Ruby
- Rust
/credential-binding-jobs1 2 3 4 5curl "https://api-$(REGION).beyondidentity.com/v1/tenants/$(TENANT_ID)/realms/$(REALM_ID)/identities/$(IDENTITY_ID)/credential-binding-jobs" \ -X POST \ -H "Authorization: Bearer $(API_TOKEN)" \ -H "Content-Type: application/json" \ -d "{\"job\":{\"delivery_method\":\"RETURN\",\"authenticator_config_id\":\"$(AUTHENTICATOR_CONFIG_ID)\"}}"
/credential-binding-jobs/credential-binding-jobs/credential-binding-jobs/credential-binding-jobs/credential-binding-jobs/credential-binding-jobs/credential-binding-jobs/credential-binding-jobs- You will need the user's
IDENTITY_IDfrom identity creation above. This is the id returned in the response JSON from the create identity API. - You can find the
REGION,TENANT_ID,REALM_IDandAUTHENTICATOR_CONFIG_IDin your console. - You can generate an
API_TOKENfrom your Beyond Identity Management API application where the token contains the scopecredential-binding-jobs:create.
The result of calling this API will be a JSON response with a credential_binding_link.
{
  "credential_binding_job": {
    "id": "c4fc2d753ca22b14",
    "realm_id": "cdf4862dc4d49791",
    "tenant_id": "000183a77dd50fa9",
    "identity_id": "87fabad6956c6d4b",
    "delivery_method": "RETURN",
    "state": "LINK_SENT",
    "post_binding_redirect_uri": "http://example.com/callback",
    "authenticator_config_id": "67bb0acf12e5c899",
    "expire_time": "2022-03-21T03:42:52.905Z",
    "create_time": "2022-03-14T03:42:52.905Z",
    "update_time": "2022-03-15T05:55:23.823Z"
  },
  "credential_binding_link": "http://example.com/v1/tenants/000183a77dd50fa9/realms/cdf4862dc4d49791/identities/87fabad6956c6d4b/credential-binding-jobs/c4fc2d753ca22b14:invokeAuthenticator?token=1St9IKIIrYyQ8sOSeuk5UkbLKnBJhuD4I7nWIqt-BNANDEFS-XVuOHxB7TFdZcRm"
}
- Once you have a binding link generated, feed the
credential_binding_linkdirectly into your application's front end using the Embedded SDK to complete the binding process.
Remember to initialize your SDK ahead of time. For more information, see SDK Setup.
- Javascript
- Kotlin
- Swift
- React Native
- Flutter
const bindResponse = await embedded.bindPasskey(bindingLink);
console.log(bindResponse);
EmbeddedSdk.bindPasskey(url = bindingLink)
.onEach { result ->
    result.onSuccess { success ->
        Timber.d("Bind Passkey success = $success")
    }
    result.onFailure { failure ->
        Timber.e("Bind Passkey failure = $failure")
    }
}
Embedded.shared.bindPasskey(url: bindingLink) { result in
    switch result {
    case let .success(bindResponse):
        print(bindResponse)
    case let .failure(error):
        print(error.localizedDescription)
    }
}
const bindResponse = await Embedded.bindPasskey(bindingLink);
console.log(bindResponse);
var bindResponse = await EmbeddedSdk.bindPasskey(bindingLink);
debugPrint(bindResponse);
The EMAIL delivery method sends an email to the user. Clicking the link will redirect the end user to the Beyond Identity Cloud. Beyond Identity Cloud will look up the Authenticator Config that is associated with that passkey creation link and redirect the end user to the Authenticator Config's Invoke URL with an appended /bind path. The Invoke URL should be an HTTP request handler in your application. Once the user has been redirected to your application, you as the developer can handle the binding link in the SDK.
- Verify the application's Invoke URL. When we send out a passkey email, the link will redirect to your application specified by the Authenticator Config's Invoke URL. This should either be an app scheme or a Universal URL / App link.
While app schemes are generally easier to set up, Universal URLs and App Links are recommended as they provide protection against App Scheme hijacking.
- Kotlin
- Swift
- React Native
- Flutter
Android supports two ways of deep linking into an application. Pick one of the following and follow the guide:
Apple supports two ways of deep linking into an application. Pick one of the following and follow the guide:
If you are using Expo, follow the deep linking guide.
If you are using an app created with the react native CLI, follow the Kotlin and Swift guides to setting up deep linking on React Native.
Also check out React Native Linking:
import { useEffect, useState } from 'react';
import { Linking } from 'react-native';

export default function useDeepLinkURL() {
  const [linkedURL, setLinkedURL] = (useState < string) | (null > null);

  // If the app is not already open
  useEffect(() => {
    const getUrlAsync = async () => {
      const initialUrl = await Linking.getInitialURL();
      if (initialUrl !== null) {
        setLinkedURL(decodeURI(initialUrl));
      }
    };

    getUrlAsync();
  }, []);

  // If the app is already open
  useEffect(() => {
    const callback = ({ url }: { url: string }) => setLinkedURL(decodeURI(url));
    const linkingEventListener = Linking.addEventListener('url', callback);
    return () => {
      linkingEventListener.remove();
    };
  }, []);

  return { linkedURL };
}

// in App.js
const { linkedURL } = useDeepLinkURL();

useEffect(() => {
  async function register() {
    if (linkedURL !== null) {
      console.log('intercepted:', linkedURL);
    }
  }

  register();
}, [linkedURL]);
Follw the Deep linking flutter guide.
- Call the endpoint in your application following the below code example.
- Curl
- CSharp
- Dart
- Go
- Java
- Node
- Python
- Ruby
- Rust
/credential-binding-jobs1 2 3 4 5curl "https://api-$(REGION).beyondidentity.com/v1/tenants/$(TENANT_ID)/realms/$(REALM_ID)/identities/$(IDENTITY_ID)/credential-binding-jobs" \ -X POST \ -H "Authorization: Bearer $(API_TOKEN)" \ -H "Content-Type: application/json" \ -d "{\"job\":{\"delivery_method\":\"EMAIL\",\"authenticator_config_id\":\"$(AUTHENTICATOR_CONFIG_ID)\",\"post_binding_redirect_uri\":\"$(POST_BINDING_REDIRECT_URI)\"}}"
/credential-binding-jobs/credential-binding-jobs/credential-binding-jobs/credential-binding-jobs/credential-binding-jobs/credential-binding-jobs/credential-binding-jobs/credential-binding-jobs- You will need the user's
IDENTITY_IDfrom identity creation above. This is the id returned in the response JSON from the create identity API. - You can find the
REGION,TENANT_ID,REALM_IDandAUTHENTICATOR_CONFIG_IDin your console. - You can generate an
API_TOKENfrom your Beyond Identity Management API application where the token contains the scopecredential-binding-jobs:create. - Set the
POST_BINDING_REDIRECT_URIto a URI in your application. On successful passkey binding the user will be re-directed to this URI.
The result of calling this API will send your user with an email from Beyond Identity with a link to click on. That link will look like the following:
http://your-app.com/v1/tenants/000183a77dd50fa9/realms/cdf4862dc4d49791/identities/87fabad6956c6d4b/credential-binding-jobs/c4fc2d753ca22b14:invokeAuthenticator?token=1St9IKIIrYyQ8sOSeuk5UkbLKnBJhuD4I7nWIqt-BNANDEFS-XVuOHxB7TFdZcRm
- Add a /bind route to your application to handle redirection
When the user taps on the link in the email, they will be redirected to the Beyond Identity Cloud which will redirect them back to your application. The Beyond Identity Cloud will use the application's Authenticator Config's Invoke URL. A /bind path will be appended to your Invoke URL as well as several other query parameters. The path /bind must be implemented as a route in your application to intercept this URL:
$invoke_url/bind?api_base_url=<api_base_url>&tenant_id=<tenant_id>&realm_id=<realm_id>&identity_id=<identity_id>&job_id=<job_id>&token=<token>
- Once you receive the incoming URL, pass it into the SDK to complete the binding process.
Remember to initialize your SDK ahead of time. For more information, see SDK Setup.
- Javascript
- Next.js
- Kotlin
- Swift
- React Native
- Flutter
const bindResponse = await embedded.bindPasskey(bindingLink);
console.log(bindResponse);
Create a bind.tsx page under /pages. Copy the following code snippet into that page:
import { useEffect, useState } from 'react';
import 'bootstrap/dist/css/bootstrap.css';

const BindPasskeyFromRedirect = () => {
  const [bindPasskeyResult, setBindPasskeyResult] = useState('');

  useEffect(() => {
    // -- 1
    const bindPasskey = async () => {
      const BeyondIdentityEmbeddedSdk = await import(
        '@beyondidentity/bi-sdk-js'
      );
      let embedded = await BeyondIdentityEmbeddedSdk.Embedded.initialize();
      // -- 2
      if (embedded.isBindPasskeyUrl(window.location.href)) {
        // Only bind if the URL is a "bind" URL
        let bindPasskeyUrl = window.location.href;
        // -- 3
        embedded
          .bindPasskey(bindPasskeyUrl)
          .then(setBindPasskeyResult)
          .catch((error) => {
            setBindPasskeyResult(error.toString());
          });
      }
    };

    bindPasskey().catch(console.error);
  }, []);

  return (
    <div className="container">
      {JSON.stringify(bindPasskeyResult, null, 2)}
    </div>
  );
};

export default BindPasskeyFromRedirect;
Validate the incoming URL with isBindPasskeyUrl in your Activity either using onCreate or onNewIntent. When the URL is intercepted, pass it to bindPasskey.
intent?.data?.let { uri ->
    when {
        EmbeddedSdk.isBindPasskeyUrl(uri.toString()) -> {
            EmbeddedSdk.bindPasskey(
                url = uri.toString(),
            ) {
                ...
            }
        }
        ...
    }
}
Catch a url from your AppDelegate or SceneDelegate. You can validate the incoming URL with isBindPasskeyUrl. When the URL is intercepted, pass it to bindPasskey.
func scene(_ scene: UIScene, openURLContexts URLContexts: Set<UIOpenURLContext>) {
    if let url = URLContexts.first?.url, Embedded.shared.isBindPasskeyUrl(url) {
        Embedded.shared.bindPasskey(url: bindingLink) { result in
            switch result {
            case let .success(bindResponse):
                print(bindResponse)
            case let .failure(error):
                print(error.localizedDescription)
            }
        }
    }
}
You can validate the incoming URL with isBindPasskeyUrl. When the URL is intercepted, pass it to bindPasskey.
const isBindUrl = await Embedded.isBindPasskeyUrl(url);
if (isBindUrl) {
  const bindResponse = await Embedded.bindPasskey(bindingLink);
  console.log(bindResponse);
}
Use Flutter's getInitialUri from uni_links to intercept the Url. You can validate the incoming URL with isBindPasskeyUrl. When the URL is intercepted, pass it to bindPasskey.
final uri = await getInitialUri();
if (uri != null) {
  bool isBindUrl = await EmbeddedSdk.isBindPasskeyUrl(uri);

  if (isBindUrl) {
      BindPasskeyResponse bindResponse = await EmbeddedSdk.bindPasskey(uri);
      debugPrint(bindResponse);
  }
}
Upon success, a private key will be created in the user's device's hardware trust module, and the corresponding public key will be sent to the Beyond Identity Cloud. At this point, the user has a passkey enrolled on this device and is ready to authenticate.
What can I do next?
After you have a passkey bound to an identity, you're ready to authenticate. See Add authentication for next steps on authentication and token exchange.