Add authentication
This guide shows how to add authentication to your application using the Hosted Web Authenticator integration model. Hosted Web offers an easy developer integration experience to your application as it directly handles passkey registration and authentication for you through a hosted web page.
Hosted Web is one of two Configuration Types that can be configured when creating an application. Selecting this option requires less configuration and code. Your app simply needs to redirect to Beyond Identity's Hosted Web Authenticator, and we do the rest.
The Hosted Web Authenticator can be set up using an OpenID Connect client library. Many frameworks and languages have their own. If you wish to find an OpenID Connect client, we recommend looking for one on the list of certified OpenID Connect clients.
Overview
With this guide you will:
- Create a Beyond Identity application using the Hosted Web configuration type.
- Configure an OpenID Connect client library or build your own.
Create your Beyond Identity application
Prerequisites
- A developer account
- Logged into your admin console
Depending on the region you chose when you signed up, you can access the Beyond Identity admin console for your tenant at:
If you are signing in from a different computer or browser, you can enter the email address you used when you signed up. Beyond Identity will send you a one time link you can use to sign in and enroll a passkey from the new browser.
Create a new realm
So far, you have the Beyond Identity Admin Realm for your Beyond Identity tenant only. In this step, you'll create a new Realm to hold your users' identities and the configuration.
Creating a realm from the Beyond Identity Admin Console is easy.
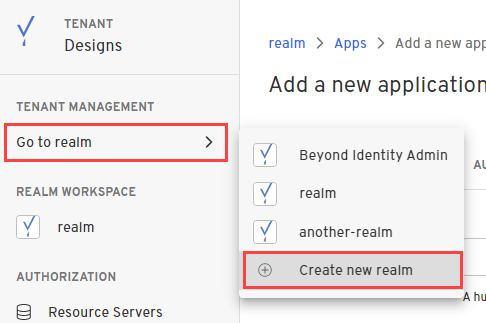
- In the Admin Console, under Tenant Management, select Go to realm > Create new realm.
-
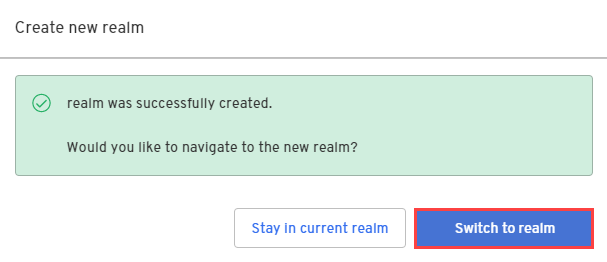
Enter a name for your realm and click Create realm.
-
In the confirmation dialog, switch to the new realm.
Create an application
In this step, you'll create a new Application containing the configuration for your users.
- From the Admin Console, under Authentication, select Apps > Add new app.

- Give your application a name.
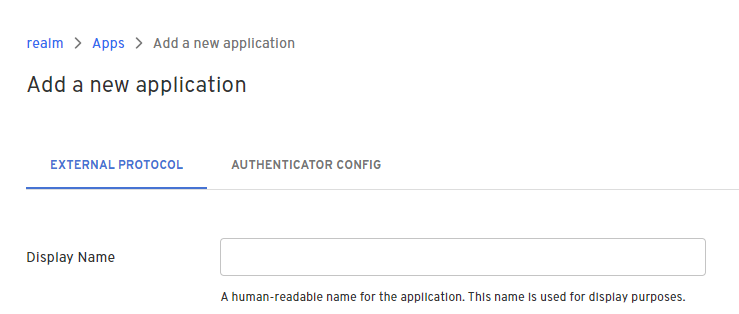
On the External Protocol tab, use the following values to complete this tab.
| Property | Value |
|---|---|
| Display Name | Descriptive name you choose |
| Protocol | OIDC
|
| Client Type | Confidential
|
| PKCE | S256
|
| Redirect URIs | Use a route in your app that is capable of handling the authorization code exchange. If you are using an OpenID Connect client library, a redirect URI may be specified for you. For example: In a Next.js application using NextAuth, your redirect URI follows the pattern: http://localhost:3000/api/auth/callback/beyondidentity |
| Token Endpoint Auth Method | Client Secret Basic
|
| Grant Type | Authorization Code
|
| All other options | Use the default values for the remaining options |
On the Authenticator Config tab, use the following values to complete this tab.
| Property | Value |
|---|---|
| Configuration Type | Hosted Web
|
| Authentication Profile | Use the recommended values for the remaining options |
Congrats! You've created and configured a Beyond Identity application. You're now ready to use the values from this applications for your OpenID Connect client.
Configure an OpenID Connect client library
Using a library is the recommended approach because it handles authorization, token exchange and accessing user info for you.
There are many libraries available depending on your application's tech stack. If you need help finding an OpenID Connect client for your tech stack, we recommend looking for one on the list of certified OpenID Connect clients.
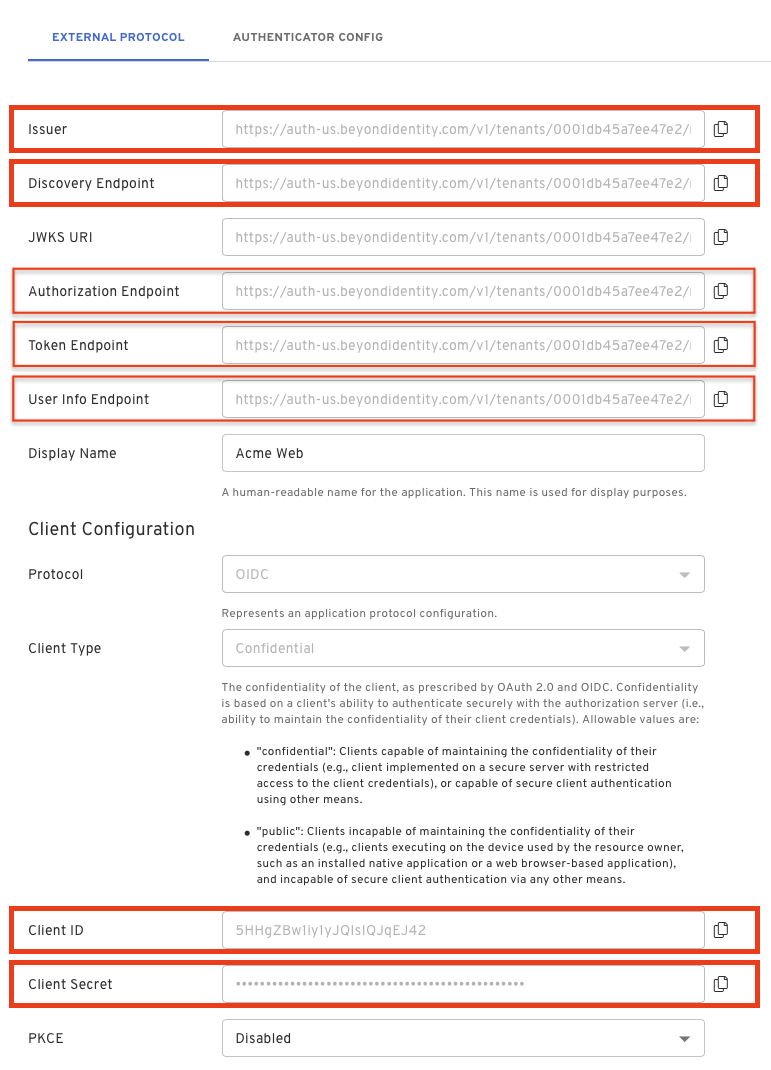
While there are many libraries available, they all need similar values to configure. You can find all the values you need under your External Protocol section of the application you created above.
Client ID and Client Secret will be needed for all of them, but there may be some variation in the URLs needed.
Remeber, if your Client Type is set to Confidential in your application's External Protocol tab then you will have a Client Secret. If the Client Type is set to Public then you will not have this value.
The Issuer and the Discovery Endpoint URL are both used by the client to identify the OpenID endpoints. The Discovery Endpoint is the Issuer + /.well-known/openid-configuration.
You can also access individual endpoints in this tab. Some libraries require copying over these URLs individually rather than using an issuer/discovery endpoint. These URLs are Authorization Endpoint, Token Endpoint and User Info Endpoint.
Some libraries will require you to explicitly pass scopes or explicitly define that you are using PKCE or state. Be sure to use "openid" as a scope and configure all relevant values.
For example using a NextAuth Provider:
{
    id: "beyondidentity",
    name: "Beyond Identity",
    type: "oauth",
    wellKnown: process.env.BEYOND_IDENTITY_DISCOVERY,
    authorization: { params: { scope: "openid" } },
    clientId: process.env.BEYOND_IDENTITY_CLIENT_ID,
    clientSecret: process.env.BEYOND_IDENTITY_CLIENT_SECRET,
    idToken: true,
    checks: ["pkce", "state"],
    profile(profile) {
      return {
        id: profile.sub,
        name: profile.name,
        email: profile.email,
      }
    },
},
Consult your library for more details on which values are needed.
How it works / Configure your own client
If you are not using a library, you will need to configure your own client. Use the Authorization Endpoint, Token Endpoint, and User Info Endpoint found in your application's External Protocol tab.
Authorization
Start with the Authorization Endpoint found in your application's External Protocol tab.
This url should look like the following:
https://auth-$REGION.beyondidentity.com/v1/tenants/$TENANT_ID/realms/$REALM_ID/applications/$APPLICATION_ID/authorize
Copy the Authorization Endpoint from to console and append the following parameters:
$(Authorization Endpoint)?
response_type=code
&client_id=$CLIENT_ID
&redirect_uri=$REDIRECT_URI
&scope=openid
&state=$STATE
&code_challenge_method=256
&code_challenge=$PKCE_CODE_CHALLENGE
| Parameter | Value |
|---|---|
| response_type | code This parameter specifies that the authorization server should return an authorization code to the client. The code will be used by the client to request an access token. |
| client_id | Copy and paste the Client ID value from your application's External Protocol tab. |
| redirect_uri | This parameter specifies the URL to which the authorization server can send an authorization code. If a state parameter was specified in the /authorize request, then that will be echoed back to this URL as well. |
| scope | openid
|
| state | This parameter is a random value generated by the client. It is included in the authorization request and returned in the response. This parameter helps the client maintain state between the request and the callback to prevent cross-site request forgery (CSRF) attacks. |
| code_challenge_method | 256
|
| code_challenge | This used in conjunction with code_challenge_method ensures that the authorization code obtained by the client can only be used by the client that originally requested it. You will need to store the hash of the code_challenge so that it can be passed to the token exchange endpoint later as a code_verifier. |
The code_challenge is generated as defined in RFC 7636, example JavaScript snippet below:
codeVerifier = crypto.randomBytes(32).toString('base64url');
codeChallenge = crypto
  .createHash('sha256')
  .update(codeVerifier)
  .digest()
  .toString('base64url');
Initiate Authorization
After you have constructed the authorization URL, ensure to URL encode it and then incorporate it into your application:
<a
href="https://auth-$REGION.beyondidentity.com/v1/tenants/$TENANT_ID/realms/$REALM_ID/applications/$APPLICATION_ID/authorize?response_type=code&scope=email%20openid&client_id=$CLIENT_ID&state=$STATE&redirect_uri=$REDIRECT_URI"
>
Login with passwordless
</a>
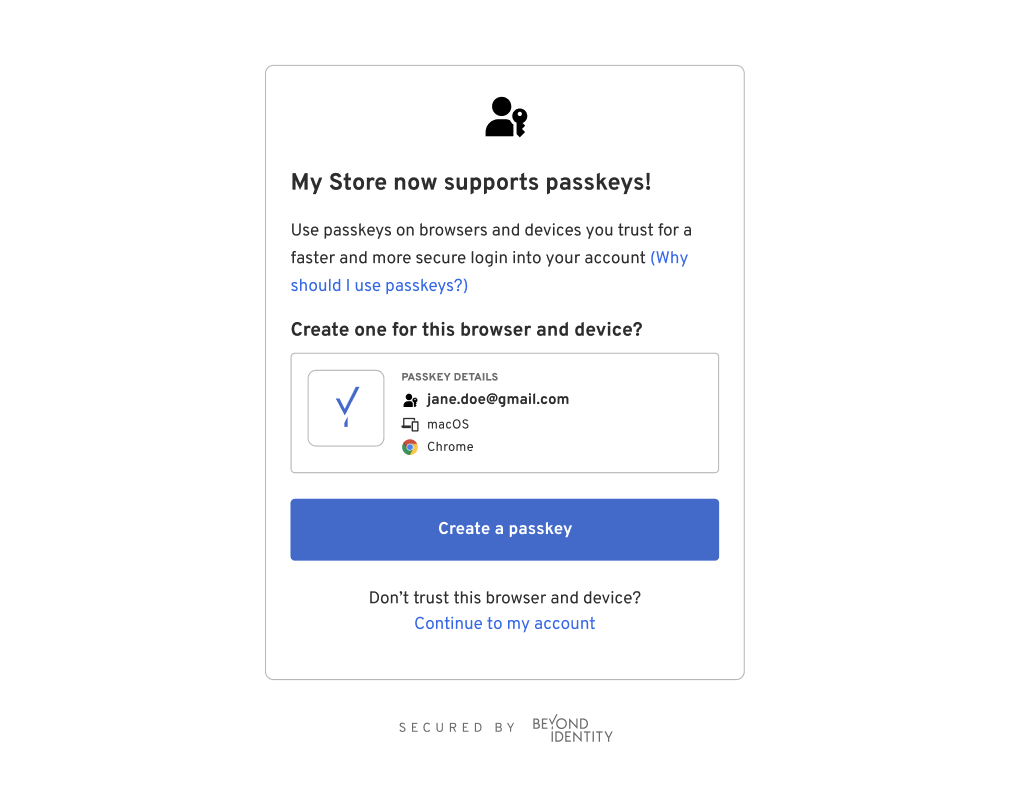
Hosted Web Authenticator
When a user taps the above link, they will be redirected to the Beyond Identity Hosted Web Authenticator. The user will be presented with UI that handles passkey registration and authentication. The URL that the user will land on will look like the following:
https://auth-$REGION.beyondidentity.com/authenticator/v1/tenants/$TENANT_ID/realms/$REALM_ID/authenticator-configs/$AUTHENTICATOR_CONFIG_ID/bi-authenticate?request=$JWT

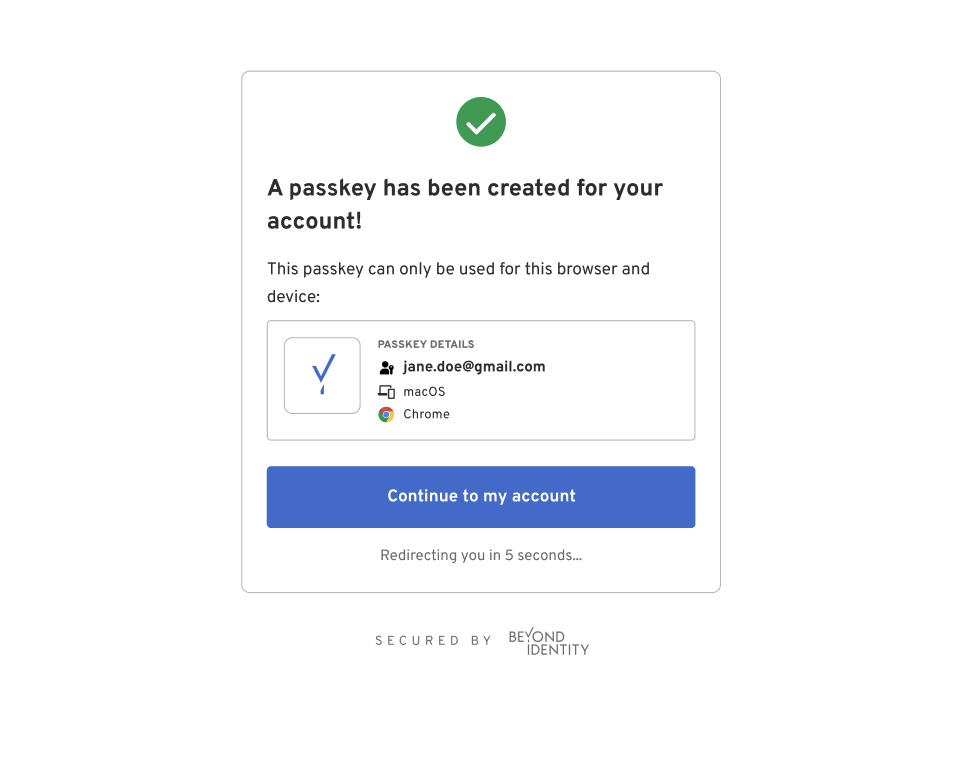
Back to your application
Upon successfully completing the UI flow, the Hosted Web Authenticator will redirect the user back to your application based on the provided redirect_uri in the authorization request appended with an authorization code and a state.
$(REDIRECT_URI)?code=$(AUTHORIZATION_CODE)&state=$(STATE)
The code is a short-lived authorization code that the client can exchange with the authorization server for an access token. The access token is what the client application uses to access protected resources on behalf of the user.
The state should be the same random value that the client included in the initial authorization request. This helps the client maintain the integrity of the authorization process. The client should then compare the received state with the original state to ensure that the response corresponds to the correct request and that the process wasn't tampered with (to prevent CSRF attacks).
Token Exchange
Now that your client has recieved an authorization code it's time to exchange the code for an access token and id token. An access token is used to access protected resources on behalf of a user. The id token contains information about the user and can be used to prove that the user has been authenticated.
Use the Token Endpoint value from your application's External Protocol tab.
If the Client Type is set to Public then you will not have a Client Secret. You can still make a token exchange without the Client Secret, but it is highly recommended that you do use PKCE S256 throughout this process. POST all of the below parameters as part of the request body.
- Client Secret Basic
- Client Secret Post
The $CLIENT_ID and $CLIENT_SECRET are sent in the Basic Authorization header.
- Curl
- CSharp
- Dart
- Go
- Java
- Node
- Python
- Ruby
- Rust
/token1 2 3 4 5curl "https://auth-$(REGION).beyondidentity.com/v1/tenants/$(TENANT_ID)/realms/$(REALM_ID)/applications/$(APPLICATION_ID)/token" \ -X POST \ -u "$(CLIENT_ID):$(CLIENT_SECRET)" --basic \ -H "Content-Type: application/x-www-form-urlencoded" \ -d "grant_type=authorization_code&code=$(AUTHORIZATION_CODE)&code_verifier=$(CODE_VERIFIER)&redirect_uri=$(REDIRECT_URI)"
/token/token/token/token/token/token/token/tokenThe $CLIENT_ID and $CLIENT_SECRET are sent in the body of the POST request as a form parameter.
- Curl
- CSharp
- Dart
- Go
- Java
- Node
- Python
- Ruby
- Rust
/token1 2 3 4 5 6 7 8 9curl "https://auth-$(REGION).beyondidentity.com/v1/tenants/$(TENANT_ID)/realms/$(REALM_ID)/applications/$(APPLICATION_ID)/token" \ -X POST \ -H "Content-Type: application/x-www-form-urlencoded" \ -F "grant_type=authorization_code" \ -F "code=$(AUTHORIZATION_CODE)" \ -F "client_id=$(CLIENT_ID)" \ -F "client_secret=$(CLIENT_SECRET)" \ -F "code_verifier=$(CODE_VERIFIER)" \ -F "redirect_uri=$(REDIRECT_URI)"
/token/token/token/token/token/token/token/token| Parameter | Value |
|---|---|
| grant_type | authorization_code This indicates the grant type of this token request. |
| code | This is the authorization code that was obtained in the last redirect. |
| redirect_uri | This must match the redirect URI that was used in the initial authorization request |
| client_id | Copy and paste the Client ID value from your application's External Protocol tab. |
| client_secret | Copy and paste the Client Secret value from your application's External Protocol tab. |
| code_verifier | The hashed value of the code_challenge sent in the original authorization request. |
User Info
Once you have an access token you can use this to access information about the user. Use the User Info Endpoint value from your application's External Protocol tab.
GET /userinfo HTTP/1.1
Host: User Info Endpoint
Authorization: Bearer <access_token>
- Curl
- CSharp
- Dart
- Go
- Java
- Node
- Python
- Ruby
- Rust
/token1 2 3curl "https://auth-$(REGION).beyondidentity.com/v1/tenants/$(TENANT_ID)/realms/$(REALM_ID)/applications/$(APPLICATION_ID)/userinfo" \ -X GET \ -H "Authorization: Bearer $(ACCESS_TOKEN)"
/token/token/token/token/token/token/token/tokenThe following user values may be returned:
| Parameter | Value |
|---|---|
| subject | The subject is used to uniquely identify the user within the context of Beyond Identity. |
| name | The name of the user |
| preferred_username | The preferred username is often a user-friendly string that identifies the user. |
| The email address associated with the authenticated user's account. |