Create new realm
When your tenant is deployed, the Beyond Identity Admin Realm gets created and populated for you. It's home for your Beyond Identity Console application and Beyond Identity Management API. In addition, it's populated with your initial Admin identity and credential, Console Authorization Policy, Console application configuration, and API configuration.
While you can only have one tenant per account, a tenant can have many realms and one Beyond Identity Admin Realm. A realm contains multiple applications, and an application utilizes the realm's directory (identity and groups), policy, events, and branding objects.
Some tenants will only need the use of a single realm, in this case a realm and a tenant may seem synonymous. It's possible that you never need to create another realm for your use case. Some of the common use cases for realms include:
-
A need for multiple development environments - staging, QA, production - an admin could create a realm for each,
-
The desire to provide separated services based on different administrative domains (holding company delegating realms to its various companies, company delegating realms to its various brands, etc), and
-
The desire to separate Admin Console and API identities, credentials and policies from those for an end-user application.
When a new realm is created, the SCIM server is available by default and a separate SCIM server is available for each realm. However, to use any SCIM functionality, an access token with scim:all scope is required. See SCIM server setup for more details.
Prerequisites
- Developer account (the Beyond Identity Admin Realm is created by default when you create a developer account)
Admin Console
Creating a realm from the Beyond Identity Admin Console is easy.
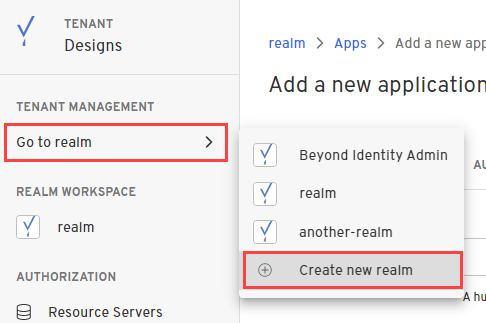
- In the Admin Console, under Tenant Management, select Go to realm > Create new realm.
-
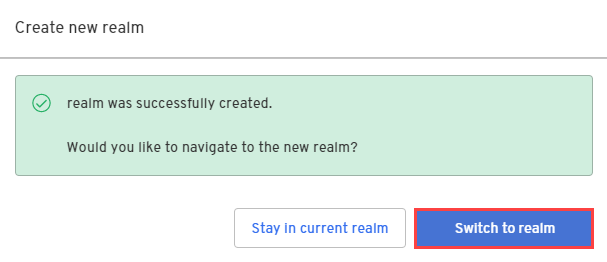
Enter a name for your realm and click Create realm.
-
In the confirmation dialog, switch to the new realm.
API
Realms can also be created by API. Before making any API calls you'll want to generate an API access token. Check out API Tokens for help creating an access token. Once you have an access token, make a request to the /realms endpoint below.
- Curl
- CSharp
- Dart
- Go
- Java
- Node
- Python
- Ruby
- Rust
/realms1 2 3 4 5curl "https://api-$(REGION).beyondidentity.com/v1/tenants/$(TENANT_ID)/realms" \ -X POST \ -H "Authorization: Bearer $(TOKEN)" \ -H "Content-Type: application/json" \ -d "{\"realms\":{\"display_name\":\"$(REALM_NAME)\"}}"
/realms/realms/realms/realms/realms/realms/realms/realmsWhat can you do next?
- Add an application
- Add an identity so users can start authenticating with Beyond Identity.
- Add groups to organize and segment your users as needed.