Integrate with NextAuth
This guide provides information on how to set up Beyond Identity as a passwordless authentication provider for a Next application that uses NextAuth (which is becoming Auth.js).
This guide uses the Embedded SDK Beyond Identity authenticator type, allowing full app customization. This solution involves creating more routes. For a lighter-weight solution, see guidance using the Hosted Web authenticator type in the guide: Getting Started with Next.js. See our Authentication article for more information on authenticator types.
In this guide, you'll:
- Configure Beyond Identity as an Identity Provider
- Create an identity and generate a passkey
- Authenticate with a passkey
Prerequisites
-
A Beyond Identity developer account. If you don't have one, reach out to Beyond Identity Support.
-
The JavaScript SDK installed and initialized
-
A Next.js Application with NextAuth installed
NextAuth
The following are provided for your reference:
Example
You'll overwrite the wellKnown, clientId, and clientSecret values later in this process so that you can use a dummy value for now.
- Create an auth route in your Next.js project
| Next.js Version | Route |
|---|---|
| 12 | Create a route at pages/api/auth/[...nextauth].js. |
| 13 | Create a route at app/api/auth/[...nextauth]/route.ts. |
- Add the following content.
- NextAuth.js
- Auth.js
import NextAuth from 'next-auth';

export default NextAuth({
  providers: [
    {
      id: 'beyondidentity',
      name: 'Beyond Identity',
      type: 'oauth',
      wellKnown: process.env.BEYOND_IDENTITY_DISCOVERY,
      authorization: { params: { scope: 'openid' } },
      clientId: process.env.BEYOND_IDENTITY_CLIENT_ID,
      clientSecret: process.env.BEYOND_IDENTITY_CLIENT_SECRET,
      idToken: true,
      checks: ['state', 'pkce'],
      profile(profile) {
        return {
          id: profile.sub,
          name: profile.sub,
          email: profile.sub,
        };
      },
    },
  ],
});
import { Auth } from '@auth/core';
import BeyondIdentity from '@auth/core/providers/beyondidentity';

const request = new Request('https://example.com');
const response = await Auth(request, {
  providers: [
    BeyondIdentity({ clientId: '', clientSecret: '', issuer: '' }),
  ],
});
You'll overwrite the Request url and BeyondIdentity clientId, clientSecret, and issuer values later, so you can use the dummy value for now.
Set up Beyond Identity as an Identity Provider
To set up Beyond Identity as an Identity Provider, you must create a Realm to hold identities and configuration. Inside that realm, you'll also create an Application that contains the authentication flow configuration. You can configure these in the admin console, which was created for you when you signed up for a developer account.
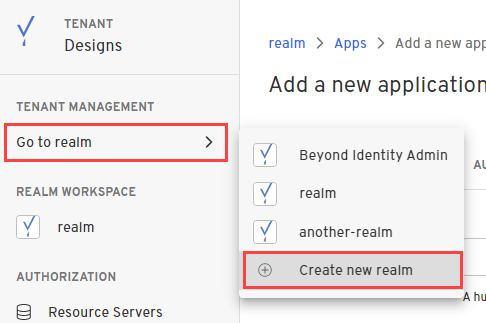
Create a Realm
Creating a realm from the Beyond Identity Admin Console is easy.
- In the Admin Console, under Tenant Management, select Go to realm > Create new realm.
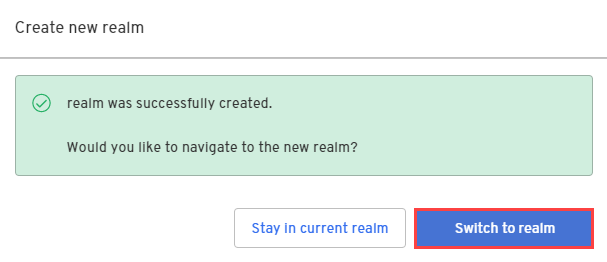
-
Enter a name for your realm and click Create realm.
-
In the confirmation dialog, switch to the new realm.
Create an Application
- From the Admin Console, under Authentication, select Apps > Add new app.

- Give your application a name.
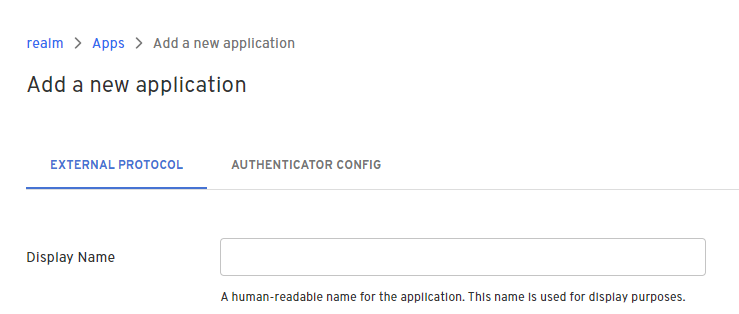
- On the External Protocol tab, use the following values to complete this tab.
| Property | Value |
|---|---|
| Display Name | Descriptive name you choose |
| Protocol | OIDC
|
| Client Type | Confidential
|
| PKCE | S256
|
| Redirect URIs | Use your application's App Scheme or Universal URL. Your redirect URI follows the pattern: http://localhost:3000/api/auth/callback/beyondidentity |
| Token Endpoint Auth Method | Client Secret Basic
|
| Grant Type | Authorization Code
|
| All other options | Use the default values for the remaining options |
- On the Authenticator Config tab, use the following values to complete this tab.
| Property | Value |
|---|---|
| Configuration Type | Embedded SDK |
| Invocation Type | Automatic |
| Invoke URL | Your application's App Scheme or Universal URL |
| Trusted Origin | Your application's App Scheme or Universal URL |
- Click Submit to save the new app.
Configure environment variables
Now that you've created an app in Beyond Identity, you're ready to update some values. Store these values in your Next application's environment variables to use with the Beyond Identity provider.
- NextAuth.js
- Auth.js
-
For wellKnown, copy and paste the value from Applications >
{New Application}> External Protocol > Discovery Endpoint. -
For clientId, copy and paste the value from Applications >
{New Application}> External Protocol > Client ID. -
For clientSecret, copy and paste the value from Applications >
{New Application}> External Protocol > Client Secret.
-
For
BeyondIdentityclientId, copy and paste the value from Applications >{New Application}> External Protocol > Client ID. -
For
BeyondIdentityclientSecret, copy and paste the value from Applications >{New Application}> External Protocol > Client Secret. -
For
BeyondIdentityissuer, copy and paste the value from Applications >{New Application}> External Protocol > Issuer.
You'll need to store a few more Beyond Identity values for API calls.
| API calls | Description |
|---|---|
BEYOND_IDENTITY_REGION | This is your tenant's region, either "us" or "eu", which you can locate in the URL of the Beyond Identity Admin Console. |
BEYOND_IDENTITY_TENANT_ID | From your realm's Home page, click Edit realm, then copy the Tenant ID from the Edit realm page. If you need help finding your tenant ID, see our Find Tenant ID how-to article. |
BEYOND_IDENTITY_REALM_ID | From your realm's Home page, click Edit realm, then copy the Realm Id from the Edit realm page. |
BEYOND_IDENTITY_APPLICATION_CONFIG_ID | From Applications > {New Application} > Authenticator Config > Authenticator Config ID |
Your .env file's contents should look something like the example below:
# Next Auth
NEXTAUTH_URL=http://localhost:3000
NEXTAUTH_SECRET=generate one here: https://generate-secret.vercel.app/32
...

# Beyond Identity
BEYOND_IDENTITY_CLIENT_ID=Njlb6brHbCofRyCWGkiUQweTz
BEYOND_IDENTITY_CLIENT_SECRET=zs2oENddYNes ... 7uamRhvRJ9d3ZJcI97X
BEYOND_IDENTITY_DISCOVERY=https://auth-us.beyondidentity.com/v1/tenants/000111222333/realms/444555666777888/applications/1233449b-11c4-4884-b622-0bfbaefd44d3/.well-known/openid-configuration

BEYOND_IDENTITY_REGION=us
BEYOND_IDENTITY_TENANT_ID=000150caae867219
BEYOND_IDENTITY_REALM_ID=898e1e08d7da2373
BEYOND_IDENTITY_APPLICATION_CONFIG_ID=2e540d7a-4caf-7448-94ba-70183a82b4ad
Create an Identity and generate a passkey
Once you've created an application in the admin console, you're ready to provision users in your realm's directory, generate passkeys, and handle those passkeys in your application.
Create an Identity
User creation can be done either in the admin console or through an API.
Using the Admin Console
-
From the Admin Console, under Directory, select Identities > Add identity.
-
Enter the name, username, and email of the new identity you're adding.

- Click Add Identity.
For more information about identities, see Add an identity.
Creating an API
In your application, create an API to call the Beyond Identity Cloud. All APIs require Authorization with an accessToken. See Access tokens for information.
const identityResponse = await fetch(
  `https://api-${process.env.BEYOND_IDENTITY_REGION}.beyondidentity.com/v1/tenants/${process.env.BEYOND_IDENTITY_TENANT_ID}/realms/${process.env.BEYOND_IDENTITY_REALM_ID}/identities`,
  {
    body: JSON.stringify({
      identity: {
        display_name: email,
        traits: {
          type: 'traits_v0',
          username: email,
          primary_email_address: email,
        },
      },
    }),
    headers: {
      Authorization: 'Bearer ' + accessToken,
    },
    method: 'POST',
  }
);
The response should contain an identity ID you'll need to generate a passkey.
let identityResponseJson = await identityResponse.json();
let identityId = identityResponseJson.id;
Generate a passkey
Once you have an identity, you can generate a passkey.
Using the Admin Console
-
In the Admin Console, under Directory, select Identities.
-
Select the identity you want to bind a passkey to and click Add a passkey.
-
Select the app and then select Send an email to user.
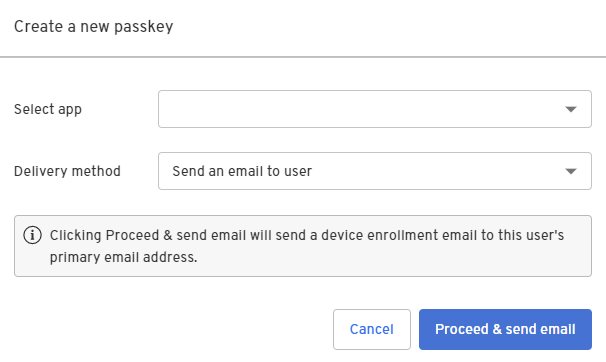
- Click Proceed & send email.
A device enrollment email is sent to your user's primary email address with a link to create their passkey. Clicking or tapping the link redirects your user to the Beyond Identity Cloud. The Beyond Identity Cloud then looks up the Authenticator Config associated with that passkey creation link. Finally, it redirects your user to your application using the Authenticator Config's Invoke URL specified.
For more information, How passkeys are created.
Creating an API
Continuing your API, use the identityId you generated above, and create a credential-binding job. A device enrollment email gets sent to your user's primary email address.
The postBindingRedirectUri is the URL you want to redirect the user toafter successfully binding a passkey.
const credentialBindingLinkResponse = await fetch(`https://api-${process.env.BEYOND_IDENTITY_REGION}.beyondidentity.com/v1/tenants/${process.env.BEYOND_IDENTITY_TENANT_ID}/realms/${process.env.BEYOND_IDENTITY_REALM_ID}/identities/${identityId}/credential-binding-jobs`,
    {
      body: JSON.stringify({
        job: {
          delivery_method: 'EMAIL',
          authenticator_config_id: ${process.env.BEYOND_IDENTITY_APPLICATION_CONFIG_ID},
          post_binding_redirect_uri: postBindingRedirectUri,
        },
      }),
      headers: {
        Authorization: 'Bearer ' + accessToken,
      },
      method: 'POST',
    }
  );

  let credentialBindingLinkResponseJson =
    await credentialBindingLinkResponse.json();
  res.send(credentialBindingLinkResponseJson);
For more information on this API, see Add a passkey.
Configure your application
Bind passkey to device
When the user clicks or taps the link in the enrollment email, they are redirected to your application. You must create a route in your application to intercept the link.
- Intercept the link from the enrollment email. The link that redirects to your application will have the
/bindpath appended to your Invoke URL and several other query parameters.
$invoke_url/bind?api_base_url=<api_base_url>&tenant_id=<tenant_id>&realm_id=<realm_id>&identity_id=<identity_id>&job_id=<job_id>&token=<token>
- Pass the link from the enrollment email into the SDK to complete the binding process.
You can validate the incoming URL with isBindPasskeyUrl. Upon success, a private key is created in the device's hardware trust module, and the corresponding public key will be sent to the Beyond Identity Cloud. At this point, the user has a passkey enrolled on this device.
- Create a bind route.
| Next.js Version | Route |
|---|---|
| 12 | create a page.tsx page under /app/bind/ |
| 13 | create a bind.tsx page under /pages/ |
If your Invoke URL is configured properly in your Authenticator Config, this page gets redirected to during a bind passkey flow. Copy the following code snippet into that page.
- NextAuth.js
- Auth.js
import { useEffect, useState } from 'react';
import 'bootstrap/dist/css/bootstrap.css';
import { signIn } from 'next-auth/react';
import { Passkey } from '@beyondidentity/bi-sdk-js';

const BIBindPasskey = () => {
  const [bindPasskeyResult, setBindPasskeyResult] = useState('');

  useEffect(() => {
    // -- 1
    const bindPasskey = async () => {
      const BeyondIdentityEmbeddedSdk = await import(
        '@beyondidentity/bi-sdk-js'
      );
      let embedded = await BeyondIdentitySdk.EmbeddedSdk.initialize();
      if (embedded.isBindPasskeyUrl(window.location.href)) {
        // Only bind passkey if the URL is a "bind" URL
        let bindPasskeyUrl = window.location.href;
        // -- 2
        embedded
          .bindPasskey(bindPasskeyUrl)
          .then((result) => {
            // -- 3
            setBindPasskeyResult(result);
            signIn('beyondidentity', {
              tenant_id: tenantId,
            });
          })
          .catch((error) => {
            setBindPasskeyResult(error.toString());
          });
      }
    };

    bindPasskey().catch(console.error);
  }, []);

  return (
    <div
      style={{
        display: 'flex',
        justifyContent: 'center',
        alignItems: 'center',
        height: '100vh',
      }}
    >
      <div className="container">
        <div className="row">
          <div className="d-flex justify-content-center">
            <div className="spinner-border" role="status">
              <span className="sr-only"></span>
            </div>
          </div>
        </div>
        <div className="row">
          {bindPasskeyResult.length > 0 && (
            <div className="row row-cols-1 row-cols-md-1 mt-3">
              <div className="col">
                <code>{JSON.stringify(bindPasskeyResult, null, 2)}</code>
              </div>
            </div>
          )}
        </div>
      </div>
    </div>
  );
};

export default BIBindPasskey;
What's happening here?
-
After tapping the email sent to the user's device, the user is directed to your application's
/bindroute appending to theinvoke_urlconfigured in the application config. -
The
useEffectis only called once on page load. In this function, we initialize the Beyond Identity SDK and useembedded.isBindPasskeyUrlto check if the current page redirected to is, in fact, a validbindURL. -
If the URL is valid, the URL using
window.location.hrefis passed directly intoembedded.bindPasskeyto complete the binding process. -
Finally, the response of
embedded.bindPasskeycontains apasskeyobject, representing the passkey bound to the device.
Once you have one passkey bound to a device, you can use it to authenticate.
@auth/nextjs is work in progress. For now, use NextAuth.js.
Configure the NextAuth Provider
| Next.js Version | Route |
|---|---|
| 12 | create a [...nextauth].ts page under /pages/api/auth/ |
| 13 | create a page.tsx page under /app/auth/[...nextauth]/ |
Add the following Beyond Identity provider. The provider goes through an OAuth/OIDC that fetches an ID token to log you into the example app. Use the values you saved in your environment variables when creating an application above.
- NextAuth.js
- Auth.js
...
import NextAuth from "next-auth"
...
providers: [
  {
    id: "beyondidentity",
    name: "Beyond Identity",
    type: "oauth",
    wellKnown: process.env.APP_DISCOVERY_ENDPOINT,
    authorization: { params: { scope: "openid" } },
    clientId: process.env.APP_CLIENT_ID,
    clientSecret: process.env.APP_CLIENT_SECRET,
    idToken: true,
    checks: ["state"],
    profile(profile) {
      return {
        id: profile.sub,
        name: profile.sub,
        email: profile.sub,
      }
    }
  }
]
...
...
import BeyondIdentity from "@auth/core/providers/beyondidentity"
...
providers: [
  //@ts-expect-error issue https://github.com/nextauthjs/next-auth/issues/6174
  BeyondIdentity({
    clientId: process.env.BEYOND_IDENTITY_CLIENT_ID,
    clientSecret: process.env.BEYOND_IDENTITY_CLIENT_SECRET,
    issuer: process.env.BEYOND_IDENTITY_DISCOVERY,
  })
],
...
Authenticate
The authenticate URL redirecting to your application will append a /bi-authenticate path to your Invoke URL.
$invoke_url/bi-authenticate?request=<request>
Create a /bi-authenticate route to intercept this URL in your application.
| Next.js Version | Route |
|---|---|
| 12 | create a bi-authenticate.tsx page under /pages/ |
| 13 | create a page.tsx page under /app/bi-authenticate/ |
If your Invoke URL is configured properly in your Authenticator Config, this page gets redirected to during a bind passkey flow. Copy the following code snippet into that page.
- NextAuth.js
- Auth.js
import { useEffect, useState } from "react";
import "bootstrap/dist/css/bootstrap.css";
import { Passkey } from "@beyondidentity/bi-sdk-js";

const BIAuthenticate = () => {
  const [biAuthenticateResult, setBiAuthenticateResult] = useState("");

  useEffect(() => {
    // -- 1
    const authenticate = async () => {
      const BeyondIdentityEmbeddedSdk = await import("@beyondidentity/bi-sdk-js");
      let embedded = await BeyondIdentityEmbeddedSdk.Embedded.initialize();
      if (embedded.isAuthenticateUrl(window.location.href)) {
        // Only authenticate if the URL is a "bi-authenticate" URL
        let biAuthenticateUrl = window.location.href;
        // -- 2
        biAuthenticate(biAuthenticateUrl).then(redirectURL => {
          // -- 4
          window.location.href = redirectURL;
        }).catch(error => {
          setBiAuthenticateResult(error.toString());
        });
      }
    }
    authenticate().catch(console.error);
  }, []);

  // -- 3
  async function biAuthenticate(url: string): Promise<string> {
    const BeyondIdentityEmbeddedSdk = await import("@beyondidentity/bi-sdk-js");
    let embedded = await BeyondIdentityEmbeddedSdk.Embedded.initialize();

    // Display passkeys so user can select one
    let passkeys = await embedded.getPasskeys();
    let promptText = passkeys.map((passkey, index) => {
      return `${index}: ${passkey.identity.username}`;
    }).join("\n");
    let selectedIndex = parseInt(prompt(promptText, "index")!!);
    if (selectedIndex >= 0 && selectedIndex < passkeys.length) {
      let selectedId = passkeys[selectedIndex].id;
      // Perform authentication using selected id
      let result = await embedded.authenticate(url, selectedId);
      return Promise.resolve(result.redirectURL);
    } else {
      // This will fail in core as it won't match to any id
      return Promise.resolve("unknown_id");
    }
  }

  return (
    <div
      style={{
        display: 'flex',
        justifyContent: 'center',
        alignItems: 'center',
        height: '100vh',
      }}
    >
      <div className="container">
        <div className="row">
          <div className="d-flex justify-content-center">
            <div className="spinner-border" role="status">
              <span className="sr-only"></span>
            </div>
          </div>
        </div>
        <div className="row">
          {
            biAuthenticateResult.length > 0 &&
            <div className="row row-cols-1 row-cols-md-1 mt-3">
              <div className="col">
                <code>
                  {JSON.stringify(biAuthenticateResult, null, 2)}
                </code>
              </div>
            </div>
          }
        </div>
      </div>
    </div>
  );
};

export default BIAuthenticate;
What's happening here?
-
The
useEffectis only called once on page load. In this function, we initialize the Beyond Identity SDK and useembedded.isBindPasskeyUrlto check if the current page redirected to is, in fact, a validbindURL. -
If the URL is valid, the URL using
window.location.hrefis passed directly intobiAuthenticate. -
biAuthenticatecallsembedded.authenticatewith a validbi-authenticateURL. This function performs a challenge/response against a passkey bound to your browser. Note that the callback inembedded.authenticatecontains logic to prompt a user to select a passkey if there is more than one. -
Finally, the
embedded.authenticateresponse contains aredirectURL. Follow this redirectURL to complete the OAuth/OIDC flow.
@auth/nextjs is work in progress. Use NextAuth.js for now.
Configure UI
- Next.js 12
- Next.js 13
NextAuth has a useSession hook to access session data and authentication status on the client side. To use this hook, you must wrap your components in a SessionProvider, which uses React Context.
- Wrap your main components in a
SessionProvider
import { SessionProvider } from 'next-auth/react';
import type { AppProps } from 'next/app';

export default function App({ Component, pageProps }: AppProps) {
  return (
    <SessionProvider session={pageProps.session} refetchInterval={0}>
      <Component {...pageProps} />
    </SessionProvider>
  );
}
- Use the
useSession()hook andsignInandsignOutfromnext-auth/reactinside a component.
'beyondidentity' in signIn is the ID of the OAuth provider as configured in the providers array above.
import { signIn, signOut, useSession } from 'next-auth/react';
const { data: session } = useSession();
const [email, setEmail] = useState('');

export default function Login() {
  const { data: session, status } = useSession();
  const [email, setEmail] = useState('');

  const handleRegistration = () => {
    // Call your registration API that you created above
    // to generate an identity and bind a passkey
    callAPICreatedAbove(email);
  };

  return (
    <div>
      {session?.user && (
        <div>
          <p>{`Welcome ${session.user.name}!`}</p>
          <button onClick={() => signOut()}>Sign Out</button>
        </div>
      )}
      {!session && (
        <div>
          <div>
            <button onClick={() => signIn('beyondidentity')}>Sign In</button>
          </div>
          <div>
            <input
              type="email"
              onChange={(event) => setEmail(event.target.value)}
            />
            <button onClick={handleRegistration}>Register</button>
          </div>
        </div>
      )}
    </div>
  );
}
Next.js version 13 introduces React Server Components. To work access session data from server components, use getServerSession.
- Update app/api/auth/[...nextauth]/route.ts to export the handler so we can use this in
getServerSession.
const handler = NextAuth({
  providers: [
    {
      id: 'beyondidentity',
      name: 'Beyond Identity',
      type: 'oauth',
      wellKnown: process.env.BEYOND_IDENTITY_DISCOVERY,
      authorization: { params: { scope: 'openid' } },
      clientId: process.env.BEYOND_IDENTITY_CLIENT_ID,
      clientSecret: process.env.BEYOND_IDENTITY_CLIENT_SECRET,
      idToken: true,
      checks: ['state', 'pkce'],
      profile(profile) {
        return {
          id: profile.sub,
          name: profile.sub,
          email: profile.sub,
        };
      },
    },
  ],
});

export { handler as GET, handler as POST };
- In your
/app/page.tsx, usegetServerSessionto access thesession.
import { getServerSession } from 'next-auth/next';
import { authOptions } from '@/app/api/auth/[...nextauth]/route';

export default async function Home() {
  const session = await getServerSession(authOptions);
  return <Login session={session} />;
}
- Pass the
sessionprop to a Login component and usesignInandsignOutfromnext-auth/react.
'beyondidentity' in signIn is the ID of the OAuth provider as configured in the providers array above.
import { signIn, signOut } from 'next-auth/react';
const [email, setEmail] = useState('');

interface LoginProps {
  session: Session | null;
}

export default function Login({ session }: LoginProps) {
  const { data: session, status } = useSession();
  const [email, setEmail] = useState('');

  const handleRegistration = () => {
    // Call your registration API that you created above
    // to generate an identity and bind a passkey
    callAPICreatedAbove(email);
  };

  return (
    <div>
      {session?.user && (
        <div>
          <p>{`Welcome ${session.user.name}!`}</p>
          <button onClick={() => signOut()}>Sign Out</button>
        </div>
      )}
      {!session && (
        <div>
          <div>
            <button onClick={() => signIn('beyondidentity')}>Sign In</button>
          </div>
          <div>
            <input
              type="email"
              onChange={(event) => setEmail(event.target.value)}
            />
            <button onClick={handleRegistration}>Register</button>
          </div>
        </div>
      )}
    </div>
  );
}