Add authentication
This guide describes how to add authentication to your application using the Beyond Identity Embedded SDK and a standard OAuth2/OIDC flow.
The OAuth2/OIDC calls can be set up using an OpenID Connect client library. Many frameworks and languages have their own. If you wish to find an OpenID Connect client, we recommend looking for one on the list of certified OpenID Connect clients.
In response to an OIDC request to the Beyond Identity /authorize endpoint, Beyond Identity initiates passwordless authentication by returning an authentication challenge and other information to your app. Before authenticating, your app can use the Beyond Identity SDK to enumerate available passkeys and should perform some logic to select one, such as presenting selection UI to the user. Once a passkey is selected, you can then use the SDK to complete authentication and finally perform the OAuth code for token exchange.
Overview
With this guide you will:
- Create a Beyond Identity application using the Embedded SDK configuration type.
- Configure an OpenID Connect client library or build your own OIDC calls.
- Invoke and consume Beyond Identity authentication calls in your app using the Embedded SDK.
Create your Beyond Identity application
Prerequisites
- A developer account
- Logged into your admin console
Depending on the region you chose when you signed up, you can access the Beyond Identity admin console for your tenant at:
If you are signing in from a different computer or browser, you can enter the email address you used when you signed up. Beyond Identity will send you a one time link you can use to sign in and enroll a passkey from the new browser.
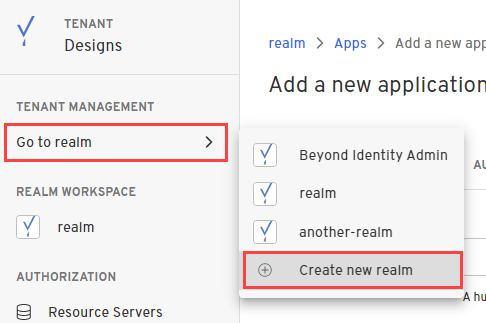
Create a new realm
So far, you have the Beyond Identity Admin Realm for your Beyond Identity tenant only. In this step, you'll create a new Realm to hold your users' identities and the configuration.
Creating a realm from the Beyond Identity Admin Console is easy.
- In the Admin Console, under Tenant Management, select Go to realm > Create new realm.
-
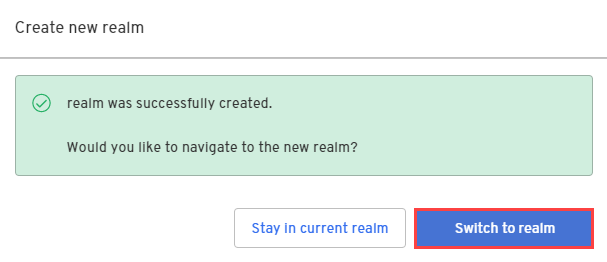
Enter a name for your realm and click Create realm.
-
In the confirmation dialog, switch to the new realm.
Create an application
In this step, you'll create a new Application containing the configuration for your users.
- From the Admin Console, under Authentication, select Apps > Add new app.

- Give your application a name.
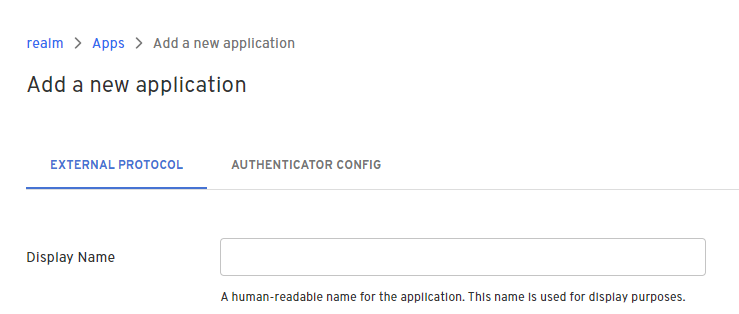
On the External Protocol tab, use the following values to complete this tab.
| Property | Value |
|---|---|
| Display Name | Descriptive name you choose |
| Protocol | OIDC
|
| Client Type | Confidential
|
| PKCE | S256
|
| Redirect URIs | Use a route in your app that is capable of handling the authorization code exchange. If you are using an OpenID Connect client library, a redirect URI may be specified for you. For example: In a Next.js application using NextAuth, your redirect URI follows the pattern: http://localhost:3000/api/auth/callback/beyondidentity |
| Token Endpoint Auth Method | Client Secret Basic
|
| Grant Type | Authorization Code
|
| All other options | Use the default values for the remaining options |
On the Authenticator Config tab, use the following values to complete this tab.
| Property | Value |
|---|---|
| Configuration Type | Embedded SDK |
| Invocation Type | In the case of a web application, this is just a URL to your web application such as 'http://localhost:3000'. In the case of a native application (iOS, Android, Flutter, React Native), this is either an App Scheme or a Universal URL / App Link. |
| Trusted Origins | Enter your app's hostname and port, such as 'http://localhost:3000' |
Congrats! You've created and configured a Beyond Identity application. You're now ready to use the values from this applications for your OpenID Connect client.
Configure an OpenID Connect client library
Using a library is the recommended approach because it handles authorization, token exchange and accessing user info for you.
There are many libraries available depending on your application's tech stack. If you need help finding an OpenID Connect client for your tech stack, we recommend looking for one on the list of certified OpenID Connect clients.
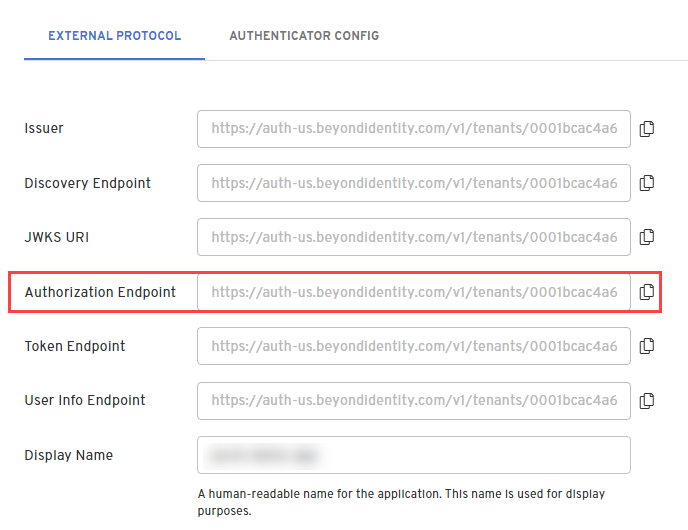
While there are many libraries available, they all need similar values to configure. You can find all the values you need under your External Protocol section of the application you created above.
Client ID and Client Secret will be needed for all of them, but there may be some variation in the URLs needed.
Remeber, if your Client Type is set to Confidential in your application's External Protocol tab then you will have a Client Secret. If the Client Type is set to Public then you will not have this value.
The Issuer and the Discovery Endpoint URL are both used by the client to identify the OpenID endpoints. The Discovery Endpoint is the Issuer + /.well-known/openid-configuration.
You can also access individual endpoints in this tab. Some libraries require copying over these URLs individually rather than using an issuer/discovery endpoint. These URLs are Authorization Endpoint, Token Endpoint and User Info Endpoint.
Some libraries will require you to explicitly pass scopes or explicitly define that you are using PKCE or state. Be sure to use "openid" as a scope and configure all relevant values.
For example using a NextAuth Provider:
{
    id: "beyondidentity",
    name: "Beyond Identity",
    type: "oauth",
    wellKnown: process.env.BEYOND_IDENTITY_DISCOVERY,
    authorization: { params: { scope: "openid" } },
    clientId: process.env.BEYOND_IDENTITY_CLIENT_ID,
    clientSecret: process.env.BEYOND_IDENTITY_CLIENT_SECRET,
    idToken: true,
    checks: ["pkce", "state"],
    profile(profile) {
      return {
        id: profile.sub,
        name: profile.name,
        email: profile.email,
      }
    },
},
Consult your library for more details on which values are needed.
Craft your own authorization request
If you are not using a library, you will need to configure your own authorization and token calls using the Authorization Endpoint and Token Endpoint found in your application's External Protocol tab.
Crafting an authorization URL is the first step in the authorization flow.
- In the Admin Console, under Apps, select the External Protocol tab, copy the Authorization Endpoint value and add it to the query parameters:
https://auth-$REGION.beyondidentity.com/v1/tenants/$TENANT_ID/realms/$REALM_ID/applications/$APPLICATION_ID/authorize?
response_type=code
&client_id=$CLIENT_ID
&redirect_uri=$REDIRECT_URI
&scope=openid
&state=$STATE
&code_challenge_method=256
&code_challenge=$PKCE_CODE_CHALLENGE
| Parameter | Value |
|---|---|
| response_type | code This parameter specifies that the authorization server should return an authorization code to the client. The code will be used by the client to request an access token. |
| client_id | Copy and paste the Client ID value from your application's External Protocol tab. |
| redirect_uri | This parameter specifies the URL to which the authorization server can send an authorization code. If a state parameter was specified in the /authorize request, then that will be echoed back to this URL as well. |
| scope | openid
|
| state | This parameter is a random value generated by the client. It is included in the authorization request and returned in the response. This parameter helps the client maintain state between the request and the callback to prevent cross-site request forgery (CSRF) attacks. |
| code_challenge_method | 256
|
| code_challenge | This used in conjunction with code_challenge_method ensures that the authorization code obtained by the client can only be used by the client that originally requested it. You will need to store the hash of the code_challenge so that it can be passed to the token exchange endpoint later as a code_verifier. |
The code_challenge is generated as defined in RFC 7636, example JavaScript snippet below:
codeVerifier = crypto.randomBytes(32).toString('base64url');
codeChallenge = crypto
  .createHash('sha256')
  .update(codeVerifier)
  .digest()
  .toString('base64url');
- Start authorization for Invocation Type.
- Manual
- Automatic
Start with a GET request to your crafted authorization URL. If successful, you will receive an authenticate_url in the response. Pass that url along with a passkey id to the Embedded SDK's authenticate function. You can confirm the validity of the URL with isAuthenticateUrl.
Don't forget to initalize your SDK and present some logic to the user to select a passkey ahead of time.
- Javascript
- Kotlin
- Swift
- React Native
- Flutter
const BeyondIdentityAuthUrl = `https://auth-${REGION}.beyondidentity.com/v1/tenants/${TENANT_ID}/realms/${REALM_ID}/applications/${APPLICATION_ID}/authorize?response_type=code&client_id=${CLIENT_ID}&redirect_uri=${URI_ENCODED_REDIRECT_URI}&scope=openid&state=${STATE}&code_challenge_method=S256&code_challenge=${PKCE_CODE_CHALLENGE}`;

let response = await fetch(BeyondIdentityAuthUrl, {
  method: 'GET',
  headers: new Headers({
    'Content-Type': 'application/json',
  }),
});
const data = await response.json();

// Display UI for user to select a passkey
const passkeys = await embedded.getPasskeys();

if (await Embedded.isAuthenticateUrl(data.authenticate_url)) {
  // Pass url and selected passkey ID into the Beyond Identity Embedded SDK authenticate function
  // Parse query parameters from the 'redirectUrl' for a 'code' and then exchange that code for an access token in a server
  const { redirectUrl } = await embedded.authenticate(
    data.authenticate_url,
    passkeys[0].id
  );
}
interface BeyondIdentityService {
    @GET("/v1/tenants/${TENANT_ID}/realms/${REALM_ID}/applications/${APPLICATION_ID}/authorize")
    suspend fun authorize(
        @Query("client_id") client_id: String,
        @Query("code_challenge") code_challenge: String,
        @Query("code_challenge_method") code_challenge_method: String = "S256",
        @Query("redirect_uri") redirect_uri: String,
        @Query("response_type") response_type: String = "code",
        @Query("scope") scope: String = "openid",
        @Query("state") state: String,
    ): Response<AuthorizeResponse>
}

val response = Retrofit.Builder()
    .addConverterFactory(GsonConverterFactory.create())
    .baseUrl("https://auth-${REGION}.beyondidentity.com")
    .build()
    .create(BeyondIdentityService::class.java)
    .authorize(
        client_id = "${CLIENT_ID}",
        code_challenge = "${CODE_CHALLENGE}",
        code_challenge_method = "S256",
        redirect_uri = "${REDIRECT_URI}",
        response_type = "code",
        scope = "openid",
        state = "{$STATE}",
    )

EmbeddedSdk.isAuthenticateUrl(response.authenticate_url) -> {
    EmbeddedSdk.authenticate(
        url = response.authenticate_url,
        passkeyId = selectedPasskeyId,
    ) { result ->
        result.onSuccess { authenticateResponse ->
            authenticateResponse.redirectUrl?.let { redirectUrl ->
                // This URL contains authorization code and state parameters
                // Exchange the authorization code for an id_token using Beyond Identity's token endpoint.
                var code = parseCode(redirectUrl)
                var token = exchangeForToken(code)
            }
        }
    }
}
let redirectURI = "\(REDIRECT_URI)".addingPercentEncoding(withAllowedCharacters: .urlHostAllowed)!
let authURL = URL(string: "https://auth-\(REGION).beyondidentity.com/v1/tenants/\(TENANT_ID)/realms/\(REALM_ID)/applications/\(APPLICATION_ID)/authorize?response_type=code&client_id=\(CLIENT_ID)&redirect_uri=\(redirectURI)&scope=openid&state=\(STATE)")!

let request = URLRequest(url: authURL)
request.httpMethod = "GET"
request.setValue("application/json", forHTTPHeaderField: "Content-Type")

struct AuthResponse: Decodable {
   let authenticate_url: String
}

let webTask = URLSession.shared.dataTask(with: request) {(data, response, error) in
   let response = try? JSONDecoder().decode(AuthResponse.self, from: data)
   let authenticateURL = URL(string: response.authenticate_url)!

   // Display UI to user to select a passkey with Embedded.shared.getPasskeys()

   if Embedded.shared.isAuthenticateUrl(authenticateURL){
      // Pass url and selected passkey ID into the Beyond Identity Embedded SDK authenticate function
      // Parse query parameters from the 'redirectURL' for a 'code' and then exchange that code for an access token in a server
      Embedded.shared.authenticate(
         url: URL(string: authenticateURL,
         id: passkeys.first!.id
      ){ result in
         switch result {
         case let .success(response):
            print(response)
         case let .failure(error):
            print(error.localizedDescription)
         }
      }
   }
}

webTask.resume()
import * as React from 'react';
import { Button } from 'react-native';
import { Embedded } from '@beyondidentity/bi-sdk-react-native';

export default function App() {
  async function authenticate() {
    const BeyondIdentityAuthUrl = `https://auth-${REGION}.beyondidentity.com/v1/tenants/${TENANT_ID}/realms/${REALM_ID}/applications/${APPLICATION_ID}/authorize?response_type=code&client_id=${CLIENT_ID}&redirect_uri=${URI_ENCODED_REDIRECT_URI}&scope=openid&state=${STATE}&code_challenge_method=S256&code_challenge=${PKCE_CODE_CHALLENGE}`;

    let response = await fetch(BeyondIdentityAuthUrl, {
      method: 'GET',
      headers: new Headers({
        'Content-Type': 'application/json',
      }),
    });
    const data = await response.json();

    // Display UI for user to select a passkey
    const passkeys = await Embedded.getPasskeys();

    if (await Embedded.isAuthenticateUrl(data.authenticate_url)) {
      // Pass url and selected passkey ID into the Beyond Identity Embedded SDK authenticate function
      // Parse query parameters from the 'redirectUrl' for a 'code' and then exchange that code for an access token in a server
      const { redirectUrl } = await Embedded.authenticate(
        data.authenticate_url,
        passkeys[0].id
      );
    }
  }

  return <Button title="Passwordless Login" onPress={authenticate} />;
}
var response = await client.get(
   Uri.parse(
   "https://auth-${REGION}.beyondidentity.com/v1/tenants/${TENANT_ID}/realms/${REALM_ID}/applications/${APPLICATION_ID}/authorize"
   "?state=${STATE}"
   "&scope=openid"
   "&response_type=code"
   "&redirect_uri=${Uri.encodeComponent("your.app")}"
   "&code_challenge_method=S256"
   "&code_challenge=${pkcePair.codeChallenge}"
   "&client_id=${CLIENT_ID}",
   ),
);
Map responseBody = json.decode(response.body);
url = responseBody['authenticate_url']

// Display UI for user to select a passkey
var passkeys = await EmbeddedSdk.getPasskeys();

if (await EmbeddedSdk.isAuthenticateUrl(url)) {
   // Pass url and selected passkey ID into the Beyond Identity Embedded SDK authenticate function
   // Parse query parameters from the 'redirectUrl' for a 'code' and then exchange that code for an access token in a server
   var authenticateResponse = await EmbeddedSdk.authenticate(url, passkeys.first.id);
}
The authenticate url that is redirected to your application will append a /bi-authenticate path to your Invoke URL. Use a "/bi-authenticate" route to intercept this url in your application:
$invoke_url/bi-authenticate?request=<request>
Native application deep linking
Make sure to set up deep linking in native applications to intercept the authenticate url.
While app schemes are generally easier to set up, Universal URLs and App Links are recommended as they provide protection against App Scheme hijacking.
- Kotlin
- Swift
- React Native
- Flutter
Android supports two ways of deep linking into an application. Pick one of the following and follow the guide:
Apple supports two ways of deep linking into an application. Pick one of the following and follow the guide:
If you are using Expo, follow the deep linking guide.
If you are using an app created with the react native CLI, follow the Kotlin and Swift guides to setting up deep linking on React Native.
Also check out React Native Linking:
import { useEffect, useState } from 'react';
import { Linking } from 'react-native';

export default function useDeepLinkURL() {
  const [linkedURL, setLinkedURL] = (useState < string) | (null > null);

  // If the app is not already open
  useEffect(() => {
    const getUrlAsync = async () => {
      const initialUrl = await Linking.getInitialURL();
      if (initialUrl !== null) {
        setLinkedURL(decodeURI(initialUrl));
      }
    };

    getUrlAsync();
  }, []);

  // If the app is already open
  useEffect(() => {
    const callback = ({ url }: { url: string }) => setLinkedURL(decodeURI(url));
    const linkingEventListener = Linking.addEventListener('url', callback);
    return () => {
      linkingEventListener.remove();
    };
  }, []);

  return { linkedURL };
}

// in App.js
const { linkedURL } = useDeepLinkURL();

useEffect(() => {
  async function register() {
    if (linkedURL !== null) {
      console.log('intercepted:', linkedURL);
    }
  }

  register();
}, [linkedURL]);
Follw the Deep linking flutter guide.
Handle Authorization in your applicaiton
The authorization flow should begin in a webview with your crafted authorization URL.
Don't forget to initalize your SDK and present some logic to the user to select a passkey ahead of time.
In a native application, the webview used should follows best practices set out in RFC 8252 - OAuth 2.0 for Native Apps. This means that on iOS applications ASWebAuthenticationSession should be used, and Custom Tabs should be used on Android devices.
UIWebView, WKWebView, and WebView are explicitly not supported due to the security and usability reasons explained in Section 8.12 of RFC 8252.
- Javascript
- Kotlin
- Swift
- React Native
- Flutter
This guide uses NextAuth for all OAuth/OIDC flows. All code snippets are provided in the context of the NextAuth Example App. Note that your application must be set up as a confidential application.
- Configuring NextAuth
Under next-auth-example/pages/api/auth/[...nextauth].ts, add the following Beyond Identity provider. The provider will go through an OAuth/OIDC that will result in fetching an id token that will log you in to the example app. Many of the values used to configure the request are the values from your crafted authorization URL.
...
providers: [
  {
    id: "beyondidentity",
    name: "Beyond Identity",
    type: "oauth",
    wellKnown: `https://auth-us.beyondidentity.com/v1/tenants/${<TENANT_ID>}/realms/${<REALM_ID>}/applications/${<APPLICATION_ID>}/.well-known/openid-configuration`,
    authorization: { params: { scope: "openid" } },
    clientId: process.env.APP_CLIENT_ID,
    clientSecret: process.env.APP_CLIENT_SECRET,
    idToken: true,
    checks: ["pkce", "state"],
    profile(profile) {
      return {
        id: profile.sub,
        name: profile.sub,
        email: profile.sub,
      }
    }
  }
],
callbacks: {
  async jwt({ token }) {
    console.log(token);
  }
}
...
- Wiring up
embedded.authenticate
Create a bi-authenticate.tsx page under /next-auth-example/pages. As long as your Invoke URL is configured properly in your Authenticator Config, this is the page that will be redirected to during an authorization flow. Copy the following code snippet into that page.
import { useEffect, useState } from "react";
import "bootstrap/dist/css/bootstrap.css";
import { Passkey } from "@beyondidentity/bi-sdk-js";

const BIAuthenticate = () => {
  const [biAuthenticateResult, setBiAuthenticateResult] = useState("");

  useEffect(() => {
    // -- 1
    const authenticate = async () => {
      const BeyondIdentityEmbeddedSdk = await import("@beyondidentity/bi-sdk-js");
      let embedded = await BeyondIdentityEmbeddedSdk.Embedded.initialize();
      if (embedded.isAuthenticateUrl(window.location.href)) {
        // Only authenticate if the URL is a "bi-authenticate" URL
        let biAuthenticateUrl = window.location.href;
        // -- 2
        biAuthenticate(biAuthenticateUrl).then(redirectURL => {
          // -- 4
          window.location.href = redirectURL;
        }).catch(error => {
          setBiAuthenticateResult(error.toString());
        });
      }
    }
    authenticate().catch(console.error);
  }, []);

  // -- 3
  async function biAuthenticate(url: string): Promise<string> {
    const BeyondIdentityEmbeddedSdk = await import("@beyondidentity/bi-sdk-js");
    let embedded = await BeyondIdentityEmbeddedSdk.Embedded.initialize();

    // Display passkeys so user can select one
    let passkeys = await embedded.getPasskeys();
    let promptText = passkeys.map((passkey, index) => {
      return `${index}: ${passkey.identity.username}`;
    }).join("\n");
    let selectedIndex = parseInt(prompt(promptText, "index")!!);
    if (selectedIndex >= 0 && selectedIndex < passkeys.length) {
      let selectedId = passkeys[selectedIndex].id;
      // Perform authentication using selected id
      let result = await embedded.authenticate(url, selectedId);
      return Promise.resolve(result.redirectURL);
    } else {
      // This will fail in core as it won't match to any id
      return Promise.resolve("unknown_id");
    }
  }

  return (
    <div
      style={{
        display: 'flex',
        justifyContent: 'center',
        alignItems: 'center',
        height: '100vh',
      }}
    >
      <div className="container">
        <div className="row">
          <div className="d-flex justify-content-center">
            <div className="spinner-border" role="status">
              <span className="sr-only"></span>
            </div>
          </div>
        </div>
        <div className="row">
          {
            biAuthenticateResult.length > 0 &&
            <div className="row row-cols-1 row-cols-md-1 mt-3">
              <div className="col">
                <code>
                  {JSON.stringify(biAuthenticateResult, null, 2)}
                </code>
              </div>
            </div>
          }
        </div>
      </div>
    </div>
  );
};

export default BIAuthenticate;
What's happening here?
- The
useEffectis only called once on page load. In this function, we initialize the Beyond Identity SDK and useembedded.isAuthenticateUrlto check if the current page that was redirected to is in fact a validbi-authenticateURL. - If the URL is valid, we pull the URL using
window.location.hrefand pass that directly intobiAuthenticatein step 3. biAuthenticatecallsembedded.authenticatewith a validbi-authenticateURL. This function performs a challenge/response against a passkey bound to your browser. Note that the callback inembedded.authenticatecontains logic in order to prompt a user to select a passkey if there is more than one.- Finally, the response of
embedded.authenticatecontains aredirectURL. Follow this redirectURL to complete the OAuth/OIDC flow.
- Build a CustomTabsIntent, and launch your crafted authorization URL.
val builder = CustomTabsIntent.Builder()
...
builder.build().launchUrl(context, AUTH_URL)
- A URL with the Invoke URL scheme should be triggered by the web page. The Android OS will look for an appropraite Activity to handle the Intent. In your Activity, which handles your Beyond Identity scheme, override onCreate &/ onNewIntent, and call
EmbeddedSdk.authenticate(). You can confirm the validity of the URL withEmbeddedSdk.isAuthenticateUrl().
intent?.data?.let { uri ->
    when {
        EmbeddedSdk.isAuthenticateUrl(uri.toString()) -> {
            EmbeddedSdk.authenticate(
                url = uri.toString(),
                passkeyId = selectedPasskeyId,
            ) {
                ...
            }
        }
        ...
    }
}
- A
redirectURLis returned from a successfulAuthenticateResponse. The authorization code and the state parameter are attached to this URL. You can now exchange the code for an id token using your Beyond Identity Token Endpoint.
intent?.data?.let { uri ->
    when {
        EmbeddedSdk.isAuthenticateUrl(uri.toString()) -> {
            EmbeddedSdk.authenticate(
                url = uri.toString(),
                passkeyId = selectedPasskeyId,
            ) { result ->
                result.onSuccess { authenticateResponse ->
                    authenticateResponse.redirectUrl?.let { redirectUrl ->
                        // This URL contains authorization code and state parameters
                        // Exchange the authorization code for an id_token using Beyond Identity's token endpoint.
                        var code = parseCode(redirectUrl)
                        var token = exchangeForToken(code)
                    }
                }
            }
        }
        ...
    }
}
Full Example:
private fun launchBI(context: Context, url: Uri = AUTH_URL) {
    CustomTabsIntent.Builder().build().launchUrl(context, url)
}

private fun handleIntent(context: Context, intent: Intent?) {
    selectPasskeyId { selectedPasskeyId ->
        intent?.data?.let { uri ->
            when {
                EmbeddedSdk.isAuthenticateUrl(uri.toString()) -> {
                    EmbeddedSdk.authenticate(
                        url = uri.toString(),
                        passkeyId = selectedPasskeyId,
                    ) { result ->
                        result.onSuccess { authenticateResponse ->
                            authenticateResponse.redirectUrl?.let { redirectUrl ->
                                // This URL contains authorization code and state parameters
                                // Exchange the authorization code for an id_token using Beyond Identity's token endpoint.
                                var code = parseCode(redirectUrl)
                                var token = exchangeForToken(code)
                            }
                        }
                    }
                }
            }
        }
    }
}

private fun selectPasskeyId(callback: (String) -> Unit) {
    // Where you can perform some logic here to select a passkey, or
    // present UI to a user to enable them to select a passkey.
}
- Start an
ASWebAuthenticationSession, and launch your crafted authorization URL.
let session = ASWebAuthenticationSession(
    url: viewModel.authorizationURL,
    callbackURLScheme: viewModel.callbackScheme
    completionHandler: { (url, error) in }
)
session.presentationContextProvider = self
session.start()
- During the session completionHandler, a URL with the invoke URL scheme should be returned. You can confirm the validity of the URL with
Embedded.shared.isAuthenticateUrl. When the webpage loads a URL, callEmbedded.shared.authenticatewith the URL and user selected passkey id.
let session = ASWebAuthenticationSession(
    url: viewModel.authorizationURL,
    callbackURLScheme: viewModel.callbackScheme
){ (url, error) in
    guard Embedded.shared.isAuthenticateUrl(url) else {/*not valid*/}
    Embedded.shared.authenticate(
        url: url,
        id: passkeyId
    ) { result in
        switch result {
        case let .success(response):
        case let .failure(error):
        }
    }
}
- A
redirectURLis returned from a successfulAuthenticateResponse. The authorization code and the state parameter are attached to this URL. You can now exchange the code for an id token using your Beyond Identity Token Endpoint.
Embedded.shared.authenticate(
    url: url,
    id: passkeyId
) { result in
    switch result {
    case let .success(response):
        let code = parseCode(from: response.redirectURL)
        let token = exchangeForToken(code)
    case let .failure(error):
    }
}
Full Example:
let session = ASWebAuthenticationSession(
    url: viewModel.authorizationURL,
    callbackURLScheme: viewModel.callbackScheme
){ (url, error) in
    guard Embedded.shared.isAuthenticateUrl(url) else {
        print("url is not valid")
        return
    }
    presentPasskeySelection { selectedPasskeyId in
        Embedded.shared.authenticate(
            url: url,
            id: selectedPasskeyId
        ) { result in
            switch result {
            case let .success(response):
                let code = parseCode(from: response.redirectURL)
                let token = exchangeForToken(code)
            case let .failure(error):
                print(error)
            }
        }
    }
}
session.presentationContextProvider = self
session.start()

private fun presentPasskeySelection(callback: (PasskeyID) -> Void) {
    // Where you can perform some logic here to select a passkey, or
    // present UI to a user to enable them to select a passkey.
}
For the reasons stated in RFC 8252, unfortunately, the react-native-community/react-native-webview is NOT recommended. If you application is able to use expo, please use expo-auth-session. If you are not using expo, please find a library that uses ASWebAuthenticationSession on iOS, and Custom Tabs on Android. One possible library is InAppBrowser.
- expo
- react-native init
- Subscribe to the
useAuthRequesthook with the Beyond Identity discovery url. Many of the values used to configure the request are the values from your crafted authorization URL.
const discovery = useAutoDiscovery(
  `https://auth-${REGION}.beyondidentity.com/v1/tenants/${TENANT_ID}/realms/${REALM_ID}/applications/${APPLICATION_ID}`
);
// Request
const [request, response, promptAsync] = useAuthRequest(
  {
    clientId: `${CLIENT_ID}`,
    scopes: ['openid'],
    redirectUri: makeRedirectUri({
      scheme: 'your.app',
    }),
  },
  discovery
);
- Use
React.useEffectto subscribe the theresponseof theuseAuthRequest. The response will contain aurlthat can be passed toEmbedded.authenticate. You can confirm the validity of the url withEmbedded.isAuthenticateUrl.
React.useEffect(() => {
  const authenticate = async (url) => {
    // Display UI for user to select a Passwordless Passkey
    const passkeys = await Embedded.getPasskeys();

    if (await Embedded.isAuthenticateUrl(url)) {
      // Pass url and selected Passkey ID into the Beyond Identity Embedded SDK authenticate function
      // Parse query parameters from the 'redirectURL' for a 'code' and then exchange that code for an access token in a server */
      const { redirectURL } = await Embedded.authenticate(url, passkeys[0].id);
    }
  };

  // response does not need to be of type 'success' if it has a url.
  // The state value is stored in a JWT in the url 'request' paramater and the url will be validated through the Beyond Identity Embedded SDK.
  if (response?.url) {
    authenticate(url);
  }
}, [response]);
- A
redirectURLis returned from a successfulAuthenticateResponse. The authorization code and the state parameter are attached to this URL. You can now exchange the code for an id token using your Beyond Identity Token Endpoint.
const { redirectURL } = await Embedded.authenticate(url, passkeys[0].id);
Full Example:
import * as React from 'react';
import {
  makeRedirectUri,
  useAuthRequest,
  useAutoDiscovery,
} from 'expo-auth-session';
import { Button } from 'react-native';
import { Embedded } from '@beyondidentity/bi-sdk-react-native';

export default function App() {
  // Endpoint
  const discovery = useAutoDiscovery(
    `https://auth-${REGION}.beyondidentity.com/v1/tenants/${TENANT_ID}/realms/${REALM_ID}/applications/${APPLICATION_ID}`
  );
  // Request
  const [request, response, promptAsync] = useAuthRequest(
    {
      clientId: `${CLIENT_ID}`,
      scopes: ['openid'],
      redirectUri: makeRedirectUri({
        scheme: 'your.app',
      }),
    },
    discovery
  );

  React.useEffect(() => {
    const authenticate = async (url) => {
      // Display UI for user to select a Passwordless Passkey
      const passkeys = await Embedded.getPasskeys();

      if (await Embedded.isAuthenticateUrl(url)) {
        // Pass url and selected Passkey ID into the Beyond Identity Embedded SDK authenticate function
        // Parse query parameters from the 'redirectURL' for a 'code' and then exchange that code for an access token in a server */
        const { redirectURL } = await Embedded.authenticate(
          url,
          passkeys[0].id
        );
      }
    };

    // response does not need to be of type 'success' if it has a url.
    // The state value is stored in a JWT in the url 'request' paramater and the url will be validated through the Beyond Identity Embedded SDK.
    if (response?.url) {
      authenticate(url);
    }
  }, [response]);

  return (
    <Button
      disabled={!request}
      title="Passwordless Login"
      onPress={() => {
        promptAsync();
      }}
    />
  );
}
- Check that an
InAppBrowserisAvailable, and launch your crafted authorization URL.
if (await InAppBrowser.isAvailable()) {
  let response = await InAppBrowser.openAuth(authUrl, 'yourScheme://', {});
}
- A URL with the invoke URL scheme should be returned from the webview. Call
Embedded.authenticatewith this url. You can confirm the validity of the URL withEmbedded.isAuthenticateUrl.
if (await InAppBrowser.isAvailable()) {
  const response = await InAppBrowser.openAuth(authUrl, 'yourScheme://', {});

  if (await Embedded.isAuthenticateUrl(response.url)) {
    const authResponse = await Embedded.authenticate(response.url, passkeyId);
  }
}
- A
redirectURLis returned from a successfulAuthenticateResponse. The authorization code and the state parameter are attached to this URL. You can now exchange the code for an id token using your Beyond Identity Token Endpoint.
if (await Embedded.isAuthenticateUrl(response.url)) {
  const authResponse = await Embedded.authenticate(response.url, passkeyId);
  const code = parseCodeFrom(authResponse.redirectURL);
  const token = exchangeForToken(code);
}
Full Example:
if (await InAppBrowser.isAvailable()) {
  const response = await InAppBrowser.openAuth(authUrl, 'yourScheme://', {});

  if (await Embedded.isAuthenticateUrl(response.url)) {
    const selectedPasskeyId = await presentPasskeySelection();
    const authResponse = await Embedded.authenticate(
      response.url,
      selectedPasskeyId
    );
    const code = parseCodeFrom(authResponse.redirectURL);
    const token = exchangeForToken(code);
  }
}

function presentPasskeySelection(): selectedPasskeyId {
  // Where you can perform some logic here to select a passkey, or
  // present UI to a user to enable them to select a passkey.
}
- Make a call to
FlutterWebAuth.authenticate(), and launch your crafted authorization URL.
var result = await FlutterWebAuth.authenticate(
    url: AUTH_URL,
    callbackUrlScheme: CALLBACK_URL_SCHEME,
);
- The result will be a URL with the Invoke URL scheme. You can call
EmbeddedSdk.authenticate(), using the result. You can confirm the validity of the URL withEmbeddedSdk.isAuthenticateUrl().
var authenticateResponse = await Embeddedsdk.authenticate(
  result,
  selectedPasskeyId
);
- A
redirectURLis returned from a successfulAuthenticateResponse. The authorization code and the state parameter are attached to this URL. You can now exchange the code for an id token using your Beyond Identity Token Endpoint.
// This URL contains authorization code and state parameters
// Exchange the authorization code for an id_token using Beyond Identity's token endpoint.
var code = parseCode(authenticateResponse.redirectUrl);
var token = exchangeForToken(code);
Full Example:
selectPasskeyId((selectedPasskeyId) async {
    var result = await FlutterWebAuth.authenticate(
        url: AUTH_URL,
        callbackUrlScheme: CALLBACK_URL_SCHEME,
    );

    var authenticateResponse = await Embeddedsdk.authenticate(result, selectedPasskeyId);

    // This URL contains authorization code and state parameters
    // Exchange the authorization code for an id_token using Beyond Identity's token endpoint.
    var code = parseCode(authenticateResponse.redirectUrl)
    var token = exchangeForToken(code)
});

Future<void> selectPasskeyId(Function(String) callback) async {
  // Where you can perform some logic here to select a passkey, or
  // present UI to a user to enable them to select a passkey.
}
Call the token endpoint for token exchange
The authenticate call returns an object that contains a redirectURL to which your app should redirect the user to complete the OIDC flow.
Keeping with the OIDC specifications, this URL includes the code and state parameters as query parameters.
Calling the /token endpoint is the second step in the authorization flow. In this call, your app sends the code as part of an OAuth call to exchange it for an access token and id token.
-
Click the External Protocol tab and copy the Token Endpoint.
-
Scroll down to Client Configuration and make a note of the Token Endpoint Auth Method selected. It determines how to make the token exchange call.
-
Client Secret Post
-
Client Secret Basic
-
- Client Secret Basic
- Client Secret Post
The $CLIENT_ID and $CLIENT_SECRET are sent in the Basic Authorization header.
- Curl
- CSharp
- Dart
- Go
- Java
- Node
- Python
- Ruby
- Rust
/token1 2 3 4 5curl "https://auth-$(REGION).beyondidentity.com/v1/tenants/$(TENANT_ID)/realms/$(REALM_ID)/applications/$(APPLICATION_ID)/token" \ -X POST \ -u "$(CLIENT_ID):$(CLIENT_SECRET)" --basic \ -H "Content-Type: application/x-www-form-urlencoded" \ -d "grant_type=authorization_code&code=$(CODE_FROM_AUTHORIZATION_RESPONSE)&code_verifier=$(CODE_VERIFIER_IF_USED_PKCE_IN_AUTHORIZATION_REQUEST)&redirect_uri=$(REDIRECT_URI_MUST_MATCH_VALUE_USED_IN_AUTHORIZATION_REQUEST)"
/token/token/token/token/token/token/token/tokenThe $CLIENT_ID and $CLIENT_SECRET are sent in the body of the POST request as a form parameter.
- Curl
- CSharp
- Dart
- Go
- Java
- Node
- Python
- Ruby
- Rust
/token1 2 3 4 5 6 7 8 9curl "https://auth-$(REGION).beyondidentity.com/v1/tenants/$(TENANT_ID)/realms/$(REALM_ID)/applications/$(APPLICATION_ID)/token" \ -X POST \ -H "Content-Type: application/x-www-form-urlencoded" \ -F "grant_type=authorization_code" \ -F "code=$(CODE_FROM_AUTHORIZATION_RESPONSE)" \ -F "client_id=$(CLIENT_ID)" \ -F "client_secret=$(CLIENT_SECRET_FROM_CONFIDENTIAL_APPLICATION)" \ -F "code_verifier=$(CODE_VERIFIER_IF_USED_PKCE_IN_AUTHORIZATION_REQUEST)" \ -F "redirect_uri=$(REDIRECT_URI_MUST_MATCH_VALUE_USED_IN_AUTHORIZATION_REQUEST)"
/token/token/token/token/token/token/token/token