Getting Started with Next.js
In this guide, you'll add Beyond Identity passkeys (public-private key pairs) for user authentication to a Next application that uses NextAuth.
This guide uses Visual Studio Code (VS Code) and the example app from NextAuth.js. However, you can use these concepts to add Beyond Identity to any web app using your Beyond Identity tenant and OAuth2/OIDC.
This guide uses the Hosted Web Beyond Identity authenticator type, which has a lighter footprint in your app. For guidance using the Embedded SDK authenticator type, see the NextAuth integration guide. See the Authentication article for more information on authenticator types.
1. Set up a developer account
If you don't have a Beyond Identity developer account yet, reach out to Beyond Identity Support.
2. Clone the sample app
Download and install the tools
First, make sure you've downloaded and installed the following tools on the development machine:
You can verify that node, npm, and git are installed using the following commands:
node -v
npm -v
git --version
Create the project
-
On the development machine, create a new folder for your project.
-
In VS Code, select File > Open Folder and select your project folder.
-
Open the terminal (View > Terminal) and clone the example app, change to the app's directory, and install the app's dependencies.
git clone https://github.com/nextauthjs/next-auth-example.git
cd next-auth-example
npm install
3. Configure Beyond Identity
In this step, you'll create a set of Beyond Identity resources containing your end users' identities and the configuration. The default realm and application names are My First Realm and My First Application, so you can go straight to Complete the configuration.
If you are signing in from a different computer or browser, you can enter the email address you used when you signed up. Beyond Identity will send you a one-time link to sign in and enroll a passkey from the new browser.
Create a new realm
The first step is to create a new realm in the Beyond Identity Admin Console.
We've already created a new application for you called My First Application, so you can skip straight to Complete the configuration below. But if you want to go through the steps of creating a new realm yourself, follow the steps below.
Create a new realm
Creating a realm from the Beyond Identity Admin Console is easy.
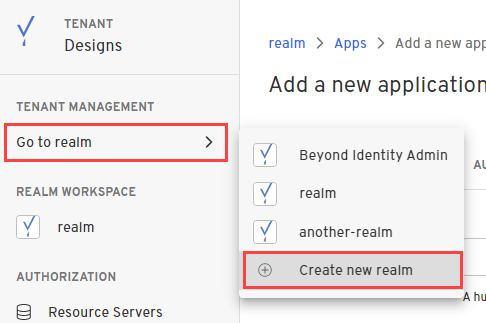
- In the Admin Console, under Tenant Management, select Go to realm > Create new realm.
-
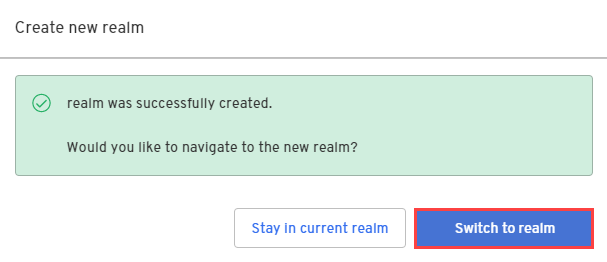
Enter a name for your realm and click Create realm.
-
In the confirmation dialog, switch to the new realm.
Create a hosted web application
The next step is to create a new Application containing the configuration for your authentication.
We've already created a new application for you called My First Application, so you can skip straight to Complete the configuration below. We will also outline the steps below if you want to go through the process of creating a hosted web application yourself.
Create a hosted web application
- From the Admin Console, under Authentication, select Apps > Add new app.

- Give your application a name.
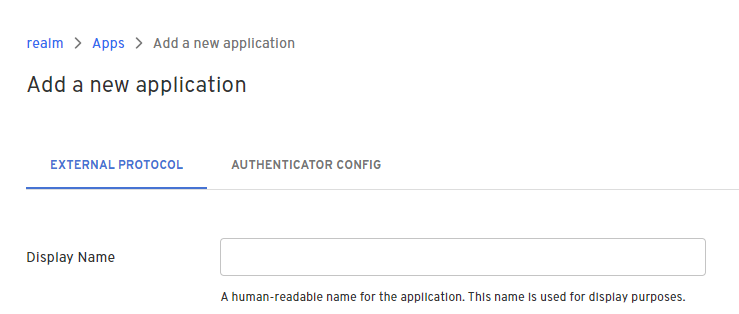
- On the External Protocol tab, use the following values to complete this tab.
| Property | Value |
|---|---|
| Display Name | Descriptive name you choose |
| Protocol | OIDC
|
| Client Type | Confidential
|
| PKCE | S256
|
| Redirect URIs | Use your application's App Scheme or Universal URL. Your redirect URI follows the pattern: http://localhost:3000/api/auth/callback/beyondidentity |
| Token Endpoint Auth Method | Client Secret Basic
|
| Grant Type | Authorization Code
|
| All other options | Use the default values for the remaining options |
- Click the Authenticator Config tab
| Property | Value |
|---|---|
| Configuration Type | Hosted Web
|
| Authentication Profile | Use the recommended values for the remaining options |
- Click Submit to save the new app.
Complete the configuration
In this step, you'll collect the configuration elements you must set environment variables in the sample app's .env.config table.
The table below lists these elements and where to find them in the tenant. If you skipped straight to this step, navigate to Authentication > Apps > My First Application to obtain the variables.
| Property Name | Where to find the value |
|---|---|
BEYOND_IDENTITY_CLIENT_ID | Copy your app’s Client ID from the External Protocol tab on the app’s configuration page in your tenant |
BEYOND_IDENTITY_CLIENT_SECRET | Copy your app’s Client Secret from the External Protocol tab on the app’s configuration page in your tenant |
BEYOND_IDENTITY_DISCOVERY | Copy your app’s Discovery Endpoint from the External Protocol tab on the app’s configuration page in your tenant |
Guess what? You're halfway there! So far in your getting started journey, you should have completed the following:
-
Signed up for a free Beyond Identity developer account, which created a passkey, tenant, and Admin Realm for you automatically.
-
Cloned the example application.
-
Created (or used the pre-existing) the configuration in your tenant, including a realm and an application.
In the next step, you'll set up the example application locally:
-
Create and populate .env.local file
-
Create Beyond Identity as an OAuth provider in the app
-
Create identities and run the app
Don't forget, if you get stuck, let us know in our Slack community.
4. Configure Beyond Identity as an OAuth provider
In this step, set your environment variables and configure Beyond Identity as an OAuth provider in the sample app.
Environment variables and .env.local file
Make the following changes to your NextAuth example app project to set up your environment variables:
-
Make a copy of the file .env.local.example called .env.local
-
In .env.local, configure the following variables from your Beyond Identity tenant:
| Variable Name | Where to find the value |
|---|---|
NEXTAUTH_URL | Use the default value of http://localhost:3000 |
NEXTAUTH_SECRET | generate one here: https://generate-secret.vercel.app/32 |
BEYOND_IDENTITY_CLIENT_ID | Copy your app’s Client ID from the External Protocol tab on the app’s configuration page in your tenant |
BEYOND_IDENTITY_CLIENT_SECRET | Copy your app’s Client Secret from the External Protocol tab on the app’s configuration page in your tenant |
BEYOND_IDENTITY_DISCOVERY | Copy your app’s Discovery Endpoint from the External Protocol tab on the app’s configuration page in your tenant |
- Copy and paste the value from Applications > {New Application} > External Protocol > Issuer.
Your .env.local file's contents should look something like the example below:
# Next Auth
NEXTAUTH_URL=http://localhost:3000
NEXTAUTH_SECRET=df118e1458e3490b22dc8e2d2a6f0247
...

# Beyond Identity
BEYOND_IDENTITY_CLIENT_ID=Njlb6brHbCofRyCWGkiUQweTz
BEYOND_IDENTITY_CLIENT_SECRET=zs2oENddYNes ... 7uamRhvRJ9d3ZJcI97X
BEYOND_IDENTITY_DISCOVERY=https://auth-us.beyondidentity.com/v1/tenants/000111222333/realms/444555666777888/applications/1233449b-11c4-4884-b622-0bfbaefd44d3
- Update the contents of the file process.d.ts to the following:
declare namespace NodeJS {
  export interface ProcessEnv {
    NEXTAUTH_URL: string
    NEXTAUTH_SECRET: string
    BEYOND_IDENTITY_CLIENT_ID: string
    BEYOND_IDENTITY_CLIENT_SECRET: string
    BEYOND_IDENTITY_DISCOVERY: string
  }
}
Create OAuth provider
Make the following change to your NextAuth example app project to configure Beyond Identity as an OAuth provider:
| Next.js Version | Route |
|---|---|
| 12 | Create a route at pages/api/auth/[...nextauth].js. |
| 13 | Create a route at app/api/auth/[...nextauth]/route.ts. |
Inside the providers array, add the following entry:
{
    id: "beyondidentity",
    name: "Beyond Identity",
    type: "oauth",
    wellKnown: process.env.BEYOND_IDENTITY_DISCOVERY,
    authorization: { params: { scope: "openid" } },
    clientId: process.env.BEYOND_IDENTITY_CLIENT_ID,
    clientSecret: process.env.BEYOND_IDENTITY_CLIENT_SECRET,
    idToken: true,
    checks: ["pkce", "state"],
    profile(profile) {
      return {
        id: profile.sub,
        name: profile.sub,
        email: profile.sub,
      }
    },
},
Double-check the package.json file
Inside the package.json file, ensure that the scripts that run the app use the correct port for the following URLs:
- your NEXTAUTH_URL, such as 'http://localhost:3000'
- the app's configured redirect URI in the BI tenant, such as 'http://localhost:3000/api/auth/callback/beyondidentity'
Next's default port is 3000, so you do not need to specify a port if you use port 3000.
If you are using a different port in your NEXTAUTH_URL, for example, '8083', the app's redirect URI would be http://localhost:8083/api/auth/callback/beyondidentity, and the script should start the app using the -p option, for example "next -p 8083"
Next, you'll create users and passkeys test the app.
5. Create users and passkeys
You are ready to test without writing more code because you created an app with the 'Hosted Web' authentication configuration type. The 'Hosted Web' authentication configuration handles user registration and authentication. If you want more customization, consider using the 'Embedded SDK' configuration type. For more information, see the NextAuth integration guide.
6. Run the example application and test sign in
In this step, you'll start the backend and frontend to run the example app locally.
- In VS Code, run:
npm run dev
-
From the browser where you created the passkey above, navigate to
http://localhost:3000. -
Sign in to the app, as shown below.
Registration and passkey binding happens in the Hosted Web UI. The user gets prompted to provide an email for verification on the first authentication. They'll have the option to generate a passkey on trusted devices, which they'll use on this device each time they authenticate.