Integrate with Auth0
This guide provides information on how to set up Beyond Identity as a passwordless authentication provider in an Auth0 environment.
Here's what you'll do in this guide:
-
Configure Beyond Identity as an Identity provider
-
Provision users when Auth0 is the master directory
You can find us in the Auth0 Marketplace.
Prerequisites
Before continuing, make sure you've met the following prerequisites:
-
Ensure that you have an Auth0 account with admin privileges
-
Access to a Beyond Identity tenant. If you don't have one, reach out to Beyond Identity Support.
Add Beyond Identity as an Identity Provider
Depending on your Auth0 subscription (license), you can add Beyond Identity as an identity provider using the Enterprise OIDC connection or as a custom social OAuth2.0 connection.
Create an OIDC App in Beyond Identity
- From the Admin Console, under Authentication, select Apps > Add new app.

- Give your application a name.
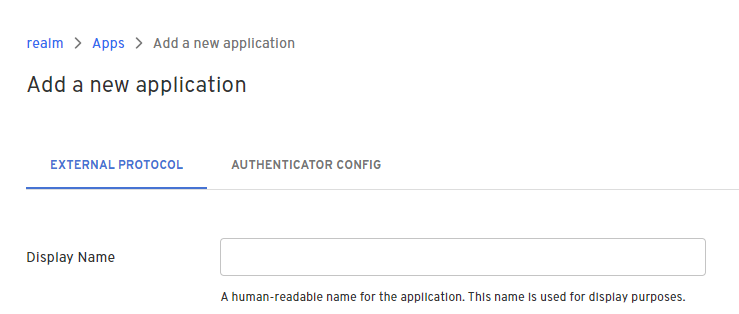
-
Select Protocol 'OIDC'.
-
Configure the Redirect URIs as follows:
https://DOMAIN.auth0.com/login/callbackwhere
DOMAINis replaced with your Auth0 domain URLExample:
https://dev-myauth099.us.auth0.com/login/callback -
On the Authenticator Config tab, for Configuration Type select 'Hosted Web'.
-
Leave all other fields with their default values and click Submit.
-
Click the newly created OIDC client app and copy and save the following values because you'll need them for the next few steps.
-
Issuer
-
Authorization Endpoint
-
Token Endpoint
-
Client ID
-
Client Secret
-
Enterprise OIDC Connection
-
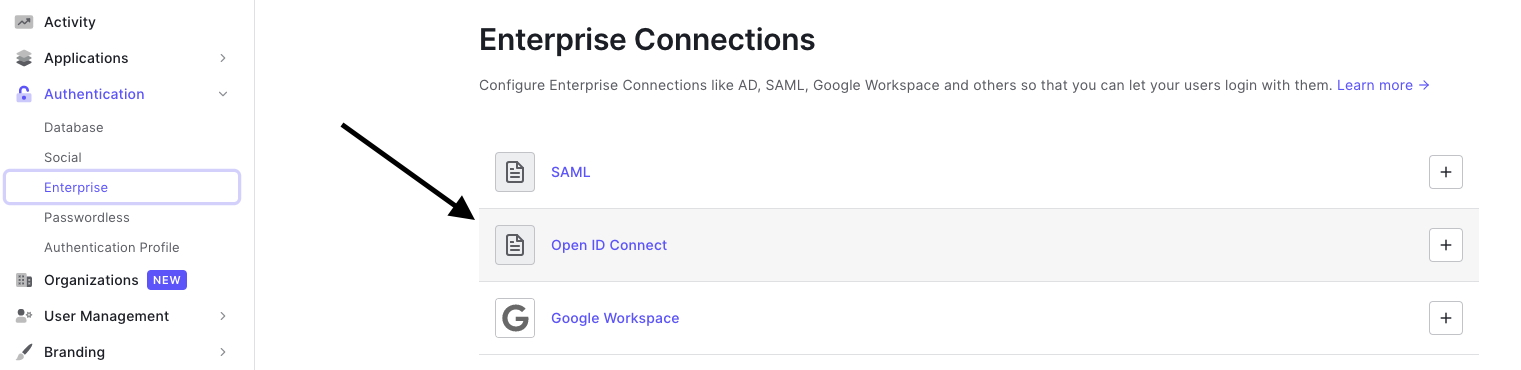
On the left side menu, click Authentication, and click Enterprise from the expanded menu.
-
On the Enterprise Connections page, click Open ID Connect.
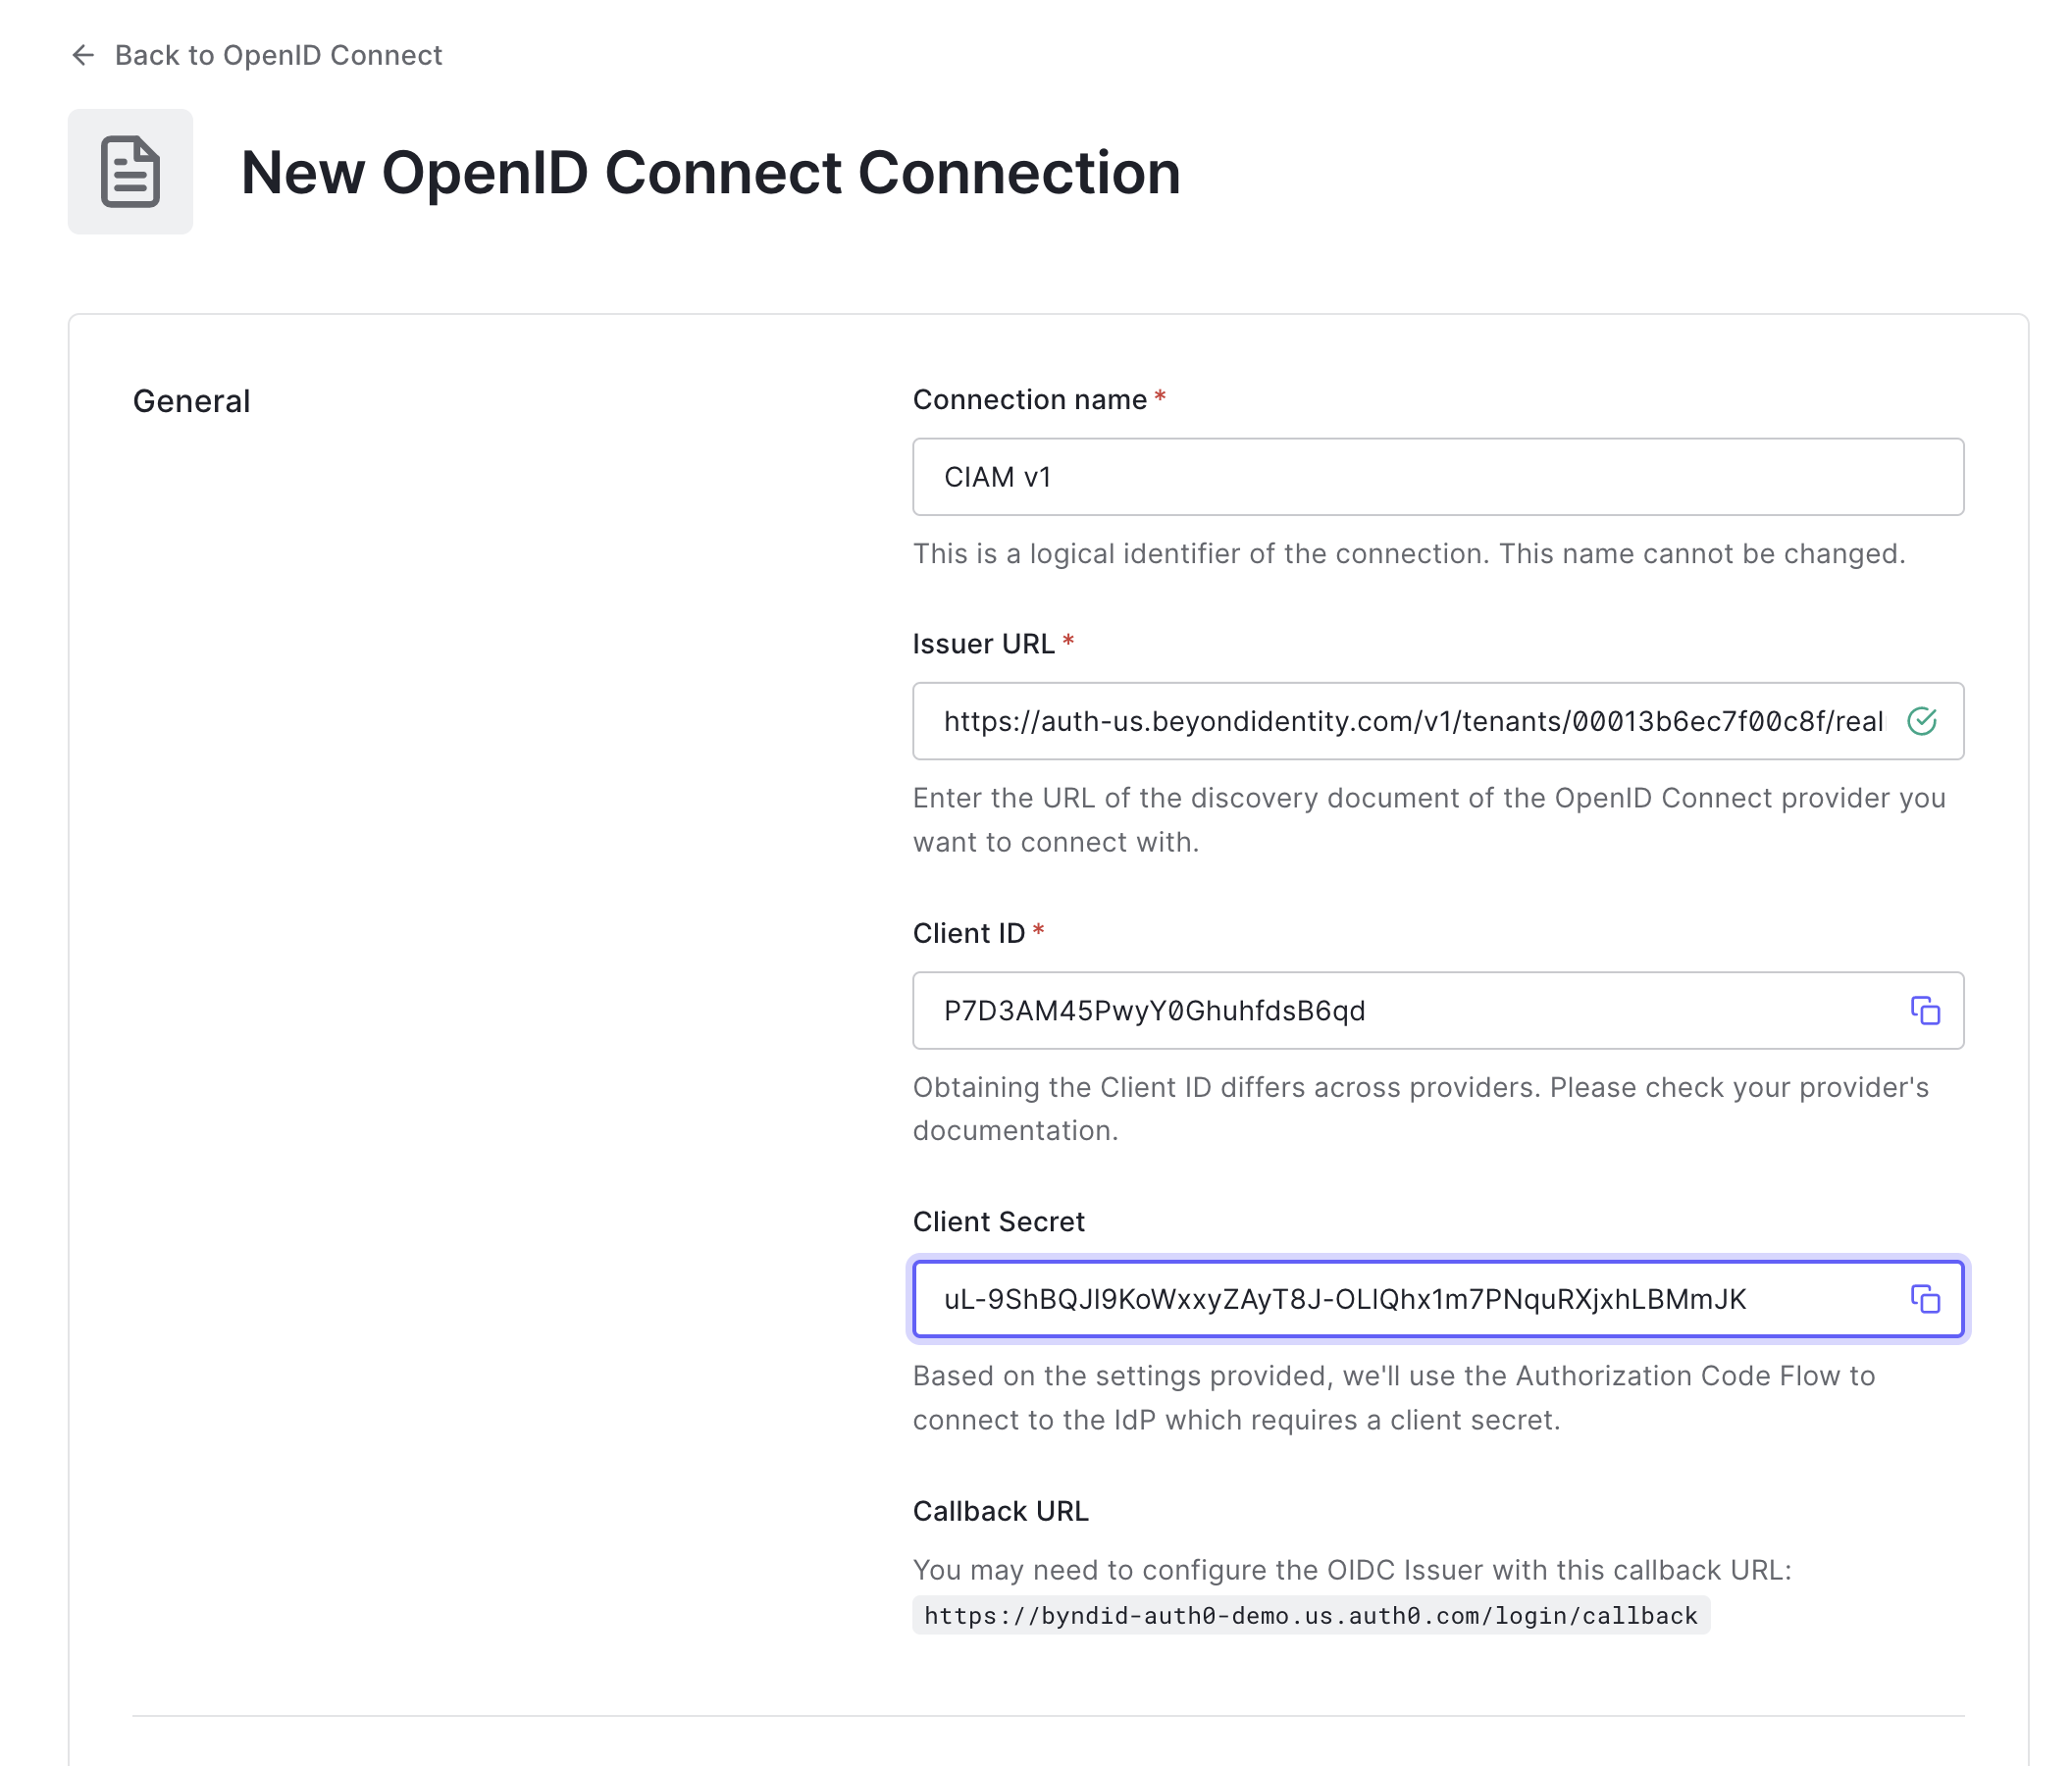
- Within the Open ID Connect menu, click Create Connection and enter the following values:
| Field | Value |
|---|---|
| Connection Name | Beyond-Identity |
| Issuer URL | Issuer corresponding to Beyond Identity app |
| Client ID | From OIDC client created in Beyond Identity |
| Client Secret | From OIDC client created in Beyond Identity |
-
Click Create.
-
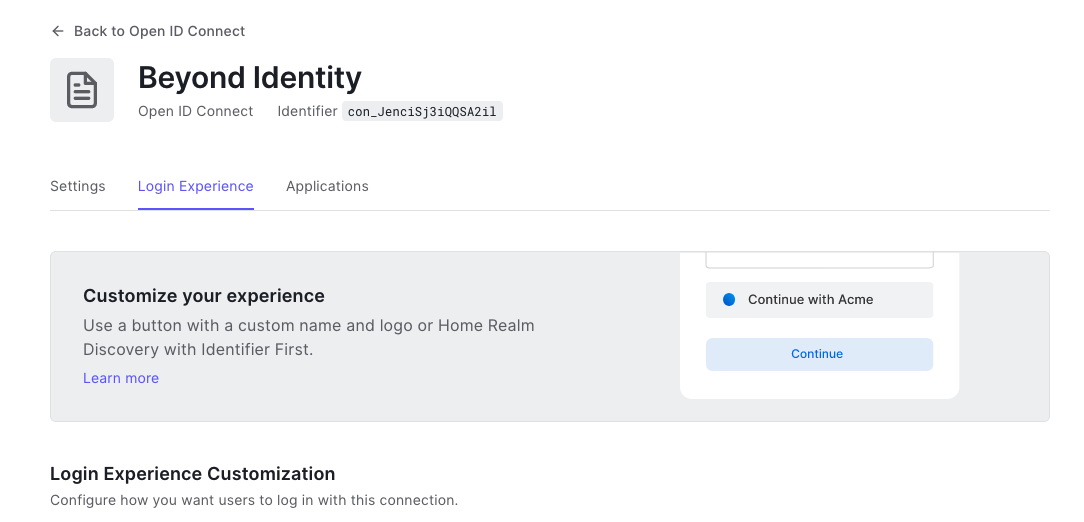
Scroll up, and click the Login Experience tab.
-
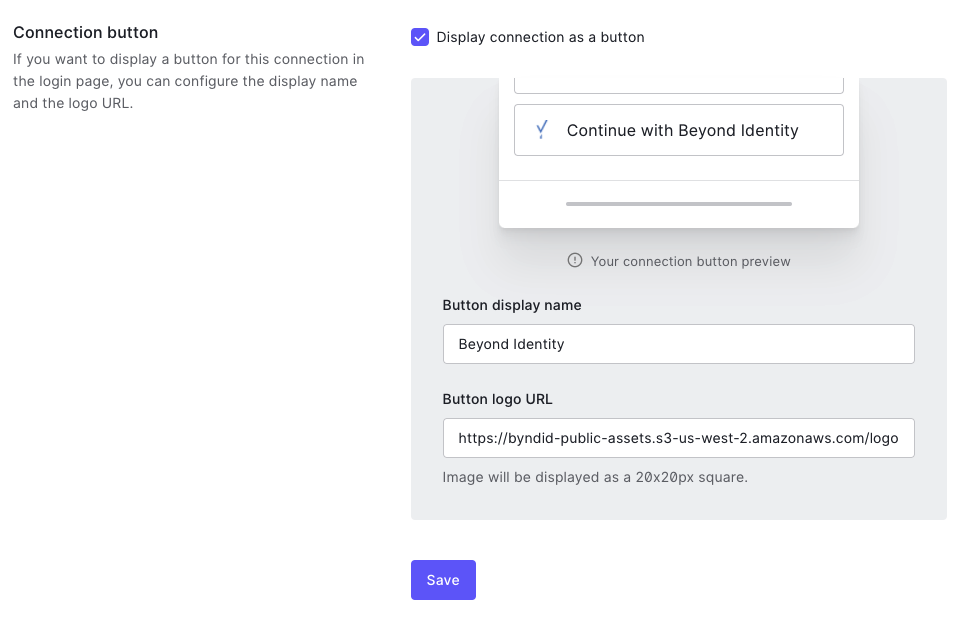
Find the Connection button section and do the following:
-
Select (enable) the Display connection as a button checkbox.
-
Enter Beyond Identity for the Button display name.
-
Add the following URL for the Button Logo URL:
https://byndid-public-assets.s3-us-west-2.amazonaws.com/logos/beyondidentity.png
-
-
Scroll down and click Save.
Custom Social OIDC Connection
-
On the left side menu, click Authentication, and from the expanded menu, click Social.
-
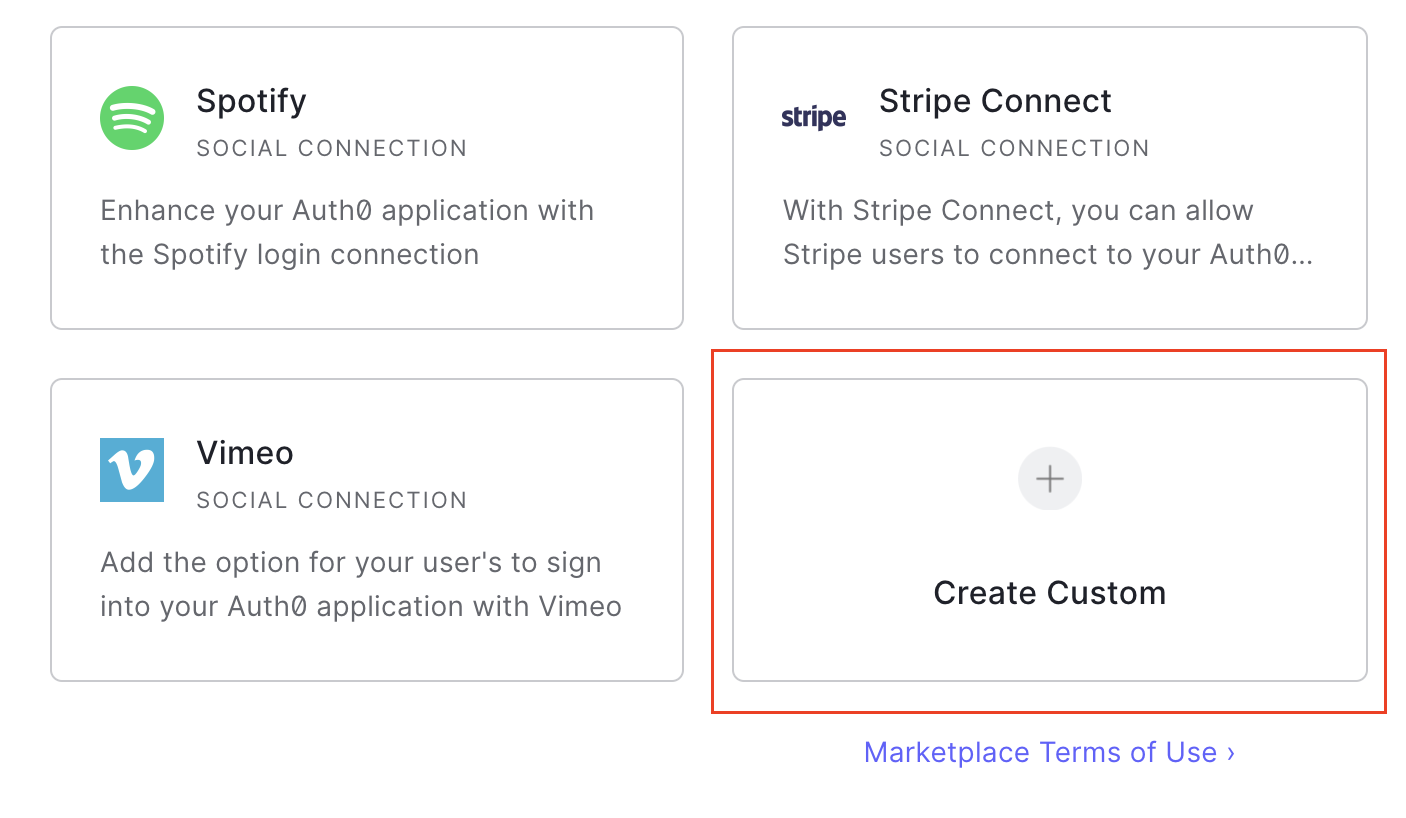
On the Social Connections page, click the + Create Connection button in the top right corner, then scroll down and select Create Custom:
- On the new connection form, enter the following values:
| Field | Value |
|---|---|
| Connection Name | Beyond-Identity |
| Authorization URL | From the Authorization Endpoint for the app created in Beyond Identity |
| Token URL | From the Token Endpoint for the app created in Beyond Identity |
| Scope | openid email |
| Client ID | From the Client ID of the app created in Beyond Identity |
| Client Secret | From the Client Secret of the app created in Beyond Identity |
- Enter the following code snippet under Fetch User profile Script:
function(accessToken, ctx, cb) {

request.get('<BEYOND_IDENTITY_BASE_URL>/userinfo',    {
      headers: {
      'Authorization': 'Bearer' + accessToken
      }
   },
   function(err, r, body) {
      if (err) {
      return cb(err);
      }
      try {
      var profile = JSON.parse(body);
      profile.provider = 'beyond';
      profile.id = profile.sub;
      profile.displayName = profile.display_name;
      profile.email = profile.email;
      cb(null, profile);
      } catch (e) {
      cb(e);
      }
   });
}
where <BEYOND_IDENTITY_BASE_URL>/userinfo is replaced with the User Info Endpoint from the app you created in Beyond Identity
- Leave the other values as default and click Create.
The connection is saved, and the Applications tab is displayed. You can now configure which applications should use this connection. Use the toggle switches to enable the connection for the applications you wish to use Beyond Identity.
-
(Optional) If you use Auth0-hosted pages, you must update the button text and button logo. Auth0 only supports this via the API at the point rather than the UI. You can follow the Auth0 docs to configure this last part:
We recommend labeling the button Beyond Identity or Passwordless.
- If you use your own login form, you can add the button manually and call the authorize endpoint specifying the connection parameter where the connection is the name of the connection you just created:
-
https://auth0.com/docs/connections/social/oauth2#log-in-using-the-custom-connection
-
Auth0's API reference: https://auth0.com/docs/api/authentication#social
Confirm Auth0 Callback URL in Beyond Identity
Check that the Auth0 callback URL is correct in the Beyond Identity OIDC integration.
-
In Auth0, under the Settings tab of the Beyond Identity OIDC connection created above, make a note of the Callback URL as shown below:

-
Navigate to the Beyond Identity Admin portal, Under Authentication click Apps.
-
Click the Auth0 app you created above.
-
Ensure that the Redirect URI value matches the value in the Auth0 connection. If the values do not match, update the value with the Callback URL from Auth0 and click Submit.
Configure Auth0 to delegate to Beyond Identity
This section of the guide describes how to configure Auth0 to delegate requests to Beyond Identity for authentication during an OAuth2 authorization flow.
In this section you will
- Configure your example app to use Auth0 for authentication, including creating the app in Auth0
- Configure Auth0 to ensure the authentication requests from the app to Auth0 can use Beyond Identity for authentication
Create the app in Auth0
In your Auth0 tenant:
-
On the left side menu, click Applications, and then Applications from the expanded menu.
-
On the Applications page, click Create Application.
-
Provide the app a name such as "NextAuth.js App" or similar and select the appropriate app type based on your platform, then click Create
-
Click the Settings tab
-
In the Allowed Callback Urls, specify a route in your app that is capable of handling the code that is returned from the authorization call and exchanging it for access and/or refresh tokens. For a web app this will be a URL, or for a native app this will be an App Scheme or Universal URL.
For example: In a Next.js application using NextAuth, your redirect URI would follow the pattern:
http://localhost:3000/api/auth/callback/auth0
-
Copy the values for Domain, Client ID, and Client Secret
-
Click Save to save the new app
Enable the app on your Beyond Identity connection in Auth0
In order for Beyond Identity to show up as an authentication option for your app, you need to enable the Beyond Identity connection for that app in Auth0:
-
In Auth0, navigate to the Enterprise or Social connection you created above for Beyond Identity.
-
Within the Enterprise or Social connection, click the Applications tab and toggle the entry for the app you have just created.
Configure Auth0 connection in the NextAuth.js sample app
Now you will create Auth0 as an OAuth provider in your app:
- JavaScript
- Kotlin
- Flutter
- React Native
- Swift
Prerequisites
This part of the integration guide uses NextAuth for all OAuth/OIDC flows. All code snippets are provided in the context of the NextAuth Example App.
Configuring NextAuth
Under next-auth-example/pages/api/auth/[...nextauth].ts, add the following Auth0 provider:
import Auth0Provider from "next-auth/providers/auth0";
...
providers: [
  Auth0Provider({
    clientId: <AUTH0_ID>,
    clientSecret: <AUTH0_SECRET>,
    issuer: <AUTH0_ISSUER>
  })
]
...
Note that you'll need to fill in the <AUTH0_ID>, <AUTH0_SECRET>, and <AUTH0_ISSUER> with the values you generated when creating your application in Auth0.
Wiring up embedded.authenticate
Create a bi-authenticate.tsx page under /next-auth-example/pages. As long as your invoke_url is configured properly, this is the page that will be redirected to during an authorization flow. copy the following code snippet into that page.
import { useEffect, useState } from "react";
import "bootstrap/dist/css/bootstrap.css";
import { Passkey } from "@beyondidentity/bi-sdk-js";

const BIAuthenticate = () => {
  const [biAuthenticateResult, setBiAuthenticateResult] = useState("");

  useEffect(() => {
    // -- 1
    const authenticate = async () => {
      const BeyondIdentityEmbeddedSdk = await import("@beyondidentity/bi-sdk-js");
      let embedded = await BeyondIdentityEmbeddedSdk.Embedded.initialize();
      if (embedded.isAuthenticateUrl(window.location.href)) {
        // Only authenticate if the URL is a "bi-authenticate" URL
        let biAuthenticateUrl = window.location.href;
        // -- 2
        biAuthenticate(biAuthenticateUrl).then(redirectUrl => {
          // -- 4
          window.location.href = redirectUrl;
        }).catch(error => {
          setBiAuthenticateResult(error.toString());
        });
      }
    }
    authenticate().catch(console.error);
  }, []);

  // -- 3
  async function biAuthenticate(url: string): Promise<string> {
    const BeyondIdentityEmbeddedSdk = await import("@beyondidentity/bi-sdk-js");
    let embedded = await BeyondIdentityEmbeddedSdk.Embedded.initialize();

    // Display passkeys so user can select one
    let passkeys = await embedded.getPasskeys();
    let promptText = passkeys.map((passkey, index) => {
      return `${index}: ${passkey.identity.username}`;
    }).join("\n");
    let selectedIndex = parseInt(prompt(promptText, "index")!!);
    if (selectedIndex >= 0 && selectedIndex < passkeys.length) {
      let selectedId = passkeys[selectedIndex].id;
      // Perform authentication using selected id
      let result = await embedded.authenticate(url, selectedId);
      return Promise.resolve(result.redirectUrl);
    } else {
      // This will fail in core as it won't match to any id
      return Promise.resolve("unknown_id");
    }
  }

  return (
    <div
      style={{
        display: 'flex',
        justifyContent: 'center',
        alignItems: 'center',
        height: '100vh',
      }}
    >
      <div className="container">
        <div className="row">
          <div className="d-flex justify-content-center">
            <div className="spinner-border" role="status">
              <span className="sr-only"></span>
            </div>
          </div>
        </div>
        <div className="row">
          {
            biAuthenticateResult.length > 0 &&
            <div className="row row-cols-1 row-cols-md-1 mt-3">
              <div className="col">
                <code>
                  {JSON.stringify(biAuthenticateResult, null, 2)}
                </code>
              </div>
            </div>
          }
        </div>
      </div>
    </div>
  );
};

export default BIAuthenticate;
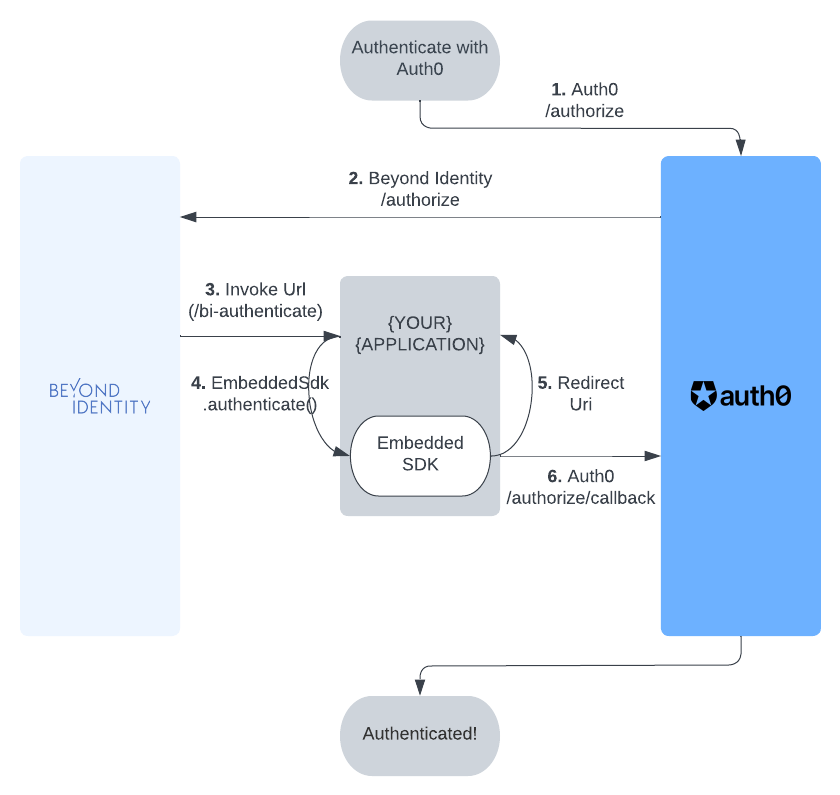
What's happening here?
- The
useEffectis only called once on page load. In this function, we initialize the Beyond Identity SDK and useembedded.isAuthenticateUrlto check if the current page that was redirected to is in fact a validbi-authenticateURL. - If the URL is valid, we pull the URL using
window.location.hrefand pass that directly intobiAuthenticatein step 3. biAuthenticatecallsembedded.authenticatewith a validbi-authenticateURL. This function performs a challenge/response against a passkey bound to your browser. Note that the callback inembedded.authenticatecontains logic in order to prompt a user to select a passkey if there is more than one.- Finally, the response of
embedded.authenticatecontains aredirectUrl. Follow this redirect URL to complete the OAuth/OIDC flow.
What does it look like?
Upon running the next auth example app and clicking on the sign in button, you'll see the provider you just added as shown in the image below. Clicking on that provider will go through an OAuth/OIDC that will result in fetching an id token that will log you in to the example app.

Prerequisites
-
Before calling
EmbeddedSdk.authenticate(), you must Authorize with Auth0.
Using an SDK
See Auth0's Developer Site for the latest Android SDKs or Widgets. This guide uses the Auth0 Android SDK.
At this time, the authorization flow cannot be completed using the SDK, so we recommend using the Web. The SDK is not designed to work with a secondary IdP. The token exchange, however, can be completed using the SDK.
Using the Web
The library follows the best practices set out in RFC 8252 - OAuth 2.0 for Native Apps, including using Custom Tabs for authorization requests. For this reason, WebView is explicitly not supported due to usability and security reasons.
Step 1. Configuring the Authenticator Config
Make sure the Authenticator Config in the Beyond Identity Console is set to type Embedded and that the Invoke URL points to your application with either an App Scheme or a Universal Link. Note: You may want to use a separate scheme for Beyond Identity and Auth0.
Step 2. Auth0 Authorize URL
To start the authorization flow, build a CustomTabsIntent, and launch the OAuth2 Authorization Request URL provided by Auth0.
val builder = CustomTabsIntent.Builder()
...
builder.build().launchUrl(context, AUTH0_URL)
Step 3. Invoke URL
A URL with the Invoke URL scheme should be triggered by the web page. The Android OS will look for an appropraite Activity to handle the Intent. In your Activity, which handles your Beyond Identity scheme, override onCreate &/ onNewIntent, and call EmbeddedSdk.authenticate(). You can confirm the validity of the URL with EmbeddedSdk.isAuthenticateUrl().
intent?.data?.let { uri ->
    when {
        EmbeddedSdk.isAuthenticateUrl(uri.toString()) -> {
            EmbeddedSdk.authenticate(
                url = uri.toString(),
                passkeyId = selectedPasskeyId,
            ) {
                ...
            }
        }
        ...
    }
}
Step 4. Redirect URL
To complete the authorization flow, build another CustomTabsIntent, and launch the redirectUrl returned from a successful AuthenticateResponse to complete the initial OAuth flow. Another url will be returned that contains an authorization code that can be used to exhange for an ID token using Auth0's token endpoint.
intent?.data?.let { uri ->
    when {
        EmbeddedSdk.isAuthenticateUrl(uri.toString()) -> {
            EmbeddedSdk.authenticate(
                url = uri.toString(),
                passkeyId = selectedPasskeyId,
            ) { result ->
                result.onSuccess { authenticateResponse ->
                    authenticateResponse.redirectUrl?.let { redirectUrl ->
                        CustomTabsIntent.Builder().build().launchUrl(context, Uri.parse(redirectUrl))
                    }
                }
            }
        }
        uri.scheme == CALLBACK_URL_SCHEME -> {
            // This URL contains authorization code and state parameters
            // Exchange the authorization code for an id_token using Auth0's token endpoint.
        }
        ...
    }
}
Full Example
private fun launchAuth0(context: Context, url: Uri = AUTH0_URL) {
    CustomTabsIntent.Builder().build().launchUrl(context, url)
}

private fun handleIntent(context: Context, intent: Intent?) {
    selectPasskeyId { selectedPasskeyId ->
        intent?.data?.let { uri ->
            when {
                EmbeddedSdk.isAuthenticateUrl(uri.toString()) -> {
                    EmbeddedSdk.authenticate(
                        url = uri.toString(),
                        passkeyId = selectedPasskeyId,
                    ) { result ->
                        result.onSuccess { authenticateResponse ->
                            authenticateResponse.redirectUrl?.let { redirectUrl ->
                                CustomTabsIntent.Builder().build().launchUrl(context, Uri.parse(redirectUrl))
                            }
                        }
                    }
                }
                uri.scheme == CALLBACK_URL_SCHEME -> {
                    // This URL contains authorization code and state parameters
                    // Exchange the authorization code for an id_token using Auth0's token endpoint.
                }
            }
        }
    }
}

private fun selectPasskeyId(callback: (String) -> Unit) {
    // Where you can perform some logic here to select a passkey, or
    // present UI to a user to enable them to select a passkey.
}
Prerequisites
-
Before calling
EmbeddedSdk.authenticate(), you must Authorize with Auth0.
Using an SDK
At the time of writing, there was no Auth0 SDK for Flutter. See Auth0's Developer Site for the latest Flutter SDKs or Widgets.
Using the Web
The library follows the best practices set out in RFC 8252 - OAuth 2.0 for Native Apps.
This guide uses the Web Auth for Flutter SDK.
Step 1. Configuring the Authenticator Config
Make sure the Authenticator Config in the Beyond Identity Console is set to type Embedded and that the Invoke URL points to your application with either an App Scheme or a Universal Link. Note: You may want to use a separate scheme for Beyond Identity and Auth0.
Step 2. Auth0 Authorize URL
To start the authorization flow, make a call to FlutterWebAuth.authenticate() with the Oauth2 Authorization Request URL provided by Auth0 and a callback url scheme.
var result = await FlutterWebAuth.authenticate(
    url: AUTH0_URL,
    callbackUrlScheme: CALLBACK_URL_SCHEME,
);
Step 3. Invoke URL
The result will be a URL with the Invoke URL scheme. You can call EmbeddedSdk.authenticate(), using the result. You can confirm the validity of the URL with EmbeddedSdk.isAuthenticateUrl().
var authenticateResponse = await Embeddedsdk.authenticate(result, selectedPasskeyId);
Step 4. Redirect URL
To complete the authorization flow, make another call to FlutterWebAuth.authenticate() with the redirectUrl returned from a successful AuthenticateResponse to complete the initial OAuth flow. Another url will be returned that contains an authorization code that can be used to exhange for an ID token using Auth0's token endpoint.
var result = await FlutterWebAuth.authenticate(
    url: authenticateResponse.redirectUrl,
    callbackUrlScheme: CALLBACK_URL_SCHEME,
);

// This URL contains authorization code and state parameters
// Exchange the authorization code for an id_token using Auth0's token endpoint.
Full Example
selectPasskeyId((selectedPasskeyId) async {
    var result = await FlutterWebAuth.authenticate(
        url: AUTH0_URL,
        callbackUrlScheme: CALLBACK_URL_SCHEME,
    );

    var authenticateResponse = await Embeddedsdk.authenticate(result, selectedPasskeyId);

    var redirectUrlResult = await FlutterWebAuth.authenticate(
        url: authenticateResponse.redirectUrl,
        callbackUrlScheme: CALLBACK_URL_SCHEME,
    );

    // This URL contains authorization code and state parameters
    // Exchange the authorization code for an id_token using Auth0's token endpoint.
});

Future<void> selectPasskeyId(Function(String) callback) async {
  // Where you can perform some logic here to select a passkey, or
  // present UI to a user to enable them to select a passkey.
}
Prerequisites
-
Before calling
Embedded.authenticate, you must Authorize with Auth0.
Using an SDK
See Auth0's Developer Site for the latest React Native SDKs or Widgets.
At this time, there is no way to intercept the first URL to authenticate with Beyond Identity, so we recommend using the Web.
Using the Web
Pick a webview library that follows the best practices set out in RFC 8252 - OAuth 2.0 for Native Apps. The library should use SFAuthenticationSession and SFSafariViewController on iOS and Custom Tabs on Android for authorization requests. UIWebView and WKWebView on iOS and WebView on Android are explicitly not supported due to the security and usability reasons explained in Section 8.12 of RFC 8252. For these reasons, unfortunately, the react-native-community/react-native-webview is not recommended. The below examples will use InAppBrowser.
Step 1. Configuring the Authenticator Config
Make sure the Authenticator Config in the Beyond Identity Console is set to type Embedded and that the Invoke URL points to your application with either an App Scheme or a Universal Link.
Step 2. Auth0 Authorize URL
To start the authorization flow, build a CustomTabsIntent or ASWebAuthenticationSession, and load the OAuth2 authorization request URL provided by Auth0. Make sure whichever webview you use shares cookies and other browsing data between the authentication session. The below example sets ephemeralWebSession to false to enable cookie re-use on iOS.
if (await InAppBrowser.isAvailable()) {
  let response = await InAppBrowser.openAuth(auth0AuthUrl, 'yourScheme://', {
    ephemeralWebSession: false,
  });
}
Step 3. Invoke URL
During the first web session, a URL with the invoke URL scheme should be returned from Auth0.
Call Embedded.authenticate with this url. You can confirm the validity of the URL with Embedded.isAuthenticateUrl.
if (await InAppBrowser.isAvailable()) {
  const response = await InAppBrowser.openAuth(auth0AuthUrl, 'yourScheme://', {
    ephemeralWebSession: false,
  });

  if (await Embedded.isAuthenticateUrl(response.url)) {
    const authResponse = await Embedded.authenticate(
      response.url,
      selectedPasskeyId
    );
  }
}
Step 4. Redirect URL
A redirectUrl is returned from a successful authenticate response that needs to be resolved by launching another web session to complete the initial OAuth flow. On completion of the second web session, another redirectUrl will be returned that contains an authorization code that can be used to exchange for an ID token.
if (await Embedded.isAuthenticateUrl(response.url)) {
  const authResponse = await Embedded.authenticate(
    response.url,
    selectedPasskeyId
  );
  if (await InAppBrowser.isAvailable()) {
    const secondWebResponse = await InAppBrowser.openAuth(
      authResponse.redirectUrl,
      'yourScheme://',
      { ephemeralWebSession: false }
    );

    // This URL contains authorization code and state parameters
    // Exchange the authorization code for an id_token using Auth0's token endpoint.
    const url = secondWebResponse.url;
  }
}
Full Example
if (await InAppBrowser.isAvailable()) {
  const response = await InAppBrowser.openAuth(auth0AuthUrl, 'yourScheme://', {
    ephemeralWebSession: false,
  });

  if (await Embedded.isAuthenticateUrl(response.url)) {
    const selectedPasskeyId = await presentPasskeySelection();
    const authResponse = await Embedded.authenticate(
      response.url,
      selectedPasskeyId
    );
    if (await InAppBrowser.isAvailable()) {
      const secondWebResponse = await InAppBrowser.openAuth(
        authResponse.redirectUrl,
        'yourScheme://',
        { ephemeralWebSession: false }
      );

      // This URL contains authorization code and state parameters
      // Exchange the authorization code for an id_token using Auth0's token endpoint.
      const url = secondWebResponse.url;
    }
  }
}

function presentPasskeySelection(): selectedPasskeyId {
  // Where you can perform some logic here to select a passkey, or
  // present UI to a user to enable them to select a passkey.
}
Prerequisites
-
Before calling
Embedded.shared.authenticate, you must Authorize with Auth0.
Using an SDK
See Auth0's Developer Site for the latest Swift SDKs.
At this time, the authorization flow cannot be completed using the SDK, so we recommend using the Web.
Using the Web
The library follows the best practices set out in RFC 8252 - OAuth 2.0 for Native Apps including using SFAuthenticationSession and SFSafariViewController on iOS for the auth request. UIWebView and WKWebView are explicitly not supported due to the security and usability reasons explained in Section 8.12 of RFC 8252.
Step 1. Configuring the Authenticator Config
Make sure the Authenticator Config in the Beyond Identity Console is set to type Embedded and that the Invoke URL points to your application with either an App Scheme or a Universal Link.
Step 2. Auth0 Authorize URL
To begin the authentication flow, start an ASWebAuthenticationSession, and load the OAuth2 authorization request URL provided by Auth0. Make sure prefersEphemeralWebBrowserSession is set to false as the browser will need to share cookies or other browsing data between the authentication session.
let session = ASWebAuthenticationSession(
    url: viewModel.auth0URL,
    callbackURLScheme: viewModel.callbackScheme
    completionHandler: { (url, error) in }
)
session.prefersEphemeralWebBrowserSession = false
session.presentationContextProvider = self
session.start()
Step 3. Invoke URL
During the session completionHandler, a URL with the invoke URL scheme should be returned from Auth0. When the webpage loads a URL, call Embedded.shared.authenticate. You can confirm the validity of the URL with Embedded.shared.isAuthenticateUrl.
let session = ASWebAuthenticationSession(
    url: viewModel.auth0URL,
    callbackURLScheme: viewModel.callbackScheme
){ (url, error) in
    guard Embedded.shared.isAuthenticateUrl(url) else {/*not valid*/}
    Embedded.shared.authenticate(
        url: url,
        id: passkeyId
    ) { result in
        switch result {
        case let .success(response):
        case let .failure(error):
        }
    }
}
Step 4. Redirect URL
A redirectUrl is returned from a successful authenticate response that needs to be resolved by launching another ASWebAuthenticationSession to complete the initial OAuth flow. On completion of the second ASWebAuthenticationSession, another redirectUrl will be returned that contains an authorization code that can be used to exchange for an ID token.
Embedded.shared.authenticate(
    url: url,
    id: passkeyId
) { result in
    switch result {
    case let .success(response):
        let newSession = ASWebAuthenticationSession(
            url: response.redirectUrl,
            callbackURLScheme: viewModel.callbackScheme
        ) { (url, error)  in
            // This URL contains authorization code and state parameters
            // Exchange the authorization code for an id_token using Auth0's token endpoint.
        }
        newSession.prefersEphemeralWebBrowserSession = false
        newSession.presentationContextProvider = self
        newSession.start()

    case let .failure(error):
    }
}
Full Example
let session = ASWebAuthenticationSession(
    url: viewModel.auth0URL,
    callbackURLScheme: viewModel.callbackScheme
){ (url, error) in
    guard Embedded.shared.isAuthenticateUrl(url) else {
        print("url is not valid")
        return
    }
    presentPasskeySelection { selectedId in
        Embedded.shared.authenticate(
            url: url,
            id: selectedId
        ) { result in
            switch result {
            case let .success(response):
                let newSession = ASWebAuthenticationSession(
                    url: response.redirectUrl,
                    callbackURLScheme: viewModel.callbackScheme
                ) { (url, error)  in
                    parseForIDToken(url)
                }
                newSession.prefersEphemeralWebBrowserSession = false
                newSession.presentationContextProvider = self
                newSession.start()

            case let .failure(error):
                print(error)
            }
        }
    }
}
session.prefersEphemeralWebBrowserSession = false
session.presentationContextProvider = self
session.start()