Integrate with Okta OIDC
With Beyond Identity, you can configure it to add passwordless authentication to your existing authentication solution.
This guide provides information on how to configure Beyond Identity as an Identity Provider for Okta using the OpenID Connect (OIDC) identity protocol.
Prerequisites
-
Access to a Beyond Identity tenant. If you don't have one, reach out to Beyond Identity Support.
-
If you do not have a Okta developer account, sign up for one.
-
Create a user in Okta that you'll use for testing. Ensure the email and username of the test user in Okta matches an account for which you can receive email. You will provision a Beyond Identity identity and passkey based on this email.
Create a new realm
Realms are unique administrative domains within a tenant. All new tenants have a default realm called Beyond Identity Admin which should not be used to configure for delegate IDP purposes.
Creating a realm from the Beyond Identity Admin Console is easy.
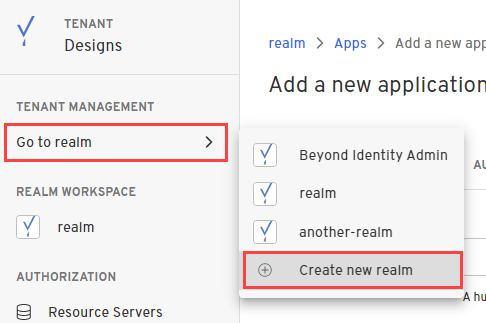
- In the Admin Console, under Tenant Management, select Go to realm > Create new realm.
-
Enter a name for your realm and click Create realm.
-
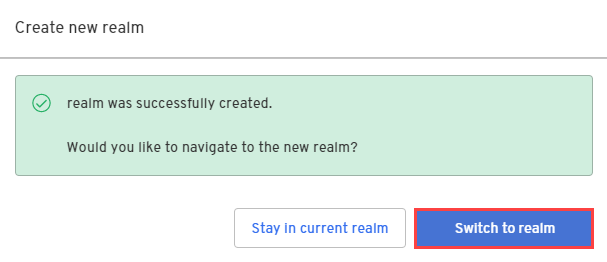
In the confirmation dialog, switch to the new realm.
Create an OIDC application
- From the Admin Console, under Authentication, select Apps > Add new app.

- Give your application a name.
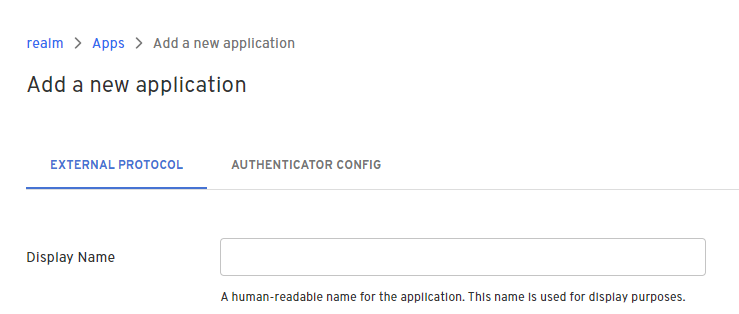
- On the External Protocol tab, under Client Configuration, set the following values:
| Field | Value |
|---|---|
| Protocol | OIDC |
| Client Type | Confidential |
| Grant Type | Authorization Code |
| Redirect URIs | https://yourokta-domain.com/oauth2/v1/authorize/callback Example: https://yourokta-domain.okta.com/oauth2/v1/authorize/callback |
| Token Endpoint Auth Method | Client Secret Post |
| Resource Server | None |
- Scroll down to Token Configuration and set the following values and click Submit.
| Field | Value |
|---|---|
| Expiration | Set to the desired expiration, for example, 604800 is one week. |
| Subject | |
| Token Signing Algorithm | RS256 |
-
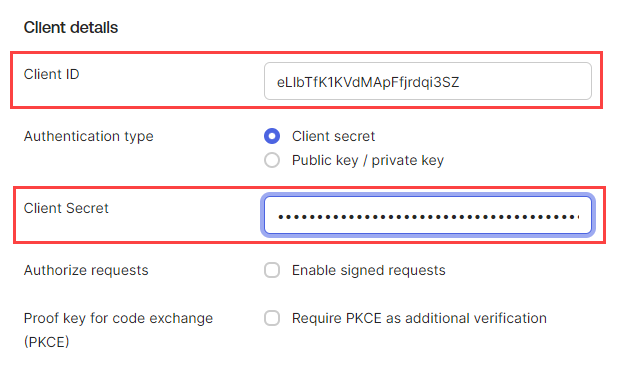
After the application is created, copy and save the following because you'll need these for the Identity provider configuration in Okta:
-
Token Endpoint
-
Authorization Endpoint
-

-
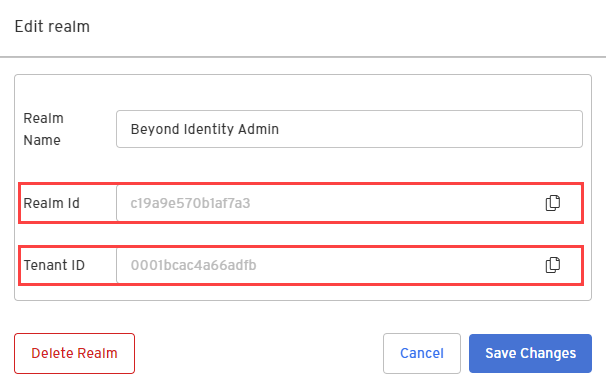
Go the the realm's dashboard and select Edit realm.
-
Copy and save the Realm Id and Tenant ID. Then click Cancel. You'll need these ID's to send the credential binding email.
Configure the identity provider in Okta
-
In Okta, select Security > Identity Providers.
-
Click Add Identity Providers, select OpenID Connect IdP, and click Next.
-
For Scopes, the only scope needed is openid, so you can remove the profile and email scopes.
-
Paste the Client ID and Client Secret values from the Okta OIDC application you created in the Beyond Identity Admin console.
- In the Endpoints section, use the following endpoint values:
You can find the Authorization and Token endpoints in the Okta OIDC application you created.
-
In the Authentication settings section, select idpuser.externalId for IdP Username.
-
Select Okta Username for Match against.
-
Click the Routing Rules tab, click Add Routing Rule, and give the rule a name.
-
From the THEN Use this identity provider drop-down, select the newly created Identity provider. The rule should match the email attribute of the test user.
-
Click Create Rule and at the prompt click Activate.
-
Click Finish and log out of Okta to test authentication with the newly provisioned identity.
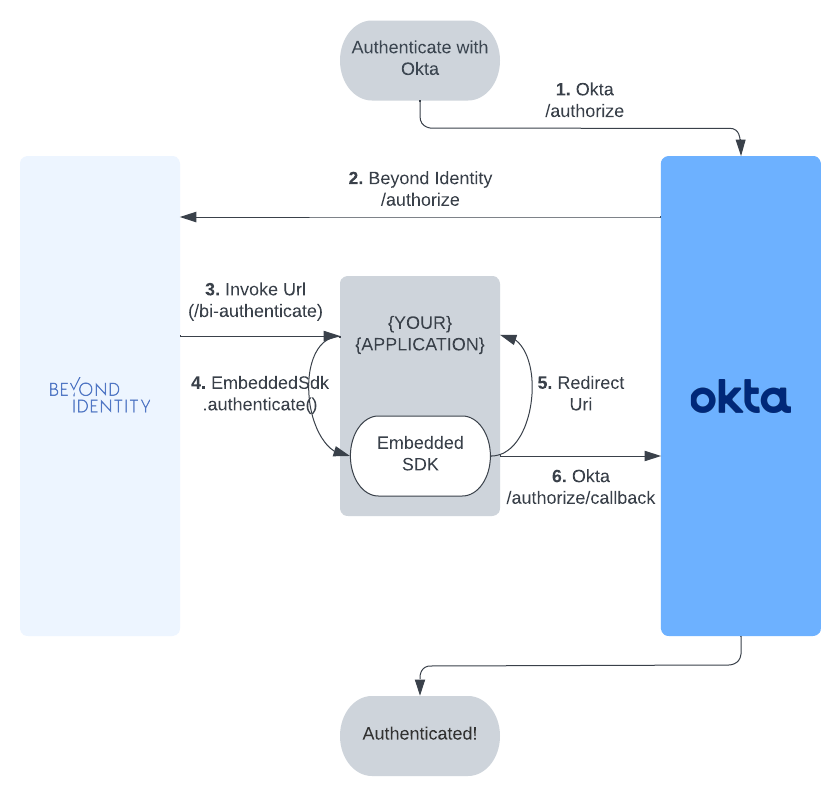
Configure Okta to delegate authorization requests to Beyond Identity
This section describes how to configure Okta to delegate to Beyond Identity for authentication during an OAuth2 authorization flow.
Okta will route authorization requests from a sample application you create using one of the platforms below to Beyond Identity.
- JavaScript
- Kotlin
- Flutter
- React Native
- Swift
Prerequisites
This part of the integration guide uses NextAuth for all OAuth/OIDC flows. All code snippets are provided in the context of the NextAuth Example App.
Configuring NextAuth
Under next-auth-example/pages/api/auth/[...nextauth].ts, add the following Okta provider:
import OktaProvider from "next-auth/providers/okta";
...
providers: [
  OktaProvider({
    clientId: <OKTA_CLIENT_ID>,
    clientSecret: <OKTA_CLIENT_SECRET>,
    issuer: <OKTA_ISSUER>
  })
]
...
You'll need to fill in the <OKTA_CLIENT_ID>, <OKTA_CLIENT_SECRET>, and <OKTA_ISSUER> with the values you generated when creating your application in Okta. See the following guide mentioned in the prerequisites.
Wiring up embedded.authenticate
Create a bi-authenticate.tsx page under /next-auth-example/pages. As long as your invoke_url is configured properly, this is the page that will be redirected to during an authorization flow. copy the following code snippet into that page.
import { useEffect, useState } from "react";
import "bootstrap/dist/css/bootstrap.css";
import { Passkey } from "@beyondidentity/bi-sdk-js";

const BIAuthenticate = () => {
  const [biAuthenticateResult, setBiAuthenticateResult] = useState("");

  useEffect(() => {
    // -- 1
    const authenticate = async () => {
      const BeyondIdentityEmbeddedSdk = await import("@beyondidentity/bi-sdk-js");
      let embedded = await BeyondIdentityEmbeddedSdk.Embedded.initialize();
      if (embedded.isAuthenticateUrl(window.location.href)) {
        // Only authenticate if the URL is a "bi-authenticate" URL
        let biAuthenticateUrl = window.location.href;
        // -- 2
        biAuthenticate(biAuthenticateUrl).then(redirectUrl => {
          // -- 4
          window.location.href = redirectUrl;
        }).catch(error => {
          setBiAuthenticateResult(error.toString());
        });
      }
    }
    authenticate().catch(console.error);
  }, []);

  // -- 3
  async function biAuthenticate(url: string): Promise<string> {
    const BeyondIdentityEmbeddedSdk = await import("@beyondidentity/bi-sdk-js");
    let embedded = await BeyondIdentityEmbeddedSdk.Embedded.initialize();

    // Display passkeys so user can select one
    let passkeys = await embedded.getPasskeys();
    let promptText = passkeys.map((passkey, index) => {
      return `${index}: ${passkey.identity.username}`;
    }).join("\n");
    let selectedIndex = parseInt(prompt(promptText, "index")!!);
    if (selectedIndex >= 0 && selectedIndex < passkeys.length) {
      let selectedId = passkeys[selectedIndex].id;
      // Perform authentication using selected id
      let result = await embedded.authenticate(url, selectedId);
      return Promise.resolve(result.redirectUrl);
    } else {
      // This will fail in core as it won't match to any id
      return Promise.resolve("unknown_id");
    }
  }

  return (
    <div
      style={{
        display: 'flex',
        justifyContent: 'center',
        alignItems: 'center',
        height: '100vh',
      }}
    >
      <div className="container">
        <div className="row">
          <div className="d-flex justify-content-center">
            <div className="spinner-border" role="status">
              <span className="sr-only"></span>
            </div>
          </div>
        </div>
        <div className="row">
          {
            biAuthenticateResult.length > 0 &&
            <div className="row row-cols-1 row-cols-md-1 mt-3">
              <div className="col">
                <code>
                  {JSON.stringify(biAuthenticateResult, null, 2)}
                </code>
              </div>
            </div>
          }
        </div>
      </div>
    </div>
  );
};

export default BIAuthenticate;
What's happening here?
- The
useEffectis only called once on page load. In this function, we initialize the Beyond Identity SDK and useembedded.isAuthenticateUrlto check if the current page that was redirected to is in fact a validbi-authenticateURL. - If the URL is valid, we pull the URL using
window.location.hrefand pass that directly intobiAuthenticatein step 3. biAuthenticatecallsembedded.authenticatewith a validbi-authenticateURL. This function performs a challenge/response against a passkey bound to your browser. Note that the callback inembedded.authenticatecontains logic in order to prompt a user to select a passkey if there is more than one.- Finally, the response of
embedded.authenticatecontains aredirectUrl. Follow this redirect URL to complete the OAuth/OIDC flow.
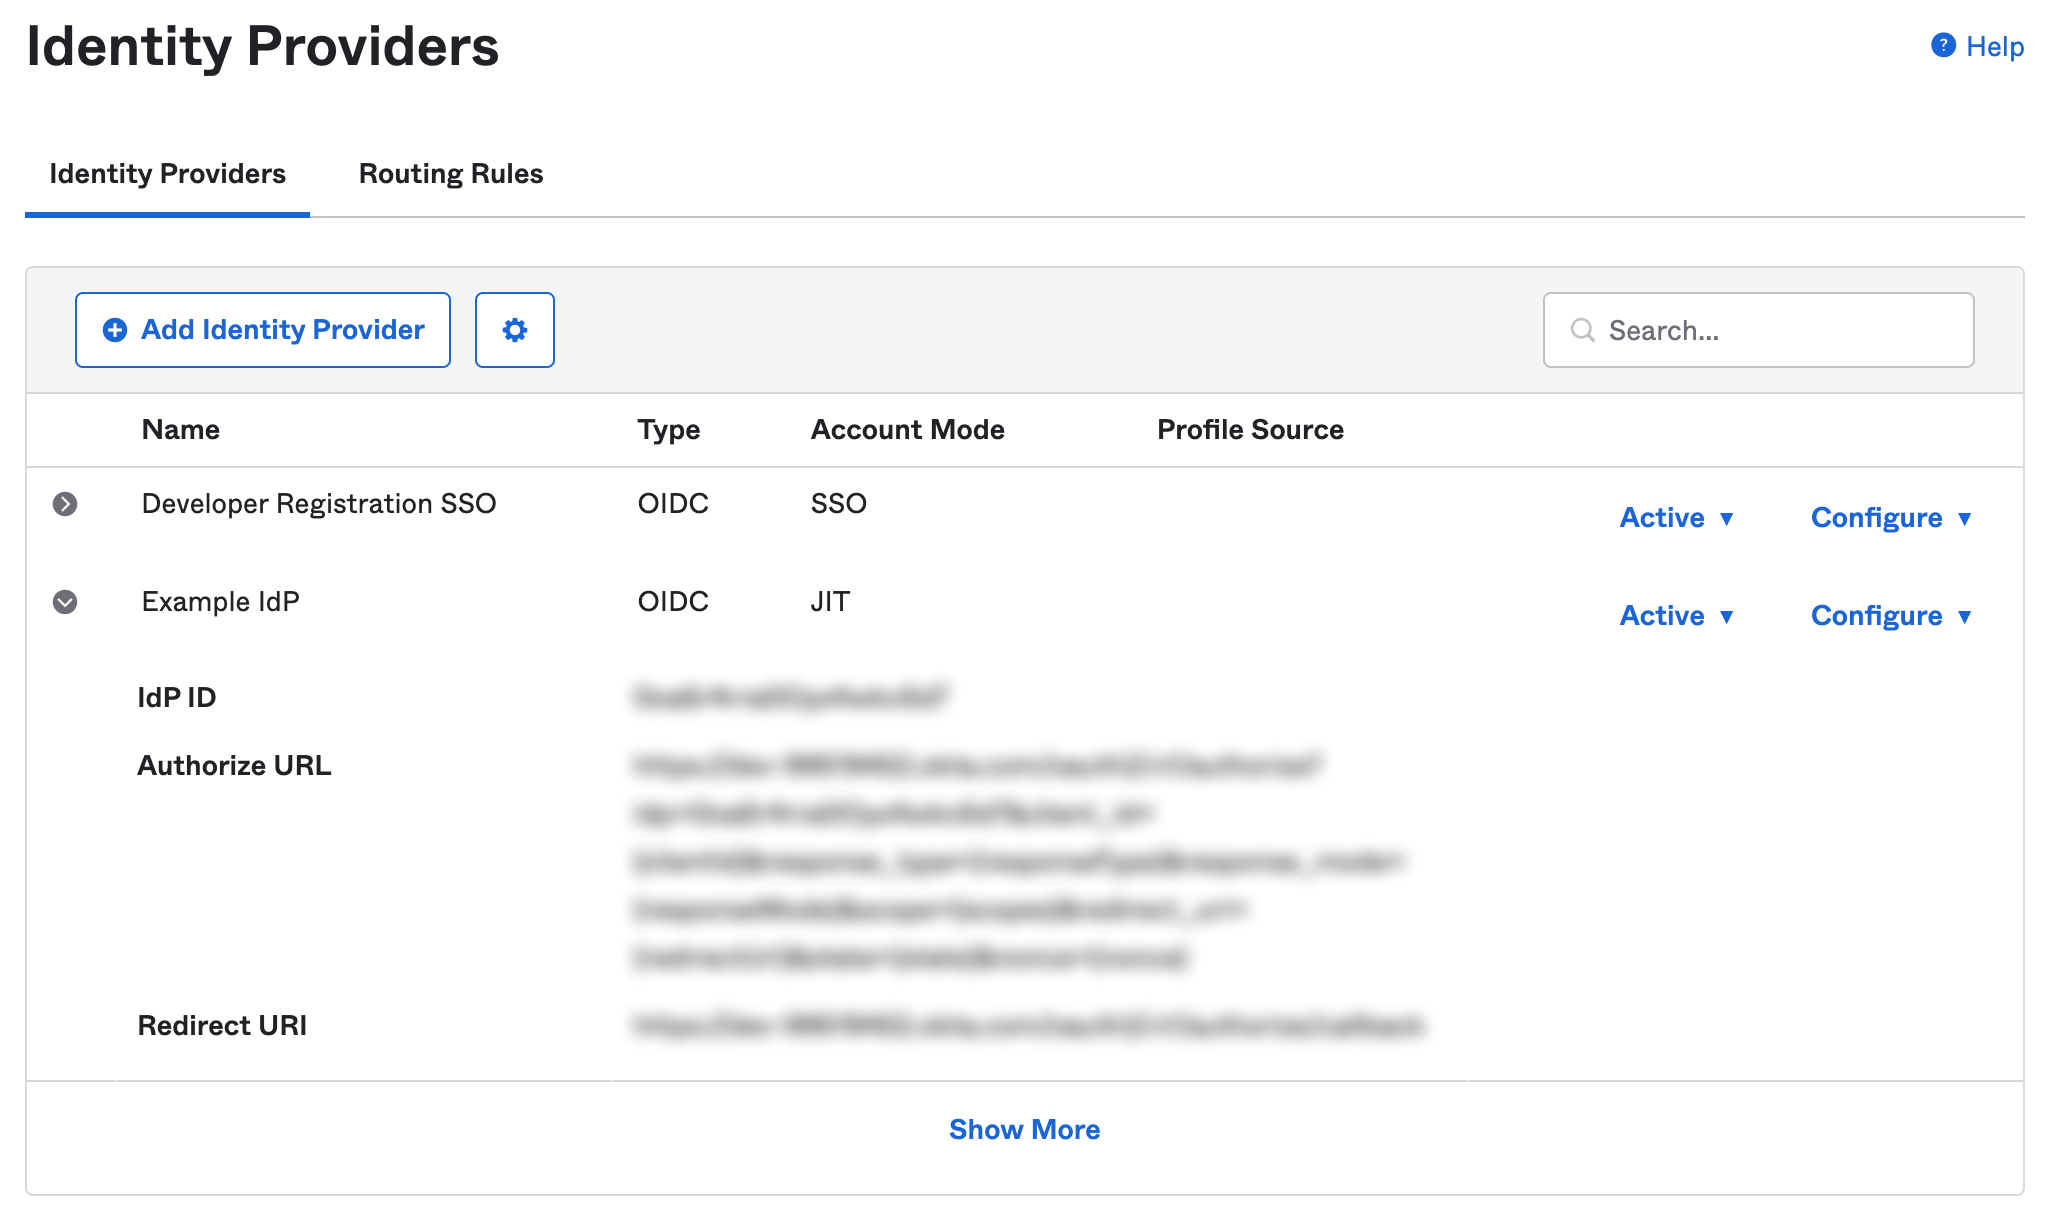
What does it look like?
Upon running the next auth example app and clicking on the sign in button, you'll see the provider you just added as shown in the image below. Clicking on that provider will go through an OAuth/OIDC that will result in fetching an id token that will log you in to the example app.

Prerequisites
-
Before calling
EmbeddedSdk.authenticate(), you must Authorize with Okta.
Using an SDK
See Okta's Developer Site for the latest Android SDKs or Widgets. This guide uses the Okta OIDC Android SDK.
At this time, the authorization flow cannot be completed using the SDK, so we recommend using the Web. The SDK is not designed to work with a secondary IdP. The token exchange, however, can be completed using the SDK.
Using the Web
The library follows the best practices set out in RFC 8252 - OAuth 2.0 for Native Apps, including using Custom Tabs for authorization requests. For this reason, WebView is explicitly not supported due to usability and security reasons.
Step 1. Configuring the Authenticator Config
Make sure the Authenticator Config in the Beyond Identity Console is set to type Embedded and that the Invoke URL points to your application with either an App Scheme or a Universal Link. Note: You may want to use a separate scheme for Beyond Identity and Okta.
Step 2. Okta Authorize URL
To start the authorization flow, build a CustomTabsIntent, and launch the OAuth2 Authorization Request URL provided by Okta.
val builder = CustomTabsIntent.Builder()
...
builder.build().launchUrl(context, OKTA_URL)
Step 3. Invoke URL
A URL with the Invoke URL scheme should be triggered by the web page. The Android OS will look for an appropraite Activity to handle the Intent. In your Activity, which handles your Beyond Identity scheme, override onCreate &/ onNewIntent, and call EmbeddedSdk.authenticate(). You can confirm the validity of the URL with EmbeddedSdk.isAuthenticateUrl().
intent?.data?.let { uri ->
    when {
        EmbeddedSdk.isAuthenticateUrl(uri.toString()) -> {
            EmbeddedSdk.authenticate(
                url = uri.toString(),
                passkeyId = selectedPasskeyId,
            ) {
                ...
            }
        }
        ...
    }
}
Step 4. Redirect URL
To complete the authorization flow, build another CustomTabsIntent, and launch the redirectUrl returned from a successful AuthenticateResponse to complete the initial OAuth flow. Another url will be returned that contains an authorization code that can be used to exhange for an ID token using Okta's token endpoint.
intent?.data?.let { uri ->
    when {
        EmbeddedSdk.isAuthenticateUrl(uri.toString()) -> {
            EmbeddedSdk.authenticate(
                url = uri.toString(),
                passkeyId = selectedPasskeyId,
            ) { result ->
                result.onSuccess { authenticateResponse ->
                    authenticateResponse.redirectUrl?.let { redirectUrl ->
                        CustomTabsIntent.Builder().build().launchUrl(context, Uri.parse(redirectUrl))
                    }
                }
            }
        }
        uri.scheme == CALLBACK_URL_SCHEME -> {
            // This URL contains authorization code and state parameters
            // Exchange the authorization code for an id_token using Okta's token endpoint.
        }
        ...
    }
}
Full Example
private fun launchOkta(context: Context, url: Uri = OKTA_URL) {
    CustomTabsIntent.Builder().build().launchUrl(context, url)
}

private fun handleIntent(context: Context, intent: Intent?) {
    selectPasskeyId { selectedPasskeyId ->
        intent?.data?.let { uri ->
            when {
                EmbeddedSdk.isAuthenticateUrl(uri.toString()) -> {
                    EmbeddedSdk.authenticate(
                        url = uri.toString(),
                        passkeyId = selectedPasskeyId,
                    ) { result ->
                        result.onSuccess { authenticateResponse ->
                            authenticateResponse.redirectUrl?.let { redirectUrl ->
                                CustomTabsIntent.Builder().build().launchUrl(context, Uri.parse(redirectUrl))
                            }
                        }
                    }
                }
                uri.scheme == CALLBACK_URL_SCHEME -> {
                    // This URL contains authorization code and state parameters
                    // Exchange the authorization code for an id_token using Okta's token endpoint.
                }
            }
        }
    }
}

private fun selectPasskeyId(callback: (String) -> Unit) {
    // Where you can perform some logic here to select a passkey, or
    // present UI to a user to enable them to select a passkey.
}
Prerequisites
-
Before calling
EmbeddedSdk.authenticate(), you must Authorize with Okta.
Using an SDK
At this time, there is no Okta SDK for Flutter, so we recommend using the Web.
See Okta's Developer Site for the latest Flutter SDKs or Widgets.
Using the Web
The library follows the best practices set out in RFC 8252 - OAuth 2.0 for Native Apps.
This guide uses the Web Auth for Flutter SDK.
Step 1. Configuring the Authenticator Config
Make sure the Authenticator Config in the Beyond Identity Console is set to type Embedded and that the Invoke URL points to your application with either an App Scheme or a Universal Link. Note: You may want to use a separate scheme for Beyond Identity and Okta.
Step 2. Okta Authorize URL
To start the authorization flow, make a call to FlutterWebAuth.authenticate() with the Oauth2 Authorization Request URL provided by Okta and a callback url scheme.
var result = await FlutterWebAuth.authenticate(
    url: OKTA_URL,
    callbackUrlScheme: CALLBACK_URL_SCHEME,
);
Step 3. Invoke URL
The result will be a URL with the Invoke URL scheme. You can call EmbeddedSdk.authenticate(), using the result. You can confirm the validity of the URL with EmbeddedSdk.isAuthenticateUrl().
var authenticateResponse = await Embeddedsdk.authenticate(result, selectedPasskeyId);
Step 4. Redirect URL
To complete the authorization flow, make another call to FlutterWebAuth.authenticate() with the redirectUrl returned from a successful AuthenticateResponse to complete the initial OAuth flow. Another url will be returned that contains an authorization code that can be used to exhange for an ID token using Okta's token endpoint.
var result = await FlutterWebAuth.authenticate(
    url: authenticateResponse.redirectUrl,
    callbackUrlScheme: CALLBACK_URL_SCHEME,
);

// This URL contains authorization code and state parameters
// Exchange the authorization code for an id_token using Okta's token endpoint.
Full Example
selectPasskeyId((selectedPasskeyId) async {
    var result = await FlutterWebAuth.authenticate(
        url: OKTA_URL,
        callbackUrlScheme: CALLBACK_URL_SCHEME,
    );

    var authenticateResponse = await Embeddedsdk.authenticate(result, selectedPasskeyId);

    var redirectUrlResult = await FlutterWebAuth.authenticate(
        url: authenticateResponse.redirectUrl,
        callbackUrlScheme: CALLBACK_URL_SCHEME,
    );

    // This URL contains authorization code and state parameters
    // Exchange the authorization code for an id_token using Okta's token endpoint.
});

Future<void> selectPasskeyId(Function(String) callback) async {
  // Where you can perform some logic here to select a passkey, or
  // present UI to a user to enable them to select a passkey.
}
Prerequisites
-
Before calling
Embedded.authenticate, you must Authorize with Okta.
Using an SDK
See Okta's Developer Site for the latest React Native SDKs or Widgets.
At this time, there is no way to intercept the first URL to authenticate with Beyond Identity, so we recommend using the Web.
Using the Web
Pick a webview library that follows the best practices set out in RFC 8252 - OAuth 2.0 for Native Apps. The library should use SFAuthenticationSession and SFSafariViewController on iOS and Custom Tabs on Android for authorization requests. UIWebView and WKWebView on iOS and WebView on Android are explicitly not supported due to the security and usability reasons explained in Section 8.12 of RFC 8252. For these reasons, unfortunately, the react-native-community/react-native-webview is not recommended. The below examples will use InAppBrowser, however, we noticed some issues with caching the authentication session on Android with InAppBrowser.
Step 1. Configuring the Authenticator Config
Make sure the Authenticator Config in the Beyond Identity Console is set to type Embedded and that the Invoke URL points to your application with either an App Scheme or a Universal Link.
Step 2. Okta Authorize URL
To start the authorization flow, build a CustomTabsIntent or ASWebAuthenticationSession, and load the OAuth2 authorization request URL provided by Okta.
By default, ephemeralWebSession is set to false, which means cookies or other browsing data will be shared across the authentication session and the user will not need to sign in again if they are already authenticated on the system browser. However, the example below sets ephemeralWebSession to true so that the user is prompted each time for demo consistency.
if (await InAppBrowser.isAvailable()) {
  let response = await InAppBrowser.openAuth(oktaAuthUrl, 'yourScheme://', {
    ephemeralWebSession: true,
  });
}
Step 3. Invoke URL
During the first web session, a URL with the invoke URL scheme should be returned from Okta.
Call Embedded.authenticate with this url. You can confirm the validity of the URL with Embedded.isAuthenticateUrl.
if (await InAppBrowser.isAvailable()) {
  const response = await InAppBrowser.openAuth(oktaAuthUrl, 'yourScheme://', {
    ephemeralWebSession: true,
  });

  if (await Embedded.isAuthenticateUrl(response.url)) {
    const authResponse = await Embedded.authenticate(
      response.url,
      selectedPasskeyId
    );
  } else {
    /*
        session may be cached and the user is already logged in.
        Try to exchange the authorization code for an id_token using Okta's token endpoint.
    */
  }
}
Step 4. Redirect URL
A redirectUrl is returned from a successful authenticate response that needs to be resolved by launching another web session to complete the initial Okta flow. On completion of the second web session, another redirectUrl will be returned that contains an authorization code that can be used to exchange for an ID token.
if (await Embedded.isAuthenticateUrl(response.url)) {
  const authResponse = await Embedded.authenticate(
    response.url,
    selectedPasskeyId
  );
  if (await InAppBrowser.isAvailable()) {
    const secondWebResponse = await InAppBrowser.openAuth(
      authResponse.redirectUrl,
      'yourScheme://',
      { ephemeralWebSession: true }
    );

    // This URL contains authorization code and state parameters
    // Exchange the authorization code for an id_token using Okta's token endpoint.
    const url = secondWebResponse.url;
  }
}
Full Example
if (await InAppBrowser.isAvailable()) {
  const response = await InAppBrowser.openAuth(oktaAuthUrl, 'yourScheme://', {
    ephemeralWebSession: false,
  });

  if (await Embedded.isAuthenticateUrl(response.url)) {
    const selectedPasskeyId = await presentPasskeySelection();
    const authResponse = await Embedded.authenticate(
      response.url,
      selectedPasskeyId
    );
    if (await InAppBrowser.isAvailable()) {
      const secondWebResponse = await InAppBrowser.openAuth(
        authResponse.redirectUrl,
        'yourScheme://',
        { ephemeralWebSession: true }
      );

      // This URL contains authorization code and state parameters
      // Exchange the authorization code for an id_token using Okta's token endpoint.
      const url = secondWebResponse.url;
    }
  }
}

function presentPasskeySelection(): selectedPasskeyId {
  // Where you can perform some logic here to select a passkey, or
  // present UI to a user to enable them to select a passkey.
}
Prerequisites
-
Before calling
Embedded.shared.authenticate, you must Authorize with Okta.
Using an SDK
See Okta's Developer Site for the latest Swift SDKs.
At this time, the authorization flow cannot be completed using the SDK, so we recommend using the Web.
Using the Web
The library follows the best practices set out in RFC 8252 - OAuth 2.0 for Native Apps including using SFAuthenticationSession and SFSafariViewController on iOS for the auth request. UIWebView and WKWebView are explicitly not supported due to the security and usability reasons explained in Section 8.12 of RFC 8252.
Step 1. Configuring the Authenticator Config
Make sure the Authenticator Config in the Beyond Identity Console is set to type Embedded and that the Invoke URL points to your application with either an App Scheme or a Universal Link.
Step 2. Okta Authorize URL
To begin the authentication flow, start an ASWebAuthenticationSession, and load the OAuth2 authorization request URL provided by Okta.
By default, prefersEphemeralWebBrowserSession is set to false, which means cookies or other browsing data will be shared across the authentication session and the user will not need to sign in again if they are already authenticated on the system browser. However, the example below sets prefersEphemeralWebBrowserSession to true so that the user is prompted each time for demo consistency.
let session = ASWebAuthenticationSession(
    url: viewModel.oktaURL,
    callbackURLScheme: viewModel.callbackScheme
    completionHandler: { (url, error) in }
)
session.prefersEphemeralWebBrowserSession = true
session.presentationContextProvider = self
session.start()
Step 3. Invoke URL
During the session completionHandler, a URL with the invoke URL scheme should be returned from Okta. When the webpage loads a URL, call Embedded.shared.authenticate. You can confirm the validity of the URL with Embedded.shared.isAuthenticateUrl.
let session = ASWebAuthenticationSession(
    url: viewModel.oktaURL,
    callbackURLScheme: viewModel.callbackScheme
){ (url, error) in
    guard Embedded.shared.isAuthenticateUrl(url) else {
        /*
            session may be cached and the user is already logged in.
            Try to exchange the authorization code for an id_token using Okta's token endpoint.
        */
    }
    Embedded.shared.authenticate(
        url: url,
        id: passkeyId
    ) { result in
        switch result {
        case let .success(response):
        case let .failure(error):
        }
    }
}
Step 4. Redirect URL
A redirectUrl is returned from a successful authenticate response that needs to be resolved by launching another ASWebAuthenticationSession to complete the initial OAuth flow. On completion of the second ASWebAuthenticationSession, another redirectUrl will be returned that contains an authorization code that can be used to exchange for an ID token.
Embedded.shared.authenticate(
    url: url,
    id: passkeyId
) { result in
    switch result {
    case let .success(response):
        let newSession = ASWebAuthenticationSession(
            url: response.redirectUrl,
            callbackURLScheme: viewModel.callbackScheme
        ) { (url, error)  in
            // This URL contains authorization code and state parameters
            // Exchange the authorization code for an id_token using Okta's token endpoint.
        }
        newSession.presentationContextProvider = self
        newSession.prefersEphemeralWebBrowserSession = true
        newSession.start()

    case let .failure(error):
    }
}
Full Example
let session = ASWebAuthenticationSession(
    url: viewModel.oktaURL,
    callbackURLScheme: viewModel.callbackScheme
){ (url, error) in
    guard Embedded.shared.isAuthenticateUrl(url) else {
        print("url is not valid")
        return
    }
    presentPasskeySelection { selectedId in
        Embedded.shared.authenticate(
            url: url,
            id: selectedId
        ) { result in
            switch result {
            case let .success(response):
                let newSession = ASWebAuthenticationSession(
                    url: response.redirectUrl,
                    callbackURLScheme: viewModel.callbackScheme
                ) { (url, error)  in
                    parseForIDToken(url)
                }
                newSession.prefersEphemeralWebBrowserSession = true
                newSession.presentationContextProvider = self
                newSession.start()

            case let .failure(error):
                print(error)
            }
        }
    }
}
session.prefersEphemeralWebBrowserSession = true
session.presentationContextProvider = self
session.start()