Integrate with Google Identity Platform and Firebase
In this walkthrough, you'll add passkey-based sign-on for Google Identity Platform identities to a Javascript web app using the Firebase SDK.
As shown in the diagram below, the web app sends an OIDC sign-on request to the Google Identity Platform, which sends an OIDC request to Beyond Identity.
Beyond Identity authenticates the user via passkey and then issues a token to the Google Identity Platform, which verifies the Beyond Identity token (the IDP token) and issues a token for the user to sign in to your web app.

Prerequisites
These are the things you'll need for this walkthrough.
-
Beyond Identity tenant. If you don't have one, reach out to Beyond Identity Support.
-
A Google Cloud project with Identity Platform enabled, upgraded to Firebase Authentication with Identity Platform.
noteThe upgrade to Firebase Authentication includes OpenId Connect support, which is required for this guide. For more details, see Google's Identity Platform pricing by authentication type.
-
Development tools
-
An IDE such as VS Code. The steps below presume VS Code.
-
Verify that node.js and npm are both installed.
node -v
npm -v -
Create the Google/Firebase project
Create the project using one of the following methods:
-
For an existing Google Cloud project created via the Google Cloud Identity Platform console, open the Firebase console, click Add project, and select your existing Google Cloud project in the project name drop down.
-
Create a project directly in the Firebase console.
Need help with the relationship between Google Cloud projects and Firebase projects? See the support note of Google's What is a Firebase Project?.
Add a web app to the Google/Firebase project
-
Select your project from the Firebase console project overview page.
-
Click Add app and select Web app.
-
Give the app a name and click Register app.
The UI presents a web snippet with the rest of the config required. It should look like the example below. You'll need this for your web app's code, but we'll let you know how to retrieve it later. Still, feel free to save this in a text file for now.
const firebaseConfig = {
   //your Firebase web app config here:
   apiKey: "{your_api_key}",
   authDomain: "{your_project_name}.firebaseapp.com",
   projectId: "{your_project_id}",
   storageBucket: "{your_project_id}.appspot.com",
   messagingSenderId: "{your_sender_id}",
   appId: "{your_app_id}"
};
Configure your Beyond Identity tenant
In this section, you'll create the app that represents Google within your Beyond Identity tenant. There are two steps: create a realm and create the app.
Log in to your tenant
Log into the Admin Console to access the tenant you created when you signed up for a free developer account. Depending on the region you selected when you signed up, you can access the Beyond Identity Admin Console for your tenant at the following:
If you have trouble getting in, try using the same computer and browser you used when you signed up.
Create a Realm
Next, you'll create a new realm in your tenant. A realm is just a logical grouping that helps you apply policy later.
Creating a realm from the Beyond Identity Admin Console is easy.
- In the Admin Console, under Tenant Management, select Go to realm > Create new realm.
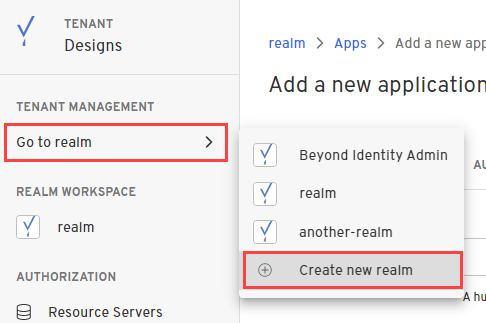
-
Enter a name for your realm and click Create realm.
-
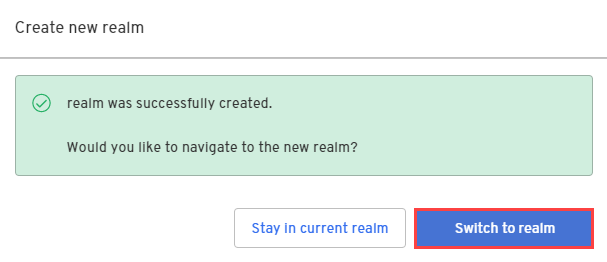
In the confirmation dialog, switch to the new realm.
Create Google Identity Platform as an OIDC app
Now we'll create an app in Beyond Identity to represent the Google Identity Platform.
- From the Admin Console, under Authentication, select Apps > Add new app.

- Give your application a name.
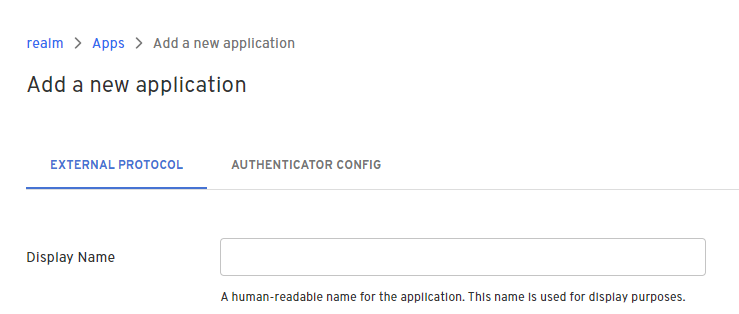
- On the External Protocol tab, use the following values to complete this tab.
| Property | Value |
|---|---|
| Protocol | OIDC |
| Client Type | Confidential |
| PKCE | Disabled |
| Redirect URIs | You'll get this from Google later in this guide, so enter a placeholder URL such as http://someexample.com for now. Your real redirect URI follows the pattern: https://{your_google-firebase_project_name}.firebaseapp.com/__/auth/handler. |
| Token Endpoint Auth Method | Client Secret Basic |
| Grant Type | Authorization Code |
| All other options | Use the recommended values for the remaining options |
-
Click the Authenticator Config tab and select Hosted Web as the Configuration Type. It's the simplest type of authenticator configuration, where Beyond Identity handles the passkey creation and selection experience. For more information on authenticator configuration types, see authenticator configurations.
-
Click Submit to save the new app.
Create an OIDC identity provider for Beyond Identity
-
Navigate to your Google/Firebase project's Providers page in either the Google or the Firebase console:
-
Firebase Console - Select your project and then select Authentication > Sign-in method.
noteYou can add CORS-authorized domains to the Google console for your test app. The firebase.app domains, as well as localhost are there by default, so you should not have to add any values
-
Click Add New Provider and select the OpenID Connect custom provider.
-
Under Configure OIDC Provider, add the following configuration:
| Property | Value |
|---|---|
| Grant Type | Code flow |
| Name | Provide any name. Take note of the resulting Provider ID displayed below the input field. It follows the pattern oidc.your-provider-name. You'll need this for your web app code. |
| Client ID | Copy the Client ID from your BI app's configuration, External Protocol tab |
| Issuer (URL) | Copy the Issuer from your BI app's configuration, External Protocol tab |
| Client Secret | Copy the Client Secret from your BI app's configuration, External Protocol tab |
- Beneath the above OIDC configuration, go to the section containing a callback URL and take a note of the URL. You'll need it for the next step below.

- Go to the Beyond Identity Admin Console, and paste the callback URL to your app's Redirect URIs on the External Protocol configuration tab.

Create a BI identity and passkey for testing
Next, you'll create a new identity and then bind a passkey to it so you can test your app.
Create an identity
Create the identity in the same realm as the test app.
-
From the Admin Console, under Directory, select Identities > Add identity.
-
Enter the name, username, and email of the new identity you're adding.

- Click Add Identity.
Bind passkey to identity
-
In the Admin Console, under Directory, select Identities.
-
Select the identity you want to bind a passkey to and click Add a passkey.
-
Select the app and then select Send an email to user.
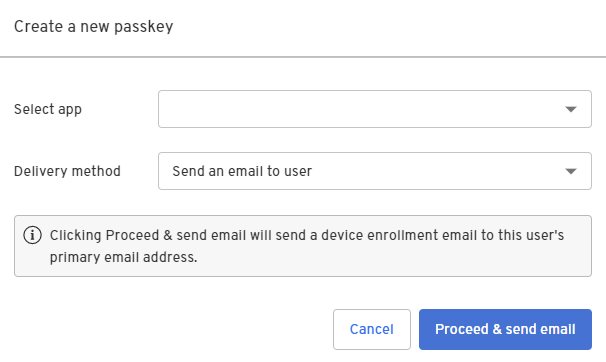
- Click Proceed & send email.
A device enrollment email is sent to your user's primary email address with a link to create their passkey. Clicking or tapping the link redirects your user to the Beyond Identity Cloud. The Beyond Identity Cloud then looks up the Authenticator Config associated with that passkey creation link. Finally, it redirects your user to your application using the Authenticator Config's Invoke URL specified.
Create the app in VS Code
At this point, you have completed the configuration steps in Google/Firebase and Beyond Identity. The next step is to create your web app.
The following steps walk you through the key steps to integrating Google/Firebase auth using Beyond Identity into your app. Refer to a complete example app.
You can find a helpful Firebase video, which is located in Google's Add Firebase to your JavaScript project article.
Install the Firebase SDK in a VS Code project
You'll create a new VS Code project and install the Firebase SDK.
-
Create a new folder for your project on the development machine.
-
In VS Code, select File > Open Folder and select your folder.
-
Select View > Terminal to open a terminal.
-
Initialize your package.json file and install the Firebase node modules:
npm init
npm install firebase
npm install firebase-tools
Configure the firebaseConfig file
-
In VS Code, at the top level of your app, create the src folder.
-
In the src folder, create an index.js and add the following:
import { initializeApp } from "firebase/app";
import { getAuth, signInWithRedirect, OAuthProvider, signOut, onAuthStateChanged, getRedirectResult, signInWithCredential } from "firebase/auth";

const firebaseConfig = {
  //your Firebase web app config here
};
- Within the firebaseConfig object, add the Firebase configuration parameters for your web app.
You can retrieve the config snippet via the Firebase console project overview page. In your project, click the settings icon (gear) in the left sidebar, select Project settings, and scroll down to Your apps > Web apps.
import { initializeApp } from "firebase/app";
import { getAuth, signInWithRedirect, OAuthProvider, signOut, onAuthStateChanged, getRedirectResult, signInWithCredential } from "firebase/auth";

//UPDATE THE CONST BELOW WITH YOUR FIREBASE PROJECT CONFIG:
//You can retrieve the config snippet via the Firebase console project overview page: https://console.firebase.google.com/u/0/,
// In your project, click the settings icon (gear) in the left sidebar, select **Project settings**, and scroll down to **Your apps > Web apps**.

const firebaseConfig = {
  //your firebase web app config here:
  apiKey: "{your_api_key}",
  authDomain: "{your_project_name}.firebaseapp.com",
  projectId: "{your_project_id}",
  storageBucket: "{your_project_id}.appspot.com",
  messagingSenderId: "{your_sender_id}",
  appId: "{your_app_id}"
};
Build out the auth flow
The following code snippets show the key pieces of the auth flow for your web app. To see them in context, refer to the example app.
Initialize Firebase objects
At the entry point to your web app, you'll need to initialize the Firebase objects that the other functions will use.
// Initialize Firebase
const app = initializeApp(firebaseConfig);

//create provider
const provider = new OAuthProvider("oidc.bi-oidc");

//add scope to request email claim
provider.addScope('email');

//create auth object (used for auth functions)
const auth = getAuth(app);
Add Sign-in and Sign-out functions
Next, you'll need sign-in and sign-out functions. For sign-in, there is sign-in via redirect (signInWithRedirect), popup (signInWithPopup), or directly by providing credentials to the function call (signInWithCredential). The below example shows sign-in with redirect:
  //initiate sign-in flow using redirect (vs. popup)
  async function signInWithBIRedirect() {
    console.log('sign-in via redirect...');

    await signInWithRedirect(auth, provider);

  }
In Firebase, the sign-in functions have explicit functions to retrieve their results. You can use the below function in your page to retrieve the results of a redirect-based sign-in. If no sign-in has taken place, the function will return null:
//get results of the 'await signInWithRedirect(auth, provider);' call
//returns null if we are refreshing the page
//upon returning from a sign-in via redirect, will return a UserCredential or an error
getRedirectResult(auth).then((result) => {
  if (result) {
    //parse id token
    result.user.getIdTokenResult().then((idTokenResult) => {
      //get id token claims
    }
  }).catch((error) => {
    //handle sign-in error
  })
Finally, the sign-out call is straightforward:
  //initiate sign-out
  function signOutUser() {
    signOut(getAuth());
    statusResult.innerHTML = ``;
  }
Add auth state observer
To keep track of auth state, you can register a function to execute every time the auth state changes. For example, you can update the UI accordingly.
  //subscribe to auth state changes
  onAuthStateChanged(auth, authStateObserver);
//auth state change observer function - this will fire each time auth state changes or the page refreshes
async function authStateObserver(user) {
      if (user) {
        //if there is a signed-in user in the context:

        //show UI elements for sign-out

        //get information from id token
        let idTokenResult = await user.getIdTokenResult();

        if (idTokenResult) {
          //update UI with id token claims
        }
      } else {
        //show UI elements for sign-in

      }
  }
Download the example app
The code snippets above showed you the key JavaScript functions required to add sign-in and sign-out to your app. Refer to our example app for a complete example showing those functions in context.
Run the example app
Use the following steps in the VS Code terminal to clone the example app, install dependencies, generate client-side code, and execute the app:
git clone https://github.com/sublimezeal/bi-goog-firebase-example.git
cd bi-goog-firebase-example
npm install
.\node_modules\.bin\webpack
serve dist
Then, navigate a browser to http://localhost:3000.
References
The following are links used for this guide.