Integrate with AWS Cognito
This guide provides information on how to set up Beyond Identity as a passwordless authentication provider for an AWS Cognito User Pool.
In this guide, you will:
- Configure Beyond Identity as an OIDC provider for AWS Cognito
- Configure AWS Cognito as an OIDC client in Beyond Identity
- Test the authorization code flow using the Amazon Cognito-hosted UI
Prerequisites
Before configuring OIDC integration between Beyond Identity and AWS Cognito, you must have a Beyond Identity tenant and realm and an AWS user pool.
Create your Beyond Identity tenant
If you still need to create your Beyond Identity tenant, reach out to Beyond Identity Support.
Now that you have your tenant, log in. You can access the Beyond Identity Admin Console for your tenant at BI admin console US or BI admin console EU, depending on your tenant region.
If you're signing in from a different computer or browser, you can enter the email address associated with your account. Beyond Identity will send you a one-time link to sign in and enroll a passkey from the new browser.
Next, you'll create a new realm and switch to that realm in your tenant. A realm is just a logical grouping that helps you apply policy later.
Create a new realm in Beyond Identity
By default, you have only the Beyond Identity Admin Realm in your tenant. In this step, you'll create a new realm to hold the app and identities you'll create using this guide.
Creating a realm from the Beyond Identity Admin Console is easy.
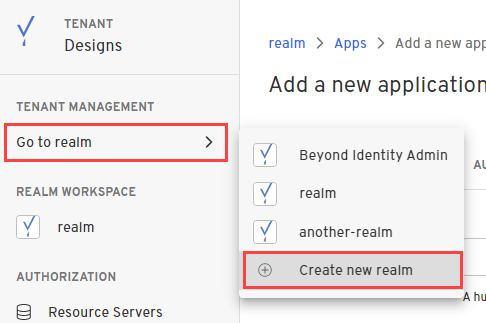
- In the Admin Console, under Tenant Management, select Go to realm > Create new realm.
-
Enter a name for your realm and click Create realm.
-
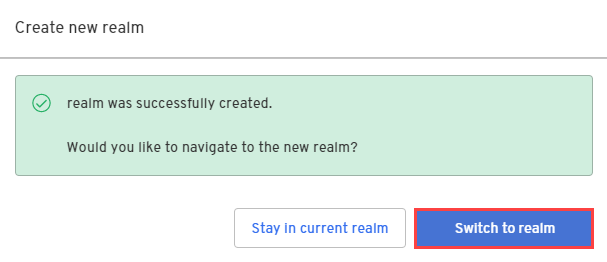
In the confirmation dialog, switch to the new realm.
Create a User Pool in AWS
The AWS user pool connects your AWS apps to the Beyond Identity OIDC provider. Follow the steps below to create the user pool.
-
Go to the AWS Console and select User pools.
-
Select Create user pool.
-
In the Configure sign-in experience section, do the following:
-
Select the Federated identity providers option, under Provider types.
-
Select Email under Cognito user pool sign-in options.
-
Under Federated sign-in options, select OpenID Connect.
-
-
In the Configure security requirements section, under MFA methods, select Authenticator apps.
-
In the Connect federated identity providers section, click Skip for now, and then click Next. You'll add add the OIDC provider after we create it later.
-
In the Integrate your app section, do the following:
-
Provide a User pool name.
-
Under Domain, select Use a Cognito domain under Domain type.
-
Under Domain, enter a domain prefix under Cognito domain.
-
under Initial app client, enter an App client name.
-
Under Allowed callback URLs, enter a callback URL for your app, such as 'http://localhost:3000'.
-
-
In the Review and create section, click Create user pool.
Part of the default configuration for your App client is that the client type is Public and the Authentication flow is ALLOW_USER_SRP_AUTH
Configure OIDC between Beyond Identity and AWS
Create AWS as an OIDC client in Beyond Identity
In this section, you'll create a resource server and app in your Beyond Identity realm to represent AWS Cognito.
Create a resource server
- First, click Go to realm and select the realm in which you wish to create the resource server. This should be the realm of the application that you wish to link to the resource server.
- Under Authorization, select Resource Servers.
- Click Create resource server.
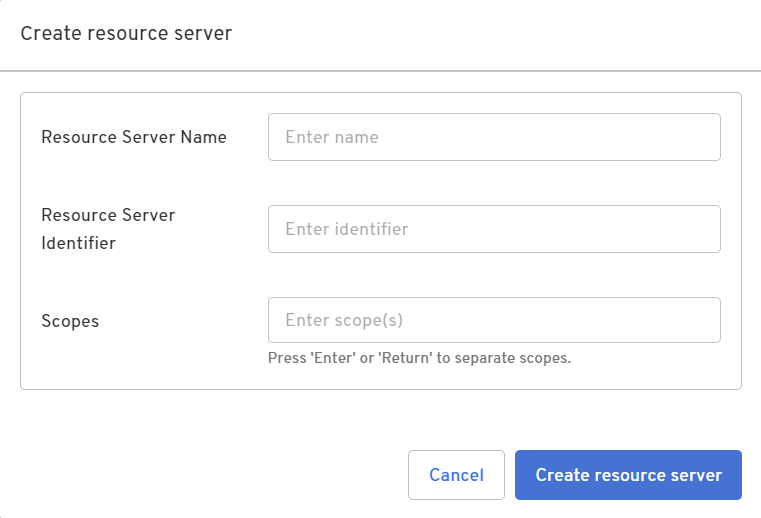
Configure the resource server with the following properties:
| Parameter | Value |
|---|---|
| Resource Server Name | any name you choose |
| Resource Server Identifier | Enter a unique identifier such as 'awsresourceserver'. This identifier is included as the audience claim in access tokens minted for your application. |
| Client Type | Enter one or more scopes, such as 'aws:customclaim', pressing Enter after each scope |
Create an application
In the same realm, create a new Application containing the configuration for your users.
- From the Admin Console, under Authentication, select Apps > Add new app.

- Give your application a name.
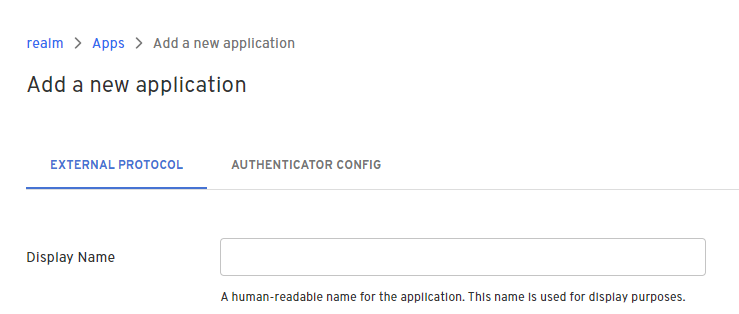
-
Configure the app with the following properties:
Parameter Value Display Name any name you choose Protocol OIDC Client Type Confidential PKCE Disabled (It's recommended to use PKCE where it is supported, but it is not a requirement for confidential clients. Redirect URIs https://your-user-pool-domain/oauth2/idpresponse, where your-user-pool-domain can be found on your AWS User pool's App integration tab under Domain Token Endpoint Auth Method Client Secret Basic Grant Type Authorization Code Resource Server Select the resource server you created above. Allowed Scopes Select scopes from the set of scopes assigned to the resource server you created above. Subject (under Token Configuration) email Configuration Type (on the Authenticator Config tab) Hosted Web all other options Use the default values for the remaining options.
- Click Submit to save the app.
Add a Federated OIDC IDP to the User Pool in AWS
In this section, you'll configure your AWS user pool with an OIDC connection to the Beyond Identity app you created earlier.
- Go to the AWS Console and select User pools.
- Select the user pool you created earlier.
- Click Sign-in experience.
- Under Federated identity provider, click Add identity provider.
- Under Identity provider, select OpenID Connect (OIDC).
- Enter a Provider name (the name cannot have spaces).
- For Client ID, enter the Client ID from the Beyond Identity app you created earlier.
- For Client secret, enter the Client Secret from the Beyond Identity app you created earlier.
- For Authorized scopes, enter
openidfollowed by other scopes you want to request, space delimited, for example,openid aws:customclaim. - For Issuer URL, enter the Issuer value from the Beyond Identity app you created earlier.
- Under Map attributes, for the required attribute 'email', enter OpenID Connect attribute
sub. - Click Add identity provider.
Update Hosted UI to point to the new Federated Provider
Now, you'll connect your user pool's app client to the OIDC provider you created earlier.
-
Go to AWS Console and select User pools.
-
Select the user pool you created earlier.
-
Click the App integration tab.
-
Scroll down to App client list and select your App client.
-
Scroll down to Hosted UI and click Edit.
-
Under Identity providers, in the drop down list for Select identity providers, select the federated provider you created earlier.
-
Click Save changes.
Test OIDC connection
Now you'll use AWS Cognito's "Hosted UI" test tool to test the integration.
-
Go to the AWS Console and select User pools.
-
Select the user pool you created earlier.
-
Click the App integration tab.
-
Scroll down to App client list and select your App client.
-
Under Hosted UI, click View Hosted UI.
As a result of this test, you should have an authorization code returned to your app client's redirect URI, such as 'http://localhost:3000/?code=`{authorization_code}`'.
Obtain code and tokens in your app
The Hosted UI test tool above submits a request to the /authorize endpoint of your user pool domain, which then redirects to the Cognito /login endpoint with a request like the following:
GET https://{your-user-pool-domain}.auth.us-east-2.amazoncognito.com/login?client_id=70vjd30ctaloisp7h1tlalvcjg&response_type=code&scope=email+openid+phone&redirect_uri=http%3A%2F%2Flocalhost%3A3000
In your app, especially if it is a public app, you will want to send PKCE parameters code_challenge_method and code_challenge with the /authorize request.
When your app receives the response with query string parameter code, you will then exchange that code for an access token by calling the /token endpoint with the required parameters including the code and if necessary the PKCE code_verifier.
Reference
See the following articles for more information on the AWS Cognito configuration steps described in this guide: